"Can you post about your flat-felling, please? I have purchased the Elna "M4" snap-on flat-felling foot, which I believe is a 4mm flat-feller. But when I do it, even following NancyQW's tip (on PatternReview), or the video of the foot, it just doesn't work. The stitching doesn't seem to be in the right place. Is it needle position? What is it? Nancy also uses DPC's crazy seam allowances." .
Twist my arm!
This is particularly flattering as I was completely unable to use my rolled hem foot until Elizabeth talked me through it.
I looked up NancyQW/Nancywin's tip (very tough to find this on patternreview)and as far as I can tell, she has very nicely set out how to follow the instructions from David Page Coffin's shirtmaking book.
I am pretty much doing the same thing, although completely ignoring the David Page Coffin allowances, and doing less pressing.
I have been making flat felled seams without a special foot for many years, and find the foot makes it easier to 1. Flat fell a seam inside a sleeve 2. Flat fell a more narrow seam 3. Mostly makes completion of the seam faster, but 4. Makes unpicking more likely.
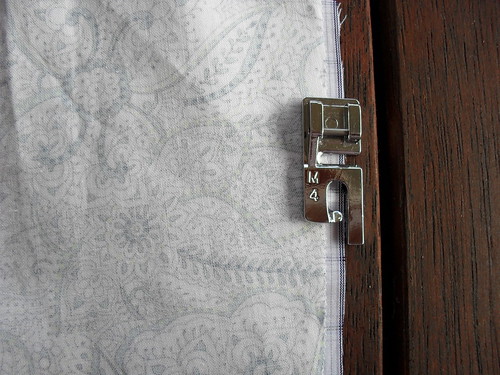
My foot is a generic foot purchased on ebay. I purchased it in 2008, and unfortunately do not have a record of the seller. It came from the USA and cost about $AUS 20 including shipping.
The space between the two prongs of the foot is 3/8 of an inch wide.
First I trim the edges.I do not measure this for a man or boy's shirt. The seam allowance here is 5/8 of an inch, the sleeve is not fitted, so I trim off any ragged edges and about another 1/4 inch from each side.
I place the right sides of the fabric together, offset by the width of the central part of the foot.

I fold the outer side over the inner side by hand, making sure that the inner side butts right up against the fold. I start the stitching with the foot completely on top of the fold, and the needle just catches the raw edge of the outer, folded over piece. This is where your needle position may be messing around with you, and could be changed to make the stitching easier.
I would not be at all surprised if this is that nasty sounding 1/8 inch of which David Page Coffin is so enarmoured, but I can manage to keep the raw edge on the correct side of the stitching line for a few seconds.
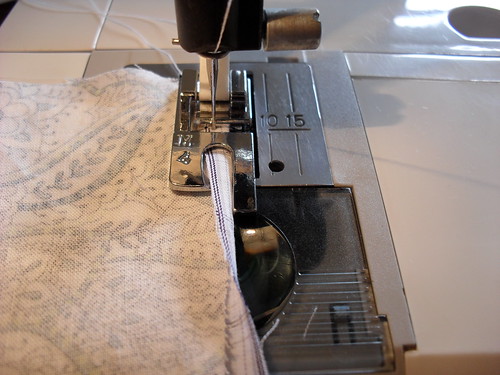
After everything is lined up and behaving itself, I make sure the needle is lowered, raise the presser foot, and pull the outer fold over the hook before lowering the foot again. After this, I just have to keep the inner fabric butted up against the fold, and the outer fold on the correct side of the stitching line, which is much easier if I just let the foot do its thing instead of my natural tendency to fiddle with it every 10 seconds.
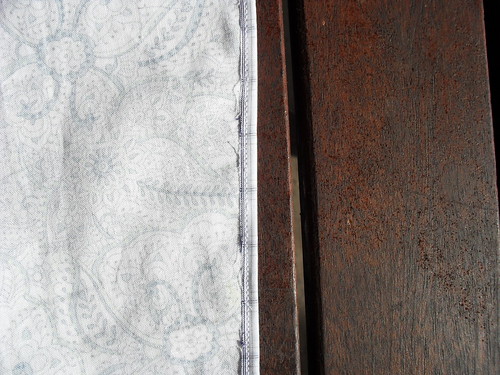
This is a successful first pass. At this point I inspect the seam closely for failure points, and re stitch if necessary. The seam is then opened out flat, and I finger press, or properly press (depending on laziness level at the time) the fold over to cover the remaining raw edge.
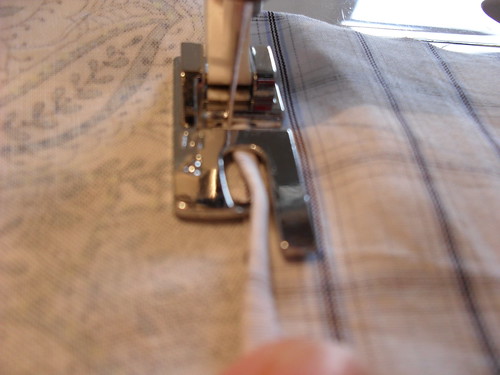
I find the next pass more pernickity than the first pass, due to the bulk of the fold. I really have to keep my eye on the point of the hook, making sure that it stays exactly on the seamline so that the fold is caught by the stitching. Other than needing attention, this is a piece of cake, because the worst you can end up with is a bit of raw edge, your seam is already sewn.
Wrong side (Those loose threads are things you pull out afterwards so that you can pretend you have perfect trimming and staying inside the line skills)
Right side. I forgot to mention that you should adjust your tension before you start, that way your outside seam will look better than this one. Isn't it skinny?
I hope this helps.
5 comments:
I'd love to have one of these! Thank you for the demo.
This looks easy. I might just have to get one of those little things. I've been doing french seams and it takes so long ...
Thank you very very kindly, Karen. I shall attempt again. Sigh. But if you can master the narrow-hemmer, I can master the felling foot. Mine looks just like yours.
I did it! I did it! Thank you thank you thank you.
My problem was essentially that I was using the outside rather than the inside of the foot guide. Or at least getting confused. I am very surprised at how narrow the seam is, it's a scant 1/8" I'd say.
BTW I found the second pass easier? I just let the fold stick up nearly vertically and whizzed along, it was very even and didn't escape the foot.
Thank you so much for this tutorial, which I found through Stitchers Guild. I'd just about given up, but thanks to you I've just sewn my first successful flat-felled seams with the felling foot!
Post a Comment