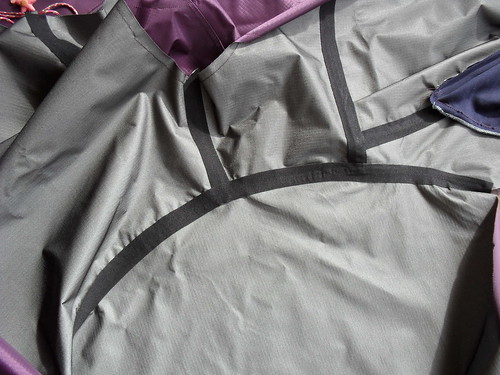
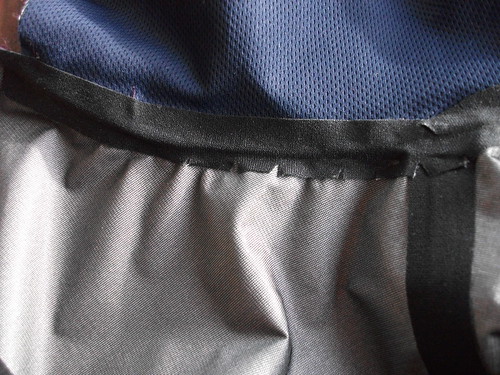
Instead of a finished object post, I will take the opportunity to answer some questions and write about seam sealing.
In my previous sewing of rainwear, I have rainproofed the seams by using the glue-like seamsealer that comes in a tube. I have even written a post about it.
For the current parka, I wanted to try heat seal tape, which is used in commercial Gore-tex jackets sold in Australia. (These are usually unlined). Actually I wanted to use this for my first attempts at Gore-tex jackets, and bought 10 yards of Melco Heat Seal tape from Seattle Fabrics about 6 years ago- but could not use it at the time, as the Gore-tex I purchased was 2-ply, with no fused lining, and so I could not iron it on the inside. I almost used it in 2008, on my daughter's 3 ply jacket, but was scared off by the Seattle Fabrics disclaimer that use of the heat seal tape is at the user's risk, due to the high temperatures required. I received no instructions with the tape, there are none on the Seattle Fabrics website, and googling heat seal tape led me to descriptions of repairing dry suits by gluing the tape on, or using a heat gun.
I was somehow not discouraged by this, being a more brave person in my sewing than I was 2 years ago, and tried out the tape with some scraps of 3-ply Gore-tex (fine mesh fused to the waterproof coating) and my ordinary domestic iron. As the tape is now over 6 years old, some of the difficulties may be due to using less than fresh materials.
Findings:
1.The grey side is the gluey side
2.The grey side sticks really well to the iron
3.Although the tape will stick to the iron (grey side) on the synthetic setting of my particular iron, it will not stick to the Gore-tex on less than the wool setting, taking about 5 to 7 seconds.
4. The wool setting is almost too hot for the Gore-tex. I found that pressing with the tip or side of the iron, so that the iron stayed on the tape, not the surrounding fabric, was the least problematic pressing technique. For areas where this was difficult, I pressed for only a few seconds at a time before allowing the surrounding fabric to cool. This meant that some areas of the tape did not seal completely on the first pressing. They sealed well with repeated pressings.

5. The tape shrinks lengthways as it is heated, only slightly, but enough to make a seam pucker if you are distracted. (The wonky base of the central hood seam is due to a paper plane incident - don't ask. If you have a 7 year old son you will know already)
6. The tape curves nicely when clipped.

7. Once heat sealed, the tape cannot be removed without tearing the Gore-tex, unless of course the tape decides to detach itself. As the tape needs to be applied throughout construction, this can lead to some spectacularly bad errors. I cannot quite bring myself to talk about my personal experiences with these errors, but may have the fortitude by my next post.
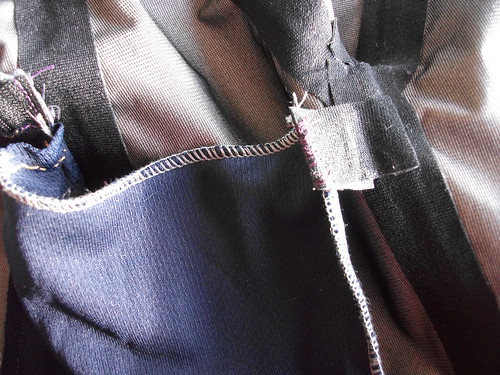
8. The tape seals quite nicely to itself. This tendency can be useful. Here you may be able to see how I have made a tag hanging from the side seam to hold up the inside chest pocket.- The side seam could not be sealed on both sides if I had sewn the pocket into the seam as you usually would for non-rainwear.

9. I needed more tape than I owned. 10 yards was not quite enough for my multiseamed Frankenpattern, mostly Jalie 2008 and BurdaWorld of Fashion Magazine 1/2010,size woman's medium (Australian 10-12). Fortunately, there is plenty of the glue-type seam sealer lying about at our house. Camping anyone?
11 comments:
I've just completed a (much simpler) raincoat that involved seam sealing and oh my, I feel for you! And I can't wait to see the finished project!
Very impressive. The seam tape looks fantastic!
I'm still to brave the realm of gortex sewing even after all your help (can it really be 2 years ago!!)re: seam sealants.
Janine
Thank you for the info! FabricMart has some Goretex right now that I am considering. I might take a biking trip next year and I'd like some rain pants.
Great post! Thanks for the info :)
you are sooo brave, and it looks really neat! -- I will bookmark your post for future ventures into sewing my own outdoor clothes -- very much looking forward to raingear that actually fits. yeah.
Karen - I'd been going to ask you earlier if you planned to seam seal your jacket but I'm glad I waited. You didn't disappoint. You've also helped with our camping. I've noticed some of the seam sealing coming away from our tent. I think I'll just buy a tube of the seam sealer from your previous jacket and use it and also stick the old seam sealing back over the top. Thanks for the help.
Wow! This is incredible. I really admire you for taking this task on. Maybe one of those little irons with different heads might help?
Wow! This is incredible. I really admire you for taking this task on. Maybe one of those little irons with different heads might help?
Wow! You have great perseverance (and a properly waterproof raincoat). Well done :-)
oh wow, I am just venturing into this realm and in NZ and wondering where is the best place to get waterproof fabric from. Can you source any in NZ?
oh wow, I am just venturing into this realm and in NZ and wondering where is the best place to get waterproof fabric from. Can you source any in NZ?
Post a Comment