
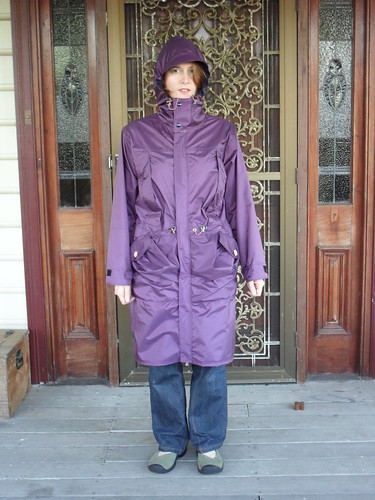
I started with Jalie 2008,

which you may notice is a man/boy pattern. I had almost worked up the energy to make this pattern - I have measurements from boy size 10 to man size medium, 38, so I knew fitting would be horrendous, when Mary Nanna revealed her fabulous parka from the January 2009 issue of Burda. I had somehow missed noticing that this issue has 4 parka patterns, all presumably allowing for a bust and waist. After recovering from my fit of jealousy at her acquistion of Gore-tex for $4 NZ per metre (hear that Seattle Fabrics???) I then spent several weeks (actually months) in a state of indecision before falling back on the Jalie pattern. Despite this being rather dated, the technical features outweighed the non-fashionable aspects for me. I really want to stay dry in this raincoat.
I traced out a pattern with small shoulders, small waist, female sized hips etc etc, and made lots of fitting changes after making a very amusing toile. Basically I shortened the bodice by about 10 cm, took about 10 cm from the shoulder width, shortened the sleeves, narrowed the sleeves by nearly 15cm and added a hidden pleat under the front pocket placket as bust allowance, as well as adding a dart and rotating it to the waist seam. I added room for my generous behind by adding an inverted pleat to the back skirt of the jacket.
I made several adaptations to the pattern in addition to fitting.
1. I did not want to line the jacket.This would make it too heavy for my climate, and also bulky to pack. I fitted the parka over a polar fleece jacket, which I will wear as a middle layer, should I need the parka for cold weather. I lined the hood and collar with wicking polyester (Stretchtex), but otherwise finished seams with heat seal tape as described in my last post. This meant I needed to add an external waist casing, with eyelets, and changed my construction order for the storm guards and hood placket.
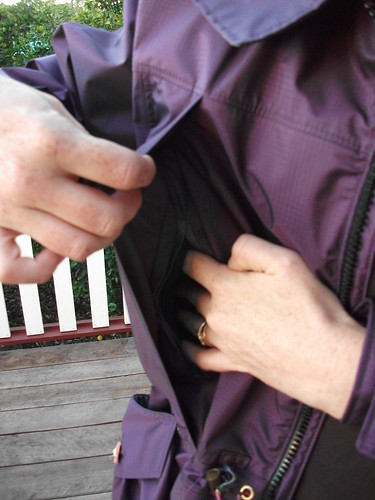
2. I added an additional internal pocket, attaching this to the waist seam in between the heat sealed casing seams. I also forgot to shorten the chest pocket bags when I shortened the bodice. The pockets are very roomy!
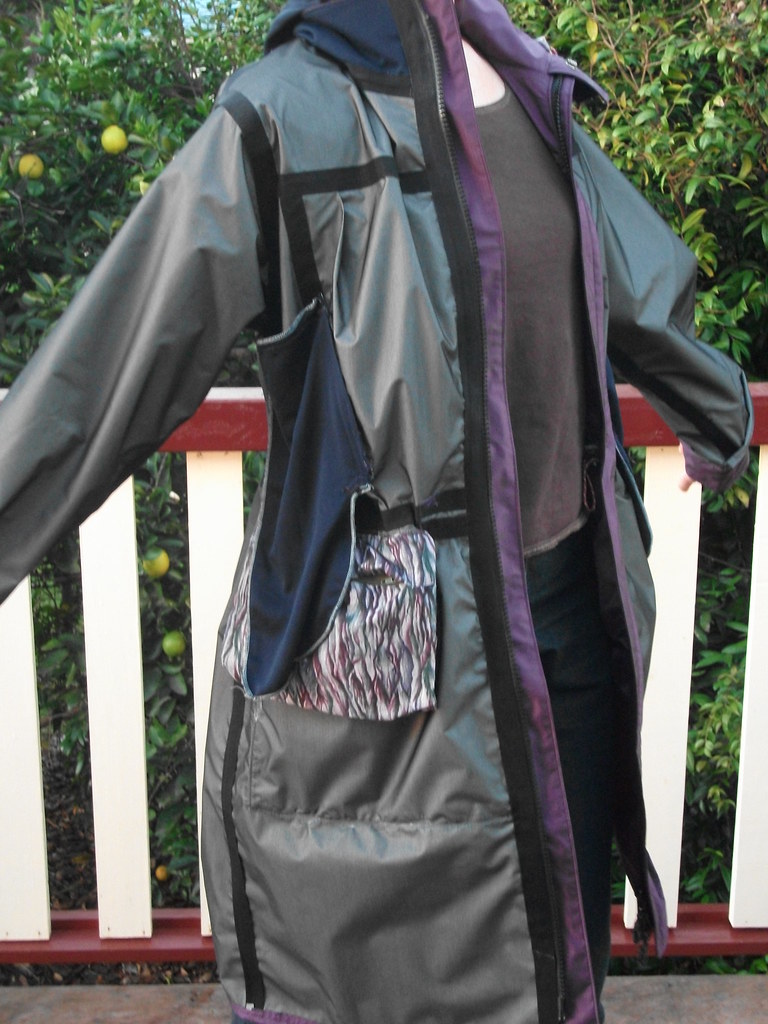
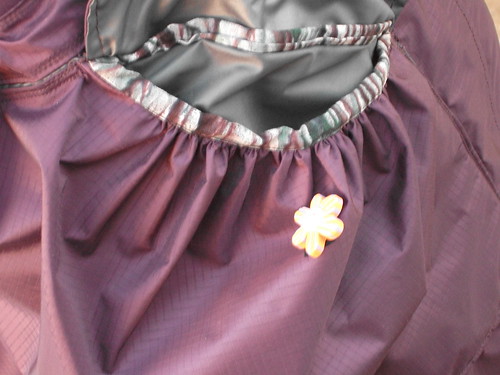
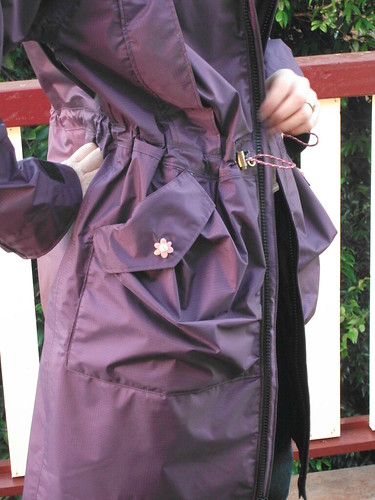
3. I added poacher pockets from Burda World of Fashion Magazine January 2009. I also added flower buttons. This may not be tasteful or grown up, but I like them anyway. I also adapted the pocket so that the flap is functional, and there is an inner pocket under the poacher pocket. I will be able to carry most of my luggage in this jacket :).

4. I adapted features from RTW Gore-tex jackets including attaching the cord clampers to the jacket, so that the drawstrings can be gathered with one hand, attaching the cord ends to the jacket, to prevent annoying bits of string from flapping around, adding fabric pull tags to the zippers, and attaching an adjustment strap to the hood, so that it can be pulled back a little if you are spending all day walking up a hill in the rain.

5. I used x-ray film to stiffen the brim of the hood. This stuff is fantastic, flexible, waterproof,washable, sew-through-able and free. It also stops the brim from flopping.
6. I left off the bottom drawstring. I never used this feature in my previous raincoat.
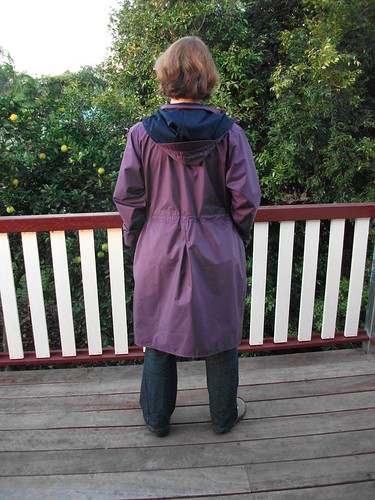
7. I lengthened the jacket considerably. I want to be able to sit down on wet grass in this jacket. The separating zipper means that I have plenty of walking room should I need to climb rocks in this jacket.
Other notes:
To repeat my earlier posts about Gore-tex, a microtex needle (sharps) works well. I used a #70. I used a walking foot for most of the construction, and a teflon foot and a zipper foot when the walking foot was too wide.
The buttonholes were challenging. The buttonhole foot slipped everywhere until I overlaid the fabric with baking paper. I sealed the ends of the buttonholes with a little glue-style seam sealer to prevent ripping. I also used a little seamsealer around the holes I made for the eyelets and snaps.
I made a really nasty mistake with the hood. I failed to read the instructions, where Jalie clearly shows the front of the hood completely free from the jacket, and instead spent some time carefully easing the hood into the entire neck seam. Gore-tex does not like to ease, so this was a difficult task. I then sealed the seam beautifully with heat seal tape.
As a result of this altered feature, I had to narrow the storm shields. I chose not to add snaps to the storm shields as I was feeling too lazy to attach these after it took me 20 minutes and 3 strikes to my thumb with a mallet to put in the 2 snaps at the hood. I did not use velco for this fastening as shown in the pattern, as I have unpleasant memories of constantly disentangling my long hair from the velcro neck fastening in my previous jacket. I don't think I will have long hair again, but I have a permanent dislike of neckline velcro that I was unable to overcome when making this parka.
I am very pleased with this jacket, but I hope it lasts 18 years, like my previous one, as I do not quite fancy making another one any time soon.
25 comments:
What a wonderful jacket! I love the color - and those pockets are great. You can't have too many pockets on a coat like this.
That is a truly amazing parka. Truly amazing - the details and technicalities have me baffled! Bravo!
AMAZING!! So much thought and work went into this, but it turned out so well. It looks great, and you would never guess that it had started out as a shapeless man pattern. I love the color and the flower buttons are perfect. Fabulous work!!
This is awesome! You really thought out all the details you needed to make it work and they all appear in your finished garment! Thans for all the pics and you should be proud...it is an amazing parka!
The Parka is absolutely georgeous. You will definitely keep nice and dry! Great job!
Very impressive! Great details. Love the color!
What a wonderful raincoat! It looks terrific, and you did a great job on it. Kudos on sticking with it even with the "learning" events along the way.
Such detail, I LOVE it, think it's awesome. Hope you will enjoy it for many years to come!
What a fabulous parka. I love the way you've combined some amazing technical features with such a pretty, 'girly' look. Thanks for sharing all the photos too - I do love a 'photo-heavy' post!
Phew! What a great accomplishment. It looks RTW, yet customized, if that makes any sense. It's great that you have the features you wanted which would be difficult to find RTW.
wow - wow - wow - how impressed am I? Very very impressed. Your coat is amazing. And despite hood challenges you have it on and don't look dorky (OK, now I'm jealous). That is true success.
I love all the features on your coat and I hope you savour this praise because it's from someone who has been there and KNOWS exactly how challenging it was and so therefore is doubly impressed at what you have achieved. Those poacher pockets are gorgeous and I'm so thrilled you went for the fun closures ...
Respect!
OMG..that is fantastic! You are amazing and such an inspiration. I've always wanted to make something like that. Love the buttons on the pockets, love the colour, love it all. Great work.
Love your Parka and you are all set for any outdoor activity. The colour and buttons are fantastic. Great work and enjoy wearing it.
Congratulations! An achievement you can truly be proud of and very inspirational. fantastic effort.
Love! Love! Love it!
Janine
Wow! That jacket looks so RTW! Well done on such a huge project. Love the purple - it looks good on you!
Karen - I agree with Sue - that is so RTW - particularly the top stitching I can see in some of the close ups. Well done. I understand when you say you'd like it to last a long time after all that work.
very nice! i can't believe how professional it looks!! :)
Congratulations on finishing - what a piece of work! This is as pretty as an "utility" garment can be, imo. Love the color and, yes, the buttons. Care to tell us how many hours you spent on this?
This is brilliant! And I love that you used old x ray film! I just paid a waste disposal company a fortune to shred 5 boxes of old OPGs, I wish I had kept some! I love the details you've added. I believe there is no such thing as a practical raincoat that is also fashionable. I am wearing a 20 year old Eddie Bauer goretex that makes me look like a dork, but I have been on so many long bushwalks and been the ONLY person to stay dry, so I will keep wearing it until it fails and then I will make one just like yours!
I admire your effort to make a gortex parka. I've got to confess that I bought one for my daughter's school outdoor programs from the Katmandu warehouse sale.
What a fabulous raincoat Karen. I am very impressed and its not a really bright Royal Purple or anything and I think is really flattering on you and with the taupe and other neutrals you have chosen.
My wife and I really enjoy your blog. How has this raincoat held up over the last 7 years? Is it still waterproof? Is there anything that you would change?
Thank you Philip. I am sorry to say that the fabric let me down. It was very costly fabric, but became non waterproof after about 3 years. It is merely water resistant now, with the resistance being proportional to how recently the fabric was ironed/tumble dried. The seams are still waterproof!I wonder if the fabric had been sitting around in the warehouse for a very long time before I purchased it.
Re construction. In retropect, the coat could have been a tiny bit shorter without losing its sitting on wet grass advantages, and I would have added an internal zipper to the poacher pockets (under the flap) to increase water resistance. I would not include the pocket behind the poacher pocket again, this becomes wet during inclement weather, even before the fabric fatigue.
Overall, I am still happy with this coat although it is no longer my hiking raincoat. It is very pleasing to have a coat that actually fits me, and it has seen much hard use including being worn under a pack without suffering cosmetically.
Post a Comment