My reason for using the filler foam was to improve the durability and robustness of the form. My four paper tape layers had not produced a rigid form, and I wanted a form that I could use for draping and moulding fabric - not something that would buckle under pressure. I also wanted some resistance to steam, so that I could do a little judicious garment pressing touch ups on the form when needed.
When the foam finally dried, the form was approximately 2 inches larger than me in circumference at several points, more at the lower ribcage, and curiously flat at the backside - which does not reproduce my figure in this region. I removed the wires, and considered my options. The most attractive of these was eating lots of chocolate in order to increase my dimensions to match the form.
At this point my children suggested that the form should be named Madge, or Violet, after the bulging characters in The Prisoner of Azkaban, and Charlie and the Chocolate Factory. These characters are respectively malevolent and obnoxious, and whilst I was thinking of the form as Aunt Madge, I could not cope with her in my sewing room. That is my excuse for leaving her lonesome in the shed for a few weeks before I did anything further.
Fortunately, I was goaded into action by the addition of a flooded gum stand to the form. This was inserted into a cavity made in the foam by a heated metal pipe. At present the fit is rather loose, which is an advantage for whizzing the form around in a circle whilst using it, but means the form leans unreliably when I want to mark a hem. The plan is to add a little more foam to fix the pole of the stand to the cavity.
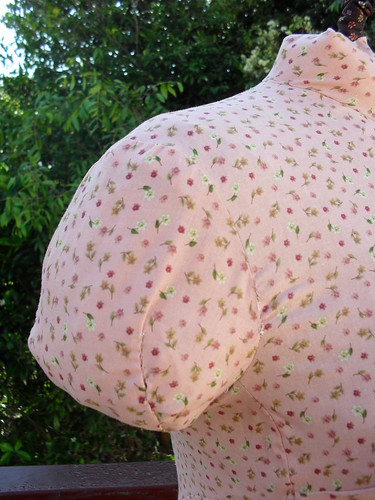
Once the stand was applied, I used the sleeves of the underlying t shirt to make fabric filled upper arms, then made the form a cover, using this Vogue pattern view D. The pattern has a bust dart, princess seams, a high neck and sleeves, and opens at the back.

I lengthened the pattern a little, so that I would have fabric to fold under the base of the form. In addition I made my usual Vogue adjustments - square shoulder, FBA, take in waist, then fitted the garment to the form without ease by hand stitching down every loose seam and pucker. I hand stitched the back seam first.
I folded the cover sleeves over the padded t shirt sleeve, and added a wide bias strip cut to my neck measurement, to the jewel neckline, then padded this as well. It makes a useful pincushion.
We had left a coat hanger in the form to assist in storage, and I decided to leave this protuding from the neck in case I need to hang the form up again.The form no longer reminds me of Madge nor Violet.
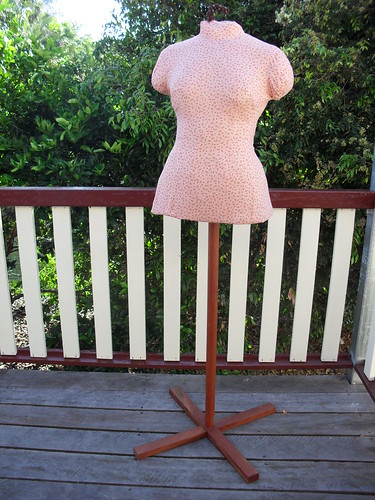
I am fairly sure that her name is Genevieve.
8 comments:
Ah Genevieve, yes, I see that name fits her. What a lovely skin you gave her!
I missed numerous of you previous post, but did you try duct tape forms? I tried it last weekend with very hefty duct tape and it worked really well. I will use my adjustable dress form as a core (put to its smallest size) and fill the gapes with pillow polyester filling.
I am sorry to read that yours is not like you wanted. It looks good on the pictures
That is the prettiest dress form I have ever seen. If you were able to get the cover on, does that mean you did get the dress form to conform to your measurements after all? I wasn't familiar with all the terms you used, so I wasn't sure.
I have to say that my attempt at a dress form was sufficiently strenuous (and disappointing to DH) that when I decided to get a Wolf, he was very much in favor of the idea. So at least our wadder served some purpose.
Yours looks fantastic!
Well, it looks lovely! Hopefully the differences in size will not be more than wearing ease? It seems like the expanding foam needs a very rigid mould otherwise it will distort it... when I have used it in casting it was always inside a a hard plastic shell inside a fibreglass mould, and you still had to be very careful not to over-fill or it would over-expand and crack the plastic. Question: are the changes in overall size, or mostly in shape (eg. two inches deeper front-to-back but narrower side to side)? If in the shape, maybe it won't be such a problem.
Ah yes, my first attempt at a paper tape form bloated like it was New Year's Day. I had to start over. The air temperature really makes a difference--on a hot day the foam expanded like nobody's business, but in the Fall it took more cans of foam for a smaller result.
I am glad that I bought my dress maker's dummy from our local mannequin manufacturer. It sure sounds like I saved myself a whole lot of hassle! (Of course I did have to pad it out and it will never be totally accurate, but it certainly does what I need it to do).
Hope after all these adventures that Genevieve serves you proud.
Genevieve is lovely and I'm sure she will assist in your sewing adventures.
I'm not showing this to Isabel she will demand her cover.
Oh its adorable! When I read the text without the picture I thought it would be hideous but its come out really well.
Post a Comment