Showing posts with label wedding. Show all posts

Friday, 17 February 2023

Burda Style 03-2020-121 Dress for Engagement photos

 This is a very exciting post for me. DD2 is engaged to Future Son-In-Law, who now that he is almost a member of our family, I consider to be fair game for my sewing blog. (I did ask permission, feeling that the general feeling of well being floating around at this particular life event was a very good opportunity for me to be gained this concession). He has actually appeared before in a headless fashion, but this is much better. I introduce FSIL, here providing handsome background for the dress that DD2 wore for engagement photos which is my excuse for putting family information on this this sewing blog. See how happy they look? We are all extremely pleased.

From a sewing point of view, I have been granted a fabulous opportunity to indulge in sewing with beautiful fabrics, as my daughter has also kindly asked me to make her wedding dress, and of course there are other important people who are also likely to need a fancy dress for this occasion. I'm sure you can imagine how thrilled I am.

Okay, back to the engagement dress. This was great fun to make, and does not deserve to be overshadowed by visions of playing with silk and lace for months on end.

The pattern is Burda Style 03-2020-121, and the fabric is a cotton sateen with elastine that my daughter kindly bought me from Spotlight in March 2020 as a sewing treat due to my entry-to-Australia- from- New Zealand- in- March 2020 home isolation. Unfortunately I had to spend most of this period trying to keep our business operating, whilst not able to attend it,  but the thoughtfulness of the gift still gives me warm fuzzies, so it was lovely to use the fabric as a gift for such a special occasion.


This pattern is the retro style feature from the magazine, and as you can see, we have chosen to make the dress without the sash. It was fairly straightforward to make, although the sweetheart bodice of the pattern is very high, just below the collarbones, and I have redrawn the front bodice for a more modern placement. I have never had to lower a neckline in a Burda pattern before.  My other alterations, for fitting, were to shorten the bodice, take in the waist, add a little to the booty. All of these are normal alterations for my daughter. I also changed the lower bodice and the skirt pleats to darts, as we found the poochiness of the pleats gave a bulky apperance at the waist. Here is the back of the inside, where you can see that I have also added a kickpleat to the back walking slit.

On looking at the photos, I recall that we also shortenened the sleeves. So maybe it was not quite so straightforward to make as I recall, but with hopeful visions of  new technical challenges ahead of me, this was not too hard to make. I will probably use the pattern again.


I have also added piping to the neckline for a tidy finish and to reduce the possibility of the neckline stretching as the fabric with elastene has this unfortunate tendency. I have also understitched the neckline ffacing to help the neckline sit well.

My daughter tells me that she likes the dress very much, and I am flattered that she chose it to wear for her photograhs.


I am looking forward to more sewing of pretty dresses.

Sunday, 27 November 2022

A dress to wear to a wedding, Burda Style 10- 2012-118, or is it BurdaStyle 02-2021-119?

 I am making a Maid of Honour dress for my older daughter. In this modern relaxed Australian wedding each female member of the wedding party is given guidelines by the bride,  rather than detailed instructions or a particular dress to buy/have made. This is very exciting, as I was able to look at hundreds of beautiful fabrics and elegant patterns with the excuse of research to present to my daughter. We just have a colour palette, and the length of the dress as a framework.


This dress here is not the Maid of Honour dress, but it is a stage in the process, and I did make it for my daughter.

Before making the above dress there was some delightful mutual and individual time wasting perusal of many fabrics  and dress photographs on the internet. Eventually I had to stop doing this as my daughter showed me a photograph of a dress that she fancies as a starting point. She apologised that is not the fabric she wants, not in the right colour palette and not the right length for the wedding, and that she didn't want a seam across the front bodice.. This was not displeasing, as my daughter kept saying things like " If I find the right dress I'll just buy it". which is not what a person whom has hardly sewn party clothes for about 2 and 1/2 years now wants to hear.

We thought that we could reproduce the salient aspects with some judicious pattern alteration of  this pattern for a woven knee length dress from Burda Style  10-2012-118, which I have made previously for myself as both a dress and a top.


 The brief from my daughter is to modify the pattern for an extended shoulder, and to make the dress floor length for the wedding, and to possibly  make a bolero.

I was a tiny bit worried that I was being hopelessly out of date here, this being a 10 year old pattern, but  Audrey of SewTawdry posted not so long ago that this pattern is very similar to a 2021 offering, with identical line drawings, so if Burda thinks it is up to date (ish), I am happy. (Audrey's top in plaid is amazing)

Naturally I needed to make a trial version before we cut into precious pricey fabric. Naturally my daughter felt that if I was going to all the trouble of making a trial version, she might as well wear the trial version when she was to attend the wedding of a close friend, as a guest, not in the bridal party.

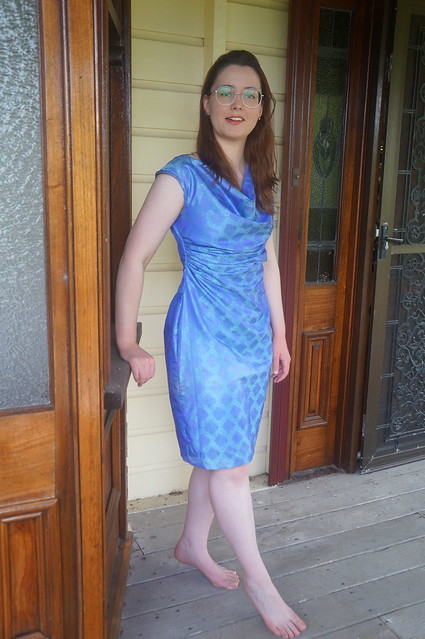
So here is version 1, in a cocktail wedding guest length, in situ at her friend's wedding.


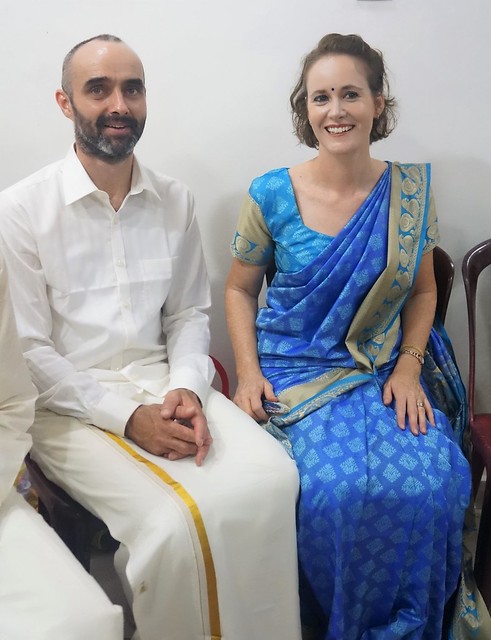
The fabric is from a sari that I  bought in Sri Lanka several years ago, to wear to a family friend's wedding there. I really enjoyed having the opportunity to wear a sari. The little blouse was made by a  seamstress in Columbo from one end of the sari that is woven with the blouse in mind. It was interesting to see how the seamstress drew the pattern straight on the fabric after taking a few measurements.


I am equally pleased to be able to use the sari to make a pretty dress.

 You can see that my daughter and Ihave chosen the reverse side of the sari to be the outer side of the dress. We thought that the fabric was silk, and it is certainly silky, but after I managed to melt a lot of the warp fibres in ironing, we now feel that it is a poly silk blend. Once I had removed the highly embellished borders from the sari, it was quite narrow, and I used most of the fabric of the sari to cut out the knee length dress. As it frayed immoderately, and is a very thin fabric, I chose to underline with enclosed seams, using a poly cotton imperial batiste, and unfortunately had not already cut extra wide seam allowances to allow for the turn of fabric, so I was quite nervous that I might have made the dress too small, not having enough fabric left to cut out another full dress length panel.


Fortunately this was not the case and I did not even have to let out the seam allowances at the final (and only) fitting. My daughter lives about two and a half thousand kilometres away from me, but was coming to Brisbane ( a mere few hundred kilometres away) the day before the wedding. I was to hem it in Brisbane, so it was just as well that I was planning to do this by hand, as I didn't fancy lugging my machine to the flat shared by our other offspring. 

It may have been finished just before she dashed off to the wedding, sans photographs, which is why you should forgive me for the slightly blurry phone shot taken by another of my daughter's friends who may have been drinking bubbly. I have delayed writing this post until a later visit, when the dress was modelled for sewing blog purposes.

Notes to myself: Add lingerie straps to assist in holding the cowl neckline, and an internal and external stay for the waistline pleats.