Showing posts with label baby clothes. Show all posts

Sunday, 24 July 2022

Another Birthday dress, and a Sirdar Birthday cardigan. The perils of knitting taking longer than sewing.

 Conveniently, two of my friends have little girls who are 3 months apart in age. Naturally, when I was invited to the younger baby's first birthday party, my thoughts were drawn to the pattern I had recently used for  Miss M . I love reusing a pattern that I have already traced out, it makes me feel smugly efficient.


 However, I was not feeling smugly efficient when I took this photo mere seconds before leaving for the party. I may have sewn the buttons on whilst a passenger in the car. The reason for this was that my thoughts had not instantly flown to this pattern, because the intended present for Miss S was a sweet little cardigan, which mysteriously had not been finished by the day of the party. I blame this timing failure on having to rip back the sleeve due to its strange and disproportionate length. Of course, that was also because I thought I could knit 2 sleeves in 3 evenings after work. I was wrong. But I can mostly sew a little girl's simple pinafore dress in 4 or so hours if everything falls into place.


This dress is also a modification of the pattern (for a romper) Lollipop (Australian Smocking and Embroidery 72). It is clearly much more simple than the dress-for-the- birthday-party that I made for Miss M, but as it was only part of Miss S's gift, and intended for everyday wear, I felt that it was equally appropriate. I made Miss S a winter dress, as her birthday is at the beginning of Autumn, and besides, I had a little remnant of cordoroy that jumped out at me when I opened the door to my fabric closet in a slightly panicky manner. You can see that I made some attempt at fancy touches, it is a birthday gift after all. The front pocket , neckline and armscyes are trimmed with pale pink mini piping and the bodice is lined in the same pink cotton twill. I do like my remnant stash. Unfortunately using up these little pieces of fabric does not encourage me to clean out my fabric scraps, which is the other name for my remnant stash.

I am very lucky, and the mother of Miss S kindly visited me with Miss S wearing her little dress about 3 months after I'd made it. Doesn't she look sweet?


However, you may notice that she also looks tall, which is particularly evident as she dashes out the door whilst having her photo taken. As I had still not finished the cargidan, and I had firm intentions that the two garments be worn as an outfit, I had to do something about the length of the dress.


I finished the cardigan, and visited the family with my gift in tow with an ulterior motive. I  also came with a pink bias bound ruffle which I sewed to the pinafore whilst giving my friend a mini sewing machine foot lesson. She has started sewing for her little one on her grandmother's sewing machine, and I think she is hooked.


The cardigan is made from Baby Bamboo, and the pattern is cardigan C  from the pattern book  346, Baby Bamboo Too

I am quite pleased with the cardigan now that it is finally on the baby.


Sunday, 13 February 2022

First Birthday dress

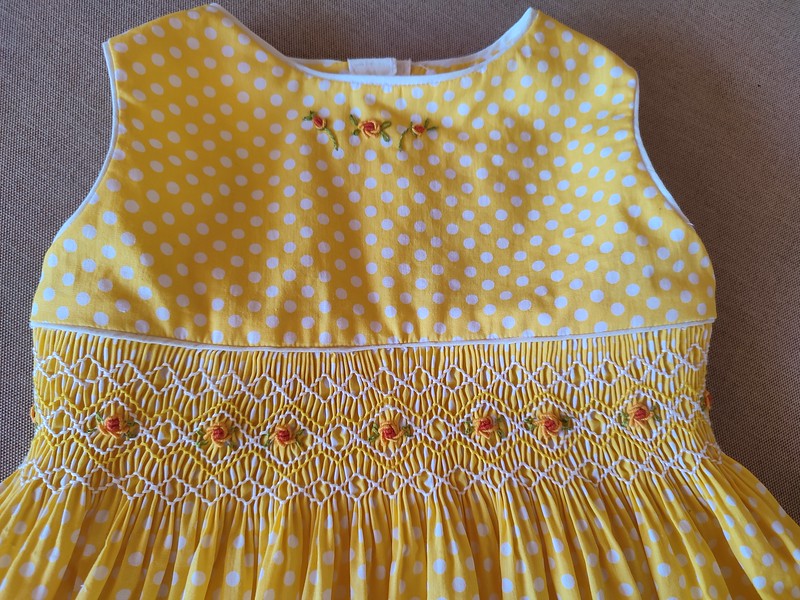
 This has been a highly enjoyable project. My friend bought some fabric for me, and asked me to make a birthday dress for her beautiful little girl. I may have hinted quite strongly that I would like to do this.


The pattern I used was a conglomeration of the romper Lollipop (Australian Smocking and Embroidery 72) and the dress Serious Fun (Australian Smocking and Embroidery 87). I should probably say that it was a simplification of the two patterns as really, the fabric and the smocking do the talking here. Basically this is a sleeveless square yoke dress with a contrast back button band and hem ruffle. The mini piping at neckline, armscyes and bodice, and the neckline embroidery are my own addition.

The smocking design is a modification of the smocking and embroidery from the Lollipop pattern.


My friend has a terrific eye for colour, but is not experienced in buying fabric. Unfortunately she was sold some rather off grain printed cotton, which required a lot of starch to line up nicely through the pleating tool. I think it turned out quite well despite this wrestling, and the recepient seemed quite comfortable on the day by all reports (Alas, I was in isolation and could not attend the party to view the dress in action, but daughter-the-second took some photographs for me) My daughter cunningly managed to gain the photographs before the consumption of cake and before the water play in the rain and puddles. As I reassured the baby's parents, smocking is very robust and a smocked cotton dress has no trouble going through the washing machine, even if you forget to turn it inside out.


Underneath the dress, there is a pair of ruffly bloomers, made from the white cotton also used for the dress ruffle, but with the ruffles made from the yellow polkadot print, edged with white binding. I modified the overall pattern that I had  used for her previously:  Burda Style 02/2016/141 to make these)  Naturally one should not photograph a young lady's underpinnings in situ, (well, I forgot to photograph them before they were provided to the birthday girl), but I assure you that they look very sweet, and could possibly turn into shorts in their next wearing, which one could photograph with impunity. I will keep an eye out for photo opportunities. Both the dress and the rompers were made for size 1, but as you can see, the dress has a little room for growth, which is an advantage for baby clothes. The romper elastic at the waist had to be shortened by about 5 cm to fit.

technical drawing from Burdastyle.com


I love sewing little girl's clothes.

Sunday, 8 August 2021

Baby sewing Burda Style 02-2019: 127, 128 and 129

 You might have noticed that I don't blog very much lately. I still sew quite a bit, but am finding that taking the photographs is not so interesting. Fortunately, some other people take photographs, and here is a delightful one which includes some of my sewing. (Permission given to post this photo by a former colleague of mine who is the mother of this adorable 4 month old baby)

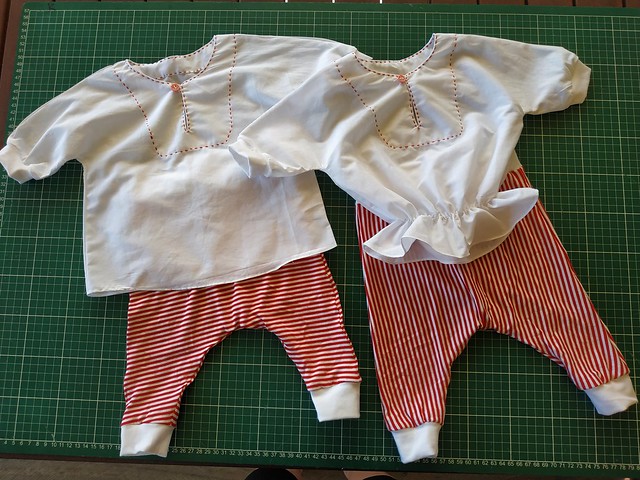
Quite some time ago, in February, I went to a baby shower for my former colleague, and naturally I felt that this was an excellent opportunity to indulge in some tiny-little-person sewing. The gender of this baby was unknown at the time, so I started with a red and white colour scheme, and made the "boy" version of the top Burda style 02-2019-127, which is identical to the girl version, 02-2019-128, other than the feminised version including a zig zagged elastic at the hipline. You may notice that I also made the girl version. This was an extra gift for another colleague's baby, whom had arrived a month prior to my sewing. 

For sizing reference, I made Burda size 0-3 months, 56cm, but added 2cm cuffs to the length of both sleeves and trousers. The pictured baby is a tall (67cm) 4 month old baby, and her mother tells me that the waist of the trousers is still a bit loose. The other recipient is now 6 months old, and 65cm tall, and both the trousers and top are still a little too big for her.


I used Imperial Batiste for the tops, this being cool to wear and having enough polyester in the poly/cotton mix to avoid ironing. However, I used a little bit of cotton-lycra knit to make cuffs at the end of the sleeves, instead of an elastic gathering (girl version) or just a hem (boy version), as in my experience, very loose sleeves end up at the baby's armpit, and zig-zagged elastic can be rough on a new baby's skin.For this reason I used shirring elastic for the hipline of the feminised top, with a bridging stitch.


For both versions of the top, I used french seams for construction, and a rolled hem at the bottom. I embroidered running stitch around the neckline and facing, and used a red and white striped button with a thread loop for fastening. 

Addition: Here is the other recipient, at 7 months.


The  red and white details were used to coordinate with the stripey red leggings, Burda Style 01-2019-129, but are hopefully subtle enough that the babies can wear the tops with other trousers, or under an overall or romper.


The fabric I used here is a very soft rayon knit, with four way stretch. I did not have much of this fabric left, as it was a remnant from a t shirt I made for myself, so I was quite pleased with myself for managing to squeeze two sets of leggings from the remnant by changing the direction of the stripes. I used the same cotton-lycra knit for the cuffs and to make a wide, soft waistband.

I really enjoyed sewing these little clothes.

Just for fun, I'm including a photo that I took when out walking this morning.

Yes, we do have kangaroos hopping down the middle of the street here.


Friday, 9 October 2009

BWOF June 2008 #136 baby romper

The swimming costumes in small sizes were for 2 of my Sydney nieces, but I did not show you the present for my youngest niece. I actually made this last year when I was making the same outfit for my next older niece (other side of the family), as I knew another baby present would come in handy.
Here she is modelling it. She has just started to walk, and is 12 months old, so you can see that the size 18 months does run small, it fits her perfectly.


I had a very busy time in Sydney, and on Friday, this busyness was almost all self inflicted. Wonderfully enabling Sharon sent me to some fabulous shops (twisting my arm of course :), even though she was out of town :( and I now have an awful lot of new fabric. I posted it back and have recieved lovely parcels all this week.
Posted by Picasa

Sunday, 30 November 2008

Australian Smocking & Embroidery Issue 83 "Fairy Floss"

I am still unearthing UFOs. I could not think why I had not finished this romper, but when I looked back at my blog realised that I had started 4 projects in one weekend near the end of winter. This was not a good idea! Unfortunately, this meant that I missed the very small winter garment window for the niece I intended to dress in this garment. I had cut out the pattern, sewed the centre seams, and naturally, completed the bit in which I was really interested - the smocking. After this, the romper somehow drifted to the bottom of my sewing pile.
 

The garment in the magazine is made from cotton velour. I love velour baby clothes, but had never seen cotton stretch velour fabric for sale in Australia before it appeared at the Country Bumpkin shop in this issue. It was available in pale pink, for $19.95 per metre. I was tempted, but decided that pale pink was not a suitable colour for rompers worn by a crawling/almost walking baby, and substituted a synthetic velour, which just happened to still be in my stash after making new born clothes whilst expecting my son (now 6). He did wear purple as a newborn, but my husband felt that purple was insufficiently blokey for a male Australian baby, so I did not use the remainder of the fabric - there was only enough for a baby garment.
 

I enjoyed making this, but ran into a few issues. My first concern is the smocking. I have used my own smocking design, as there was only a tiny amount of smocking on the magazine garment, with most of the embellishment being ribbon and bullion roses. I now know why. The smocking does not show up well on the plush fabric, and because fibres of the plush poke up between threads, the smocking looks a bit scanty and uneven. I used 3 strands of DMC cotton, but should have used 4. I don't think I will smock on velour again, but it was an interesting experiment. My choice of lazy daisies and chain stitch was also not ideal. The bullion stitches used on the magazine garment show up much better. I should have used 3 dimensional embroidery for the flowers.
The second issue was the garment style. I do not know many immobile 12 month old babies, and this pattern has non grip feet included in all sizes, including the 12 month size I have made. I don't think this is a good idea for any standing or walking baby in anything other than pyjamas. I eliminated the feet.
The construction of this garment did not seem to take into account the knit nature of the fabric. Piping was used where it would limit the stretch inappropriately IMO. I did use it at the front bodice, but did not like the look of it, so sewed another few mm outside the seam allowance to make it very skinny and unobtrusive, then did not use it anywhere else. I also removed some of the sleeve fullness, as I felt the sleeves were too bulky. I did not include the collar, as I ran out of fabric. I hope the neck is not too wide. The romper is very large for size 12 months IMO, I hope it is not too big for the intended recipient, but I suppose she is not getting any smaller.

As the romper will not fit any of my nieces during winter, I had to look further afield for someone to wear the garment. Rashly, I offered it to a baby whose mother sews. I had not constructed the garment when I made the offer, so of course everything that could go wrong with the construction occurred. I am not going to point out the defects, but I know they will be glaringly obvious to a sewing mum. Now I want to make her something else, just to show that I can do it properly!
Posted by Picasa

Friday, 21 November 2008

"Sunshine" Australian Smocking and Embroidery Issue #60

The last time my SIL was looking through my smocking magazines, this dress was one she picked out as a favourite for her daughter (niece youngest-but-one). It is " Sunshine" from Australian Smocking and Embroidery Issue #60, made up in size 18 months.
 

I have used a combination of quilting cottons for my version, which will be part of my neice's Christmas present. I think the name "Sunshine" led me to these hot, summery colours.
 

I am not sure if you can see in the photograph, but the main yellow print has daisies in different shades of yellow. I used my own smocking design for this project, using very simple stitches to make the smocking easy and suitable as a handbag project. Like the magazine version, I used the print as inspiration for the smocking.
I used a variagated yellow DMC embroidery floss for the diamond smocking background, then a red from the distorted grid print for the accent wave and trellis hearts. The bottom row of the smocking is emphasised with the same red, and also the shade of orange used in the matching bloomers. This orange fabric is also used for the piping. I have added a few lazy daisies in the red and orange, with blue centres and a bright green leaf and stem for contrast.
 

I found the construction of this set rather time consuming. Partly this is my fault, as I was practicing with my rolled hem foot again,and making several mistakes, but the instructions also call for a lot of handsewing, and the ruffle is over 3metres long. It looks pretty, but I was thinking seriously about a ruffling foot about half way through. The shoulder pieces do not look buckled when the garment is hung up, I just don't think this top likes to lie flat.
Posted by Picasa

Friday, 17 October 2008

BWOF 07-2008-136 baby romper and hat

I have started making Christmas presents, as I hope to make pretty clothes as gifts for each of my 7 nieces. Today I was lucky enough to look after my next-to-youngest niece for the day, and took the opportunity to do a little fitting and also take some photographs of her in some of her presents. I guess this means her present is really a gift for my SIL! I will have to buy my niece a book as well.
I did not have as much luck with the photos as I would like, due to lack of toddler co-operation. Here is a flat photograph of my version of hat and romper number 136 from the July 2008 Burda world of fashion. I made the size 80cm, equivalent to size 18 months, as my niece will be 18 months old in December. The hat is size 48cm, the largest size in the pattern.
 

I left off the sleeves, as it is very hot here in December. I bound the armhole with constrast bias binding, and piped the round yoke.
 

I particularly like the pocket details. I made the ties thinner than the pattern called for - around 5mm wide finished, as I felt the original width covered up the v cut-out.
 

The size is a little smaller than Australian RTW 18months. My niece is not particularly big for her age, and the clothes fit her quite well now, at age 16 months. The fit of the hat is quite close, and if I were making it again I would make the circumference a little larger. I have used hat elastic to keep the hat on, rather than ties.
 

I think this is a very pretty toddler outfit, and hope my sister-in-law likes it.
Posted by Picasa

Monday, 8 September 2008

Topkids Issue 56 , Design 1, baby dress set

Whilst I felt quite happy to abandon all my ongoing projects in order to make another baby dress for my very new niece, I managed to restrain myself from starting an elaborate smocking project (that is next :)) ) and decided to make a little pinafore dress. The current delightful Spring weather in Queensland is not nearly so warm in Sydney,so I thought this sort of dress would allow layering, so more wear over the next month or so.
I looked through my extensive collection of TopKids magazines, and found this outfit in issue 56.
 

The garment shown in the magazine is made from terry toweling. I wanted to use denim or corduroy for a very casual wear look, but felt that this silhouette would be fine in a woven, particularly as I would like the baby to be able to wear this now, so any lack of ease due to using woven instead of knit in the smallest size ("newborn" 62cm length)would not be an issue for an average size newborn. After some fabric fondling, I decided to use a very soft fine wale corduroy, which fortuitously co-ordinates with some newborn size striped knit pants from my possible baby present stash.
 

You can see that I have made a few changes to the pattern. The magazine uses a bias binding to finish the neck and arm holes, but turns this in fully, then topstitches. I chose to use the bias binding as a contrast trim, so trimmed 5mm from these seam allowances, and folded over the bias, after sewing it to the right side, then stitched in the ditch on the right side for the neck, armholes and hem. In a more dressy garment, I would have handstitched this seam, but I wanted this pinafore to be both quick to construct, and extra sturdy - this SIL now has 3 children under 4 years of age and so no time to fuss with delicate washing techniques.
I also used my own adaption of the embroidery design both in shape and in the stitches used. My flower is very naive and simple (ie, quick, I want this in the post today)using 6 threads of stranded DMC cotton for running stitch petals and leaf, 5 threads in stem stitch for the stem and 5 threads in french knots for the flower center. I have added a few 2 and 3 strand straight stitches to the petals and leaf.
 

I changed the fastening from a placket style at the back to a shoulder fastening. In my opinion, this is easier for dressing the baby, and also means I could use novelty heart buttons instead of sensible flat, non baby poking buttons. Being careless, I failed to cut a longer shoulder to allow for this change, so used bias binding to extend the front shoulder, and to finish the edge on the back shoulder. I used buttonhole stitch loops to cope with the novelty buttons.
 
At the back I embroidered a lazy daisy, just for fun.
Posted by Picasa

Sunday, 7 September 2008

Baby gifts

My new niece arrived today, so all non baby sewing projects took a back burner. This morning I embroidered this bonds suit.
 

This afternoon I made a fine wale corduroy pinafore dress with an embroidered flower on the front to match the blue and white pants I made a few weeks ago. I already had a baby gift made, but felt really inspired to make more baby clothes, especially as my other options include jeans, pants and alterations - baby clothes are much more fun. I will take some photos in the daylight, but not until I have traced out a pants pattern.
Posted by Picasa

Monday, 4 August 2008

BWOF 7-2008 #135 Burda version vs my version

 
I have finished my version of the #135 dress. At first glance it appears very similar to Burda's dress, but that was the idea.
 
I know this sounds arrogant, but the main improvement in my version of the dress is the ease of the pleating, smocking and construction, and I cannot really show you this. With the Burda version, I had to wrestle with many aspects, one of the worst was applying the bias binding to the neckline. You can see that in my version, the on grain neck, and the line of cable within the seam allowance make the application very straight forward. I lined up the edge of the bias strip with the line of cable smocking, stitched around 3mm away, and not only did my wave stitches stay an equal distance away from the neck, but all my pleats remain straight, and evenly spaced. This was not what happened in the Burda dress, despite serious sewing wrestling.
 
You can see the difference that this makes to the finished dress in this close up. Part of the better appearance of the strawberry print is the additional width of fabric in the bodice.
 
The other aspect of my version that I like is the less voluminous skirt. The Burda skirt is as wide as the baby is long. The Burda sleeves are also more voluminous.
I do think that you can make a pretty smocked dress as a smocking newbie, just using written instructions. I am pleased that Burda put one in their magazine to entice new smockers, I just wish they had made the pattern more user friendly.
Posted by Picasa

Sunday, 3 August 2008

Pleating, Blocking, Smocking altered version of BWOF 7-2008 #135

After altering the a line dress to a bishop dress as described in my post yesterday, I am now reaping the rewards of this change. First, this new version is much easier to pleat, as the neckline is on the cross grain. Instead of using the curved template that Burda instructs you to transfer to the neckline, which I can assure you is time consuming,tedious,and difficult to keep accurate, the new version can be pleated by much quicker methods. I used a pleater.
 

An alternative is to use a smocking dot transfer
 
However, if you are new to smocking, and using this as a first attempt, you do not need any fancy equipment. You can rule 6 lines horizontally, 1cm apart (note I suggest 6 lines, not 4 as Burda instructs) with the first line just above the stitching line of the neck, around 3mm. Mark each of these lines at 1cm intervals. These marks are where you stitch to gather the fabric - Burda's instructions are correct in this section.
Once you have pulled up the threads to gather your fabric, you need to block the neckline to the shape of Burda's pattern piece. Burda's instructions give a rough idea of how this is done. The template should have the top edge on the second row of gathering (this would be the first row if you use only 4 rows as per Burda) and the bottom edge on the 5th row of gathering (4th per Burda). If you lightly spray the fabric with starch, evenly spread the pleats in a fan shape. In the new version, the fan spreads out more gradually, as there is a lot more fabric. Pin the neckline to a flat surface, I use my ironing board. You can then either lightly steam the pleats, holding the iron above the fabric, or allow the starch to air dry. When the fabric is dry, you are ready to smock. However, although Burda tells you to mark the centre front of the dress, it does not tell you that your smocking design should be centred here too. After you have pleated the garment, your centre front is the valley between the 2 centre pleats. You do need to count your pleats to find out where this valley is located. If it is more than a few mm off the marked centre front of the fabric, you will need to unpick some pleats from the more numerous side in order to have the centre of your smocking design at the centre of your fabric. Start your smocking with an over cable at the 2nd line of gathering thread, work to one end, then turn and start from the middle again. This will make your design finish at the same part of the pattern at the back. I have chosen to finish at a cable, as I find this neat and visually satisfying.
 

I have used the same smocking design - the 4 step wave, as my take on the Burda intent and used in the previous version of this dress. The dress size is the same, and I have again used 3 strands of DMC thread. As there are more pleats, and the pleats are now close to each other, the effect of the same stitches is much more rich and textural. It was also far easier to stitch, and I had no difficulties in keeping the pleats in the blocked shape.
You can see that the first row of gathering has a cable stitch along the gathering thread. This is a holding row, to keep the pleats even during smocking, and in garment construction. You will not see this line in the finished garment. The gathering thread below the smocking is used to help keep the lower edge of the pleats evenly fanned out during the smocking.
I hope to construct the new version of the dress tomorrow. I have made one change to my pattern already - I think the sleeves are too long and too curved, and have trimmed them down around an inch at the deepest part of the curve, tapering to nothing at the side seam.
 
Posted by Picasa