Me-made-May seems to have a subtitle in the reflection posts. Is what you sew, what you wear? I wear what I sew, but unfortunately, at times, this is boring in the sewing phase. It is a bad thing when you find your own blog and your favourite hobby rather dull. I hope this will pass! I am keeping it real. Sewing is not just pretty things for self (or daughter) adornment. Wardrobe building is not very exciting, but it needs to be done if you are anti fast-fashion or don't fit RTW. How to do it well, without excess expense, and in a minimal number of garments is endlessly interesting in theory. See this thread and its precursors.
I like a blog with shiny new patterns and endless party outfits as much as the next person, but my real life includes lots of clothes for work, exercise outfits for middle aged persons, and t shirts for the conservative 11 year old male. If sewing was just a hobby for me, I could be a dilettante, but fortunately for my budget, sewing has practical aspects around here.
I find it interesting, in the Me-Made-May round ups, that several people have said they have too many clothes, but still find it hard to find things to wear every day. I think Mikhaela sums it up very nicely here. Too many lovely clothes that aren't worn much, and not enough every day clothes that meet practical needs.
Of course, this could mean that we don't dress up enough in everyday life, despite having more options that the non sewing majority.
Clio says that nearly everyone wears a dress to the sewing meet ups,and wonders why. I guess that depends on your climate and lifestyle. I wear dresses for most of the year - but not to work.
Rachel of House of Pinhero says 65% of the clothes she's sewn are dresses.
I think I'll write down what type of clothing I wear the most, and see if I can balance my sewing with my wardrobe needs. This sounds a little like Carolyn's project where she sketched everything she wore for a year (such an organised lady, I'm in awe of her sewing and artistic skills), but I will not be sketching.
Here are more everyday clothes, that I needed a sew-a- long and self persuasion techniques to sew instead of something more interesting.
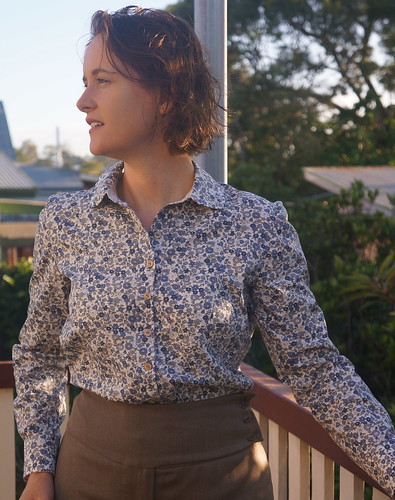
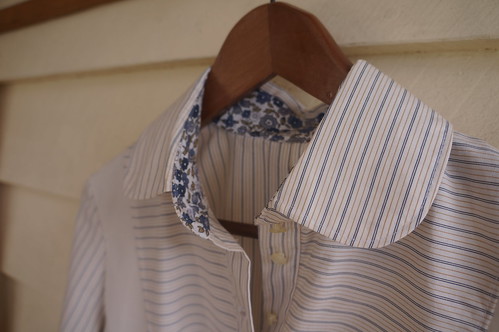
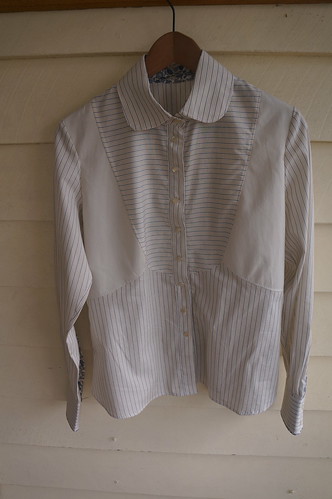
Blouse 01-2008-107 again, in a subdued Mumsy floral - possibly the floral is pushing the professional boundaries at work, floral has so little gravitas, but it is inoffensive. Hopefully the business-like shape of the shirt balances the prettiness.
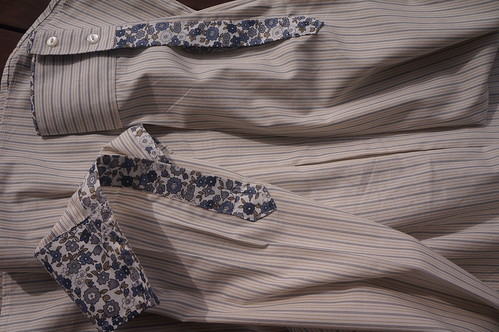
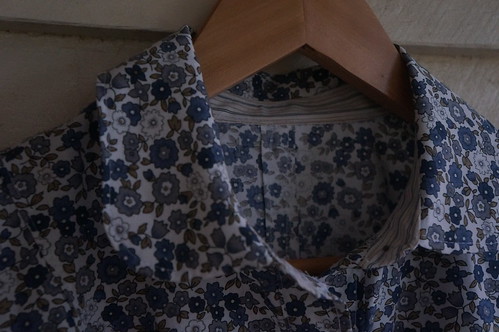
There is some more business-like stripe on the inside of the (narrowed) collar stand and in the cuffs, but there wasn't enough for the plackets.
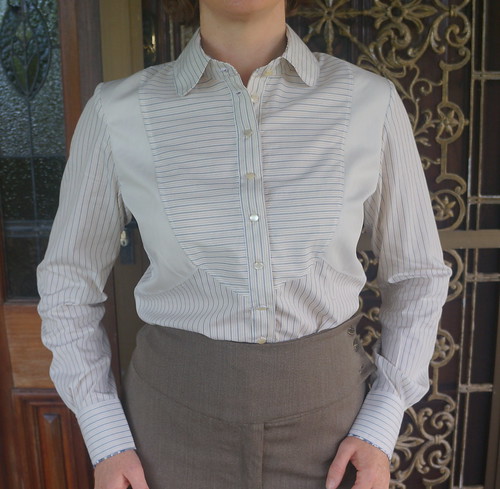
Worn with Self drafted Useful trousers for work
Why are work clothes so boring to sew?
I'll like wearing these much better than I would like shopping for or wearing ill fitting ugly work clothes, I just have to convince myself that this is what I want to make. Really.
Stashbusting statistics: About 1.5m of mid weight cotton woven, provenance forgotten, but a few years old
Showing posts with label BWOF 01-2008. Show all posts
Tuesday, 10 June 2014
Sunday, 8 June 2014
Burda World of Fashion 01-2008-107 Bib front blouse
I've grit my teeth and am sticking to my work clothes plan. I rather like the trousers (considering that they are well, trousers), they've done their duty well at work, but photos are lacking, so I shall post about the blouse of multiple fabrics instead.
In my typical very - poor - use - of- time in an attempt to be thrifty, I was determined to make some sort of garment from a shirting remnant (man shirt), and thinking of the fabric squeezing possibilities inherent in a blouse with 8 pieces in the front, actually had a workable arrangement for this rather interesting take on a business shirt, Burda Style 01-2008-107.
Naturally, I needed a little help from another fabric to get a whole blouse from my remnant, but as I often make contrast collar stand, cuffs and plackets, for work shirts, I didn't see this as a problem
Unfortunately, in an unusual burst of enthusiasm for cutting out (usually I make one garment before starting the next one), I was cutting out blouse the first from my 6pac at the same time, and surprisingly having a largish rectangle of my striped shirting cotton left over, I cut out cuffs and collar stand for my cream blouse and patted myself on the back for using up every last piece of the remnant.
I'm sure you can fortell the next stage of this story.
Yes, I had only cut out one of the upper side pieces. This was cut in a single layer, so as to have the stripes in opposite directions for the 2 sides. When Icarefully went through casually checked the pieces of the shirt, pinned to their pattern, prior to cutting out my extra cuffs, I failed to notice that there was a singleton.
The partially completed bodice lay around on my sewing table for a few days looking at me mockingly.
I wasn't keen to use the same fabric as the collar and cuffs, this being a bit strong in contrast, but having 3 fabrics in the blouse was making me think that the blouse would read "weekend cheerful and colourful patchwork" rather than "professional with a touch of whimsy".
Eventually, I went with a solid off-white, in a cotton herringbone twill (shirt weight), which has enough of a stripe effect to give me the directional variation I was after.
It is not a disaster, but I'm not sure if I like it as much as my original plan, there is something rather noticeable about it for a work blouse.
My other design changes to the pattern were to offset the cuffs again, for a line of contrast from the right side, to add more buttons to the front fastening for gaposis resistance, and also an inverted pleat at the back, sewn down at the top and waist, to ensure room for arm movement with minimal untucking.Instead of the complex half chesterfield front with an added tab, (which was fun, looks good but used a lot of fabric and required fiddling) I have used the most simple form of sewn on placket - a long strip folded over, with self fabric as interfacing. I have used a David Page Coffin sleeve placket pattern and instructions from Shirtmaking.
Seams are flatfelled, for garment longevity and inside tidiness to be visible when the sleeves are rolled up, and I have used flat buttons on the cuffs instead of the shank ones at the front, to reduce catching.
It should be very practical and useful, and there is another blouse from the same pattern cut out and ready to go.
Unfortunately I have a sudden urge to sew chiffon and ruffles.
Scrapbusting statistics about 1.3 m of shirting remannt (Global Fabrics, Wellington 2011), and a few cm of 2 other cottons - herringbone twill from Michael's fabrics and unremembered location for the floral.
In my typical very - poor - use - of- time in an attempt to be thrifty, I was determined to make some sort of garment from a shirting remnant (man shirt), and thinking of the fabric squeezing possibilities inherent in a blouse with 8 pieces in the front, actually had a workable arrangement for this rather interesting take on a business shirt, Burda Style 01-2008-107.
technical drawing from www.burdafashion.com
I've made this before (with the collar from 108) using different stripe directions for the front and find the effect quite pleasing. (The FBA method and other alterations I used for this garment are shown at the post about the previous blouse )Naturally, I needed a little help from another fabric to get a whole blouse from my remnant, but as I often make contrast collar stand, cuffs and plackets, for work shirts, I didn't see this as a problem
Unfortunately, in an unusual burst of enthusiasm for cutting out (usually I make one garment before starting the next one), I was cutting out blouse the first from my 6pac at the same time, and surprisingly having a largish rectangle of my striped shirting cotton left over, I cut out cuffs and collar stand for my cream blouse and patted myself on the back for using up every last piece of the remnant.
I'm sure you can fortell the next stage of this story.
Yes, I had only cut out one of the upper side pieces. This was cut in a single layer, so as to have the stripes in opposite directions for the 2 sides. When I
The partially completed bodice lay around on my sewing table for a few days looking at me mockingly.
I wasn't keen to use the same fabric as the collar and cuffs, this being a bit strong in contrast, but having 3 fabrics in the blouse was making me think that the blouse would read "weekend cheerful and colourful patchwork" rather than "professional with a touch of whimsy".
Eventually, I went with a solid off-white, in a cotton herringbone twill (shirt weight), which has enough of a stripe effect to give me the directional variation I was after.
It is not a disaster, but I'm not sure if I like it as much as my original plan, there is something rather noticeable about it for a work blouse.
It should be very practical and useful, and there is another blouse from the same pattern cut out and ready to go.
Unfortunately I have a sudden urge to sew chiffon and ruffles.
Scrapbusting statistics about 1.3 m of shirting remannt (Global Fabrics, Wellington 2011), and a few cm of 2 other cottons - herringbone twill from Michael's fabrics and unremembered location for the floral.
Sunday, 5 February 2012
Burda World of Fashion 01-2008-107/8 shirt
This week's sewing is greatly satisfying, as I have used a pattern I have been wanting to try for the last 4 years, but could not get my hands on.

My version of this very popular blouse,
BWOF 01-2208-107/8 is due to Carol, who kindly loaned me her copy of the magazine, from which she has made some fabulous garments, both in 2008 and recently. I have kept her magazine far too long, having indulged in an unprecedented amount of tracing.

I admit it was with some reluctance that I posted it back to her, but be assured, Carol, despite anyinclinations indications to the contrary, I am not a pattern magazine abductress,and it is hopefully arriving back to you early this week. I am very grateful for your generosity.
I wanted to try this blouse, not just because of all the gorgeous versions about (mostly the short sleeved version)
, but because I wanted to try the full bust adjustment, this being a bit of a new adventure for me in a bib front blouse of this shape.
I mostly used Debbie Cook's excellent tips and drawings, from her version of this blouse.

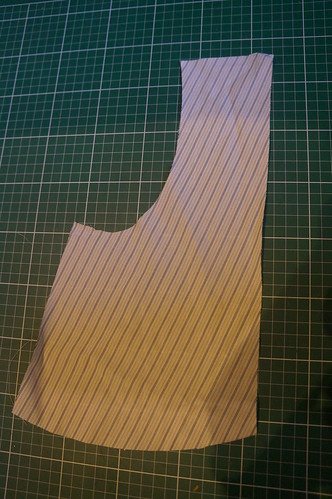
My interpretation of her instructions lead to the above additions to the front pieces. (My other fitting alterations were a square shoulder adjustment, shortening of the sleeves, a full biceps adjustment and a little waist nipping)
I was quite pleased with the fit of the bodice - a little less fitted than the magazine intended I suspect, but this is not a bad thing for me in a work blouse.
My next issue was with the front placket. In the magazine, the top section of the blouse is buttoned in the usual manner, with the bottom section having a concealed placket.
I wanted to use a contrast fabric for the inside of the right, overlapping placket, and the whole of the underneath placket. I also wanted the plackets to use self fabric for interfacing, in the manner of David Page Coffin's Shirtmaking instructions. Fiddling with this rather late one evening, I decided that the lower section of the overlapping placket required an additional step, and could not understand why there were so many layers of fabric in the top section.

When I reviewed the placket the next morning I realised that Burda applies an extra section to the lower part of the placket. This was too late for me, as I had already applied this same section to the upper half of the blouse, admiring my own cleverness as I prettily enclosed the seam of the tab in this section rather than having to fold over 4 layers of fabric as suggested by Burda.
I moved on, feeling only moderately stupid, and came up against a stripe direction issue in the standing collar.

I should have cut the stand with the stripes going lengthwise.
Try as I might, I could not imagine myself actually wearing this blouse with the leaning stripes so prominently displayed. Naturally I had been convincing myself throughout the hand stitching of the inner collar and the topstitching that no-one would notice, but I had to admit that this was a lie once the thing was finished.
I chopped off the top seam, unpicked the topstitching and turned this standing collar into a collar stand for the collar from version 107, via some tricky handstitching to convince the collar stand curves to behave. I am pleased with the collar, and can live with the wonky stripes on the stand now than there is a collar to distract the eye from this detail.

Next were the cuffs and plackets. I did not want to use a bias strip for the placket, so used the David Page Coffin Shirtmaking instructions for a regular placket. I scaled down the placket piece from the pattern I use for my husband's shirts.
At this point I also came across this interesting post by Pamela Erny, where she describes how to wrap the cuff so that the inner cuff contrast fabric appears at the outside. I combined her instructions with the David Page Coffin instructions and my own intention to have a diagonal slant to one end of the cuff and only had to unpick and recut the inner cuff once ;).

I can wear the blouse buttoned to the neck, but prefer it with the collar open to show the contrast.
This was an interesting and rather challenging project for me, mostly due to my own errors, but I am sure my next version will be more straight forward.
My version of this very popular blouse,
BWOF 01-2208-107/8 is due to Carol, who kindly loaned me her copy of the magazine, from which she has made some fabulous garments, both in 2008 and recently. I have kept her magazine far too long, having indulged in an unprecedented amount of tracing.
I admit it was with some reluctance that I posted it back to her, but be assured, Carol, despite any
I wanted to try this blouse, not just because of all the gorgeous versions about (mostly the short sleeved version)
, but because I wanted to try the full bust adjustment, this being a bit of a new adventure for me in a bib front blouse of this shape.
I mostly used Debbie Cook's excellent tips and drawings, from her version of this blouse.
My interpretation of her instructions lead to the above additions to the front pieces. (My other fitting alterations were a square shoulder adjustment, shortening of the sleeves, a full biceps adjustment and a little waist nipping)
I was quite pleased with the fit of the bodice - a little less fitted than the magazine intended I suspect, but this is not a bad thing for me in a work blouse.
My next issue was with the front placket. In the magazine, the top section of the blouse is buttoned in the usual manner, with the bottom section having a concealed placket.
I wanted to use a contrast fabric for the inside of the right, overlapping placket, and the whole of the underneath placket. I also wanted the plackets to use self fabric for interfacing, in the manner of David Page Coffin's Shirtmaking instructions. Fiddling with this rather late one evening, I decided that the lower section of the overlapping placket required an additional step, and could not understand why there were so many layers of fabric in the top section.
When I reviewed the placket the next morning I realised that Burda applies an extra section to the lower part of the placket. This was too late for me, as I had already applied this same section to the upper half of the blouse, admiring my own cleverness as I prettily enclosed the seam of the tab in this section rather than having to fold over 4 layers of fabric as suggested by Burda.
I moved on, feeling only moderately stupid, and came up against a stripe direction issue in the standing collar.
I should have cut the stand with the stripes going lengthwise.
Try as I might, I could not imagine myself actually wearing this blouse with the leaning stripes so prominently displayed. Naturally I had been convincing myself throughout the hand stitching of the inner collar and the topstitching that no-one would notice, but I had to admit that this was a lie once the thing was finished.
I chopped off the top seam, unpicked the topstitching and turned this standing collar into a collar stand for the collar from version 107, via some tricky handstitching to convince the collar stand curves to behave. I am pleased with the collar, and can live with the wonky stripes on the stand now than there is a collar to distract the eye from this detail.
Next were the cuffs and plackets. I did not want to use a bias strip for the placket, so used the David Page Coffin Shirtmaking instructions for a regular placket. I scaled down the placket piece from the pattern I use for my husband's shirts.
I can wear the blouse buttoned to the neck, but prefer it with the collar open to show the contrast.
This was an interesting and rather challenging project for me, mostly due to my own errors, but I am sure my next version will be more straight forward.
Subscribe to:
Posts (Atom)