Showing posts with label Tutorial. Show all posts

Monday, 26 May 2014

Burda Style 02-2009-120 tunic blouse.

Thank you for the encouraging comments about Project Formal. Unfortunately, I cannot indulge myself with constant evening dress sewing, and have returned to the everyday sewing with my efforts over the weekend.
I am so grateful for sew-a-longs. I have the greatest difficulty in motivating myself to make clothes for work, because my work is not the place for sartorial self expression, and I have to wear trousers. Urgh.
The Fabulous Dr E has a seasonal sew a long of 6 pieces hosted at Stitchers Guild, just perfect for a work wardrobe update.These useful pieces are deadly dull, but will get a lot of wear. I am making 2 pairs of trousers, 3 blouses and a very easy knit fabric cardigan top. Hopefully these will all co-ordinate.

DSC03387

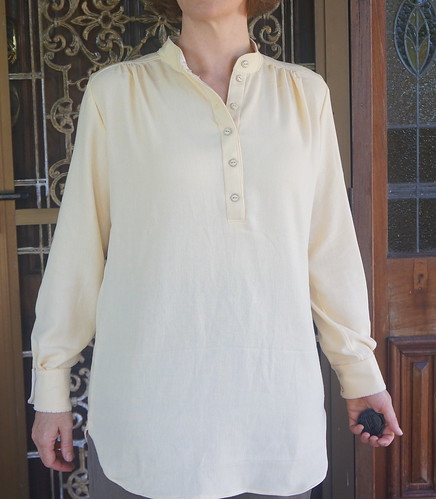
First up is a pattern I haven't tried before, the tunic blouse from February 2009 Burda Style, 120.

technical drawing from http://www.burdafashion.com
 A particularly pleasant aspect about using these older Burdas (aside from my natural tendency to sew clothing that is 5 years or so out of date) is that the pattern sheets have only half the number of patterns on them as the current issues, so they are really easy to trace.
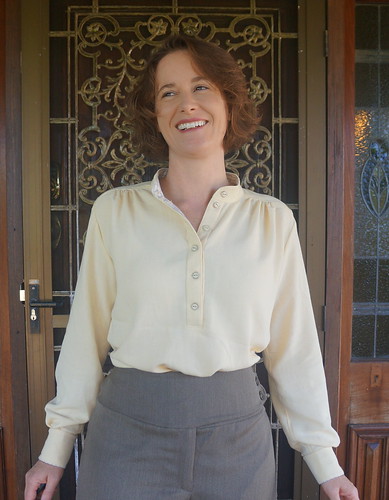
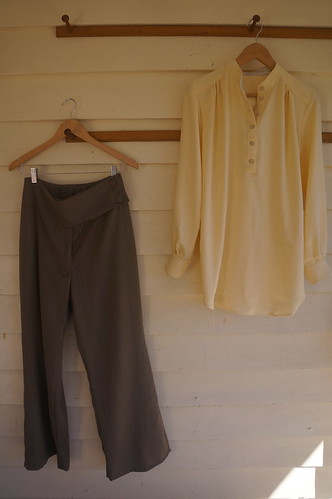
It looks terribly casual in the photo above, but the intention is to wear it tucked in, this untucked photo is to demonstrate the length of the tunic (longer length B). The fabric is from deep stash, pre 2008 Martin & Savage Fabric, from the days when I was experimenting with allegedly breathable polyester woven fabrics for work wear (heavily pushed by Australian Stitches Magazine at the time). This will definitely be a winter only blouse - the weave is soft and loose, and the fabric is quite fine, but my previous experience with this type of fabric is that it is quite warm to wear if you live in the subtropics.
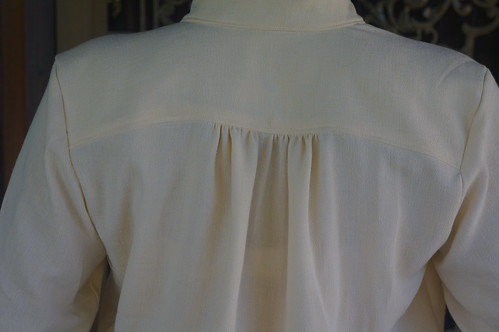
The blouse was nicely drafted, and not tricky to sew, having gathers rather than darts. I did not have to do a FBA, yay, but made my usual square shoulder adjustment, large arm adjustment and also removed 2cm from the shoulder seams as, unusually for me with Burda, the shoulders were too wide. It has gathers at the back too, making it very practical for reaching forward.

DSC03386

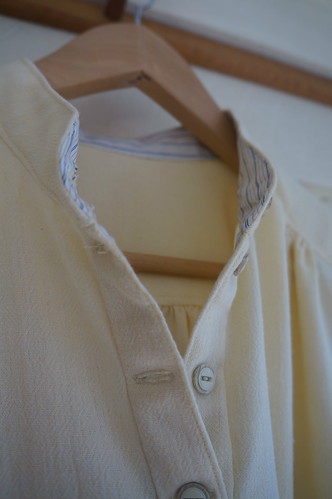
In an attempt to workify this casual looking blouse, I used a shirting fabric for contrast inner placket, inner collar stand and cuffs + binding.

DSC03393

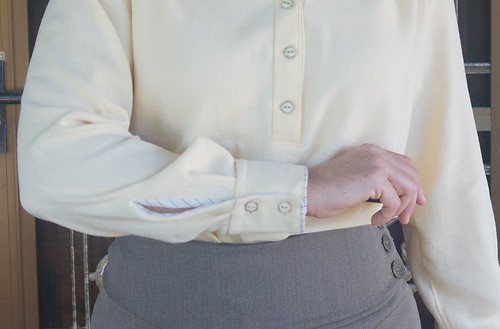
 I offset the cuffs so the stripe shows as a border.
DSC03381
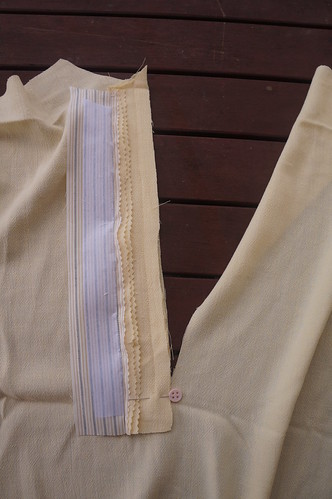
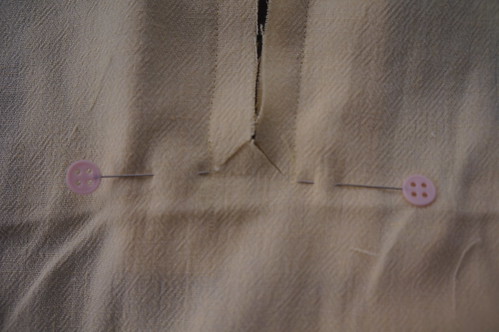
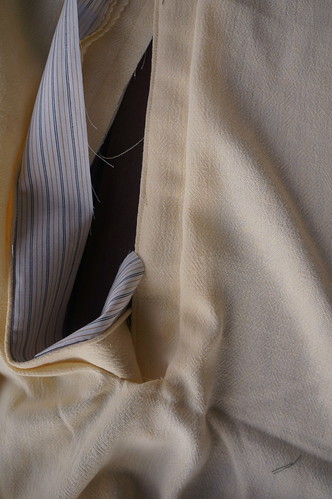
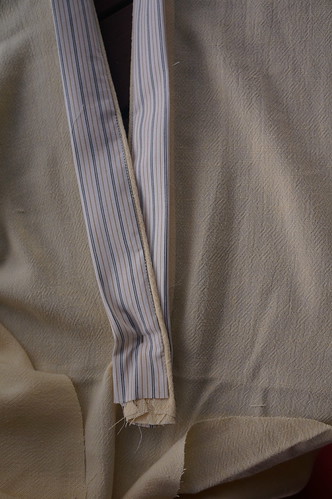
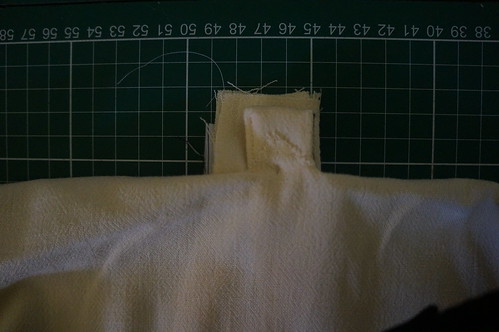
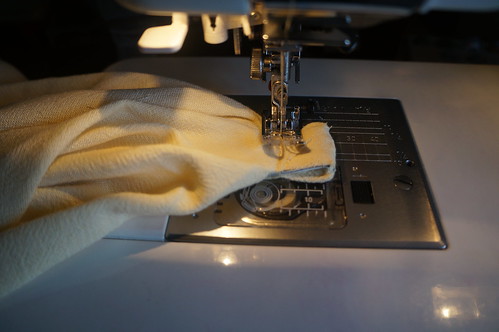
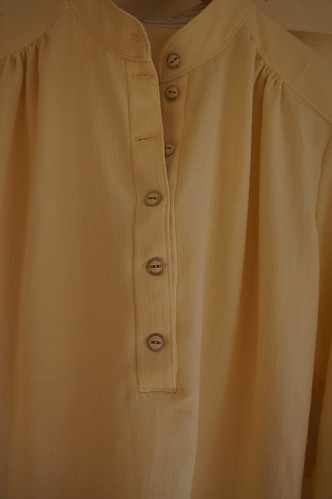
Burda is somewhat terse with the front placket instructions, and the two previous reviewers of this pattern both mentioned this as a difficulty, so I took photographs of this section of the construction.

DSC03349

Cut front opening to within 1cm of the marked line, sew each placket to the front, stopping at the end of the line- ensure sides match.

DSC03350

Cut diagonally into the corners at the base of the front opening (you can sew across between the two vertical seam allowances for reinforcement)

DSC03351

DSC03353

Turn plackets to the inside, laying one over the other, turn seam allowance at base of placket to the inside, making sure the outside of the placket is straight - pin in place

Finish insides of long edges (I handstitched)

DSC03354
Secure seam allowance of bottom edge to plackets (I handstitched)
Finish short edges of placket (I handstitched)
DSC03355
Sew across short edge on the inside, ensuring that seam is straight and that there is no gap where the seam meets the long edge seams

DSC03394

Turn out and topstitch as desired. Make buttonholes and attach buttons after collar stand is finished.

DSC03379

Blouse tucked in for work.

DSC03391

6pac so far
I will report on the trousers later.


 Stashbusting statistics - 1.5m woven polyester - pre 2008. Alas, there is a sizeable piece remaining.


Sunday, 24 June 2012

Elastic in seams, Vogue 8305 top, Jalie Sweetheart top

I am highly flattered by being asked a technical sewing question.

Mary Nanna, excellent seamstress of Make it Smirk fame, commented "You mention using elastic in the seams with the merino - can you explain this process?" 

Despite a sneaking suspicion that Mary Nanna is much better at sewing than I, and could possibly be asking this question with the aim of provoking some smirking from champion sewers of knits, here is my approach to this process, developed by close inspection and some destruction of RTW, and considerable trial and error. Please note that I am a self taught seamstress and profess no qualifications in the "right" way to carry out any sewing what so ever. (That disclaimer was for Bunny, because she has a very good point about tutorials). This is how I use elastic in the seams of knits. Your results may not be the same ;)


1. Inspect the fabric. Deliciously buttery stretchy fabric that ripples into a puddle on the sewing room floor at every opportunity is a very good candidate for elastic in the seams. If your knit is stable and has fabulous recovery, elastic may not be of much  use to you, and may just increase bulk in your seams.
2. Consider your seams. Elastic is useful in knits for seams that you want to stretch just a bit, but not too much. Seams under stress, that you do not want to stretch at all (eg fitted shoulder seams) may require more stability than elastic can offer. For example: I regularly use twill tape or woven fabric selvage in shoulder seams on knits - voile or organza in a fine knit, and quilting/shirting cotton for a medium knit. Other people regularly use clear elastic in shoulder seams with good results, but this has not been my experience.
3. Elastic, Foot, Needle and stitch selection:
These decisions depend on several factors. For merino knits, swim wear, and thin rayon knits, I use a clear elastic described as "swimwear" elastic, produced by Beutron, and supplied in Australia by J.D.Leutenegger. I buy it by the roll, and use a roll within 2 years or so, so the elastic is relatively fresh.  I find that this elastic is difficult to sew with a ball point needle, which is recommend for knitted fabric, and which is the needle I tend to use for merino where elastic is not involved. Instead I use a stretch needle of 70 or above when using elastic in the seams. As I am lazy, I generally do not change the needle back to a ball point to complete the remainder of the garment, which has occasionally lead to stitch problems with fine fabrics. I generally use a walking foot on my conventional machine when sewing with knits, and have much better success when sewing elastic if I am using the walking foot rather than when using a regular foot.
SDC10062
The stitch I like to use when including elastic in the seam is a 3 step zigzag, with stitch length of between 1.0 and 2.0mm and stitch width of between 1.0 and 1.5mm. On occasion, when I am using the elastic to assist in gathering the fabric, I use a straight stitch.
4. Consider the purpose of the elastic
 a) Supporting a stretch seam
In the raglan merino top I made recently (Vogue 8364) leading to Mary Nanna's question, I wanted the elastic to support the seams mostly vertically, as the fabric was very unstable, and did not have a snappy recovery. (Merino rib knit). I suspected that should I sew this garment without using elastic, my top would end up knee length by the end of the day, with sleeves extending well past my finger tips.
I sewed the elastic on top of the seam without stretching, just holding it in place as I sewed the regular seam.
SAM_1462
 I did this for all of the raglan seams, the neckline seam and for the sleeve and side seams, so that the top does not stretch out of shape during wear, nor during washing. I clip the elastic where seams intersect.
SAM_1436
Adding the elastic to the seams worked very nicely, even though I hung the top on the line to dry (folded in the middle over the line) instead of laying it flat on a towel to dry as would have been the most garment protective option ;).

In the following top, Vogue 8305, which I sewed for my demonstration photos, I used the elastic differently. This merino jersey top has some lycra in it, and has better recovery than the merino rib fabric used in Vogue 8. The elastic requirements are different.
b) Preventing gaping in a neck seam
I used elastic in the neckline-facing seam. I had previously found that this wrap over style tended to gape during wear, so I stretched the elastic slightly as I sewed it directly over the seam, gathering the seam very slightly. To do this, I used the same needle, foot and stitch length, but stretched the elastic equally to the front and the back at the same time (so that the needle was not pulled to either direction. I stretch the front with my right hand and the back with my left hand.
SDC10066
 (just pretend that photo has the elastic being pulled straight from the front - pressing the button on the camera was tricky with my left hand)
SDC10065

SDC10102

In wear, the intention is that the the slight gathering will be stretched out by the body, so that the neckline lays flat. This is where trail and error come in!
For this garment I did not use any elastic in the sleeve or side seams with the following exception-
 c) A stretchable stay for gathering or pleats
The other use of elastic in this garment was as a stay for the gathering at the side seam. This gathered area needs to stretch with the garment, but when unsupported, has a tendency to droop in a southerly direction, ruining the line of the dress and giving an unfortunate impression of pot bellied-ness. In this seam, the gathered fabric is overlaid with the unstretched elastic, and the same 3 step zig zag is used to attach the elastic as a stay before the side seam is sewn.
SDC10063

Here I guide the fabric front and back using my left hand to hold the elastic in place, without stretching.

d) To increase the recovery of a knit fabric within a binding
In Jalie 2795, the sweetheart top, which I have made many times, the front bodice binding is stretched significantly to shape the t shirt.
SDC10105
 My merino knit did not have enough recovery, in my opinion, to shape the neckline sufficiently without unsightly rippling and bagging of the finished front neckline.

In this instance, I placed the unstretched clear elastic inside the folded binding and overlocked the three layers together.
SDC10104
When I later stretched this  binding to fit the front bodice piece per the instructions, the elastic ensured that the bodice was gathered in as if I had used a fabric with better elasticity than my merino jersey. (The seam is also topstitched through the elastic)
SDC10106

SDC10108

Elastic in seams gives the garment more longevity, sometimes more stability and sometimes more recovery. Using it is a bit of a trial and error process, but  for me, it was worth some experimental sewing.


Tuesday, 22 February 2011

Shirring with the bridging stitch and buttonhole foot

Katherine h asked me to provide more details about shirring with the bridging stitch, so I have lots of thrilling photographs for you.
The bridging stitch is #10 on my Husqvarna Lily 550,

SAM_3173

and #31 on my Janome 6600.

This outs me as an extravagant seamstress owning multiple sewing machines, but the Husqvarna officially has a completely worn out motor, which my sewing machine repairman tells me is due to my non-domestic level of use of the machine. Doesn't he know that sewing nearly every day is normal domestic behaviour?. I still use the Husqvarna for shirring, buttonholes, and some stitches, because my large collection of Husqvarna feet do not fit my Janome :(.

The stitch zig-zags alternately on either side of the needle. In addition to shirring, I use this stitch for fold-over elastic application on underwear and sportswear.

SAM_3196
Once upon a time when I dabbled in heirloom sewing, I also used it to attach laces to each other. My Husqvarna manual says " The bridging stitch is suitable for joining two pieces of fabric with folded edges. Leather and vinyl are joined by butting the edges close to each other using the bridging stitch. Also use to join lace and ribbon."


The real benefit of using the Husqvarna for shirring is the buttonhole foot, C. This foot has a small hook at the back for corded buttonholes, and also has a slight groove under the inside edge of the place to hold the cord arms away from each other.
SAM_3170
This means you can sew over two strands of elastic at once, without much danger of catching the elastic in the zig-zag and ruining the shirring, as the elastic is nicely held in place by the foot, provided you hold the elastic in front of the foot under a little tension.
SAM_3174
Unfortunately, I do not have an equivalent foot for my Janome.
SAM_3176

Once I have sewn enough strands of shirring, I have a short cut for distributing the gathering.
SAM_3177
I pull up the elastic quite aggressively at one end.
SAM_3178
Then I hold the elastic threads firmly at both ends, and pull the fabric firmly side to side.
SAM_3179
As the elastic stretches then relaxes again, the gathers distribute reasonably evenly over the whole piece of fabric. Any remaining bunching can be sorted out by repeating the process, or stroking the gathers apart or together as needed to provide even gathering across the desired width.
SAM_3180

SAM_3182

At this point I use very narrow zigzag to stitch vertically across each end of the elastic threads. I then tie off both ends of the shirring.

SAM_3188

I find the tying off necessary so that I can wash the finished garment in the washing machine. The loose ends of the elastic tend to fray, and the knots keep the fraying from intruding into the shirred area.

Monday, 1 November 2010

Making a dress form part 1

SAM_2300
Warning - very photo heavy post.

Whilst I was discussing sewing in person with Elizabeth, my need for a dress form became apparent to my husband. I am not sure if he met Elizabeth's dress form, Maude, but he certainly heard about her useful attributes. This is the sort of information that is hard to avoid when you hang around 4 sewing obsessed people for several days.

Shortly after we returned home, very late one Friday evening, he suddenly announced that he was prepared to start taping. I admit, readers, that I was not very keen. On Friday evenings, after the children are in bed, I like to drink a glass or two of red wine whilst either reading, surfing sewing blogs, or maybe doing a little mindless knitting or hand sewing. Standing up with my stomach held in for a couple of hours was not high on my agenda. However, as I had asked him to help me with this about 2 years previously, I thought I should leap at the chance. I was very grateful, but unfortunately not very well organized.

We used a layer of duct tape over an old t shirt and old cycling knicks, followed by 3 layers of pre-gummed paper tape from the framing shop. We used the duct tape first as it is a little stretchy, and we wanted to compress the t shirt fabric before using the paper tape. My husband is very good at taping, having taped up hundreds of sprained ankles and unstable shoulders in the course of his work, so it took about 90 minutes, with lots of short and shaped pieces where curving was required. Unfortunately for my vanity, I was not able to hold in my stomach for this long.

Before removing the taped form, by slicing it up the back, he marked bony anatomical points - tip of the shoulders, collarbones, anterior and posterior iliac crests (hip bones). We used bony landmarks because it was too late in the evening to finish the entire job, and we felt that replacing the form to match bony landmarks would be more accurate than trying to match landmarks over softer tissue at the classic sewing references at waist, and mid hip . We were lucky that we had chosen this method, as when we removed the form, it was not stiff. The shape changed considerably on removal, and we realized that we needed another layer of paper tape - which I did not have.
dress form back
The pre-dress form was hung up on a coat hanger - theoretically overnight but actually for the next few days whilst supplies were gathered, and my husband made some tools to improve the outcome. I am very lucky that he likes woodwork.
SAM_2475_plus_logo_TLdressformstitchbliss
Noticing the tendency of the form to distort in the median and sagittal planes, he made simple super-size calipers to take width and depth measurements of the reapplied and re-taped form. The points at which these measurements were taken were marked on the form by my daughter as my husband took the measurements. The waistline, hip line and bust lines were also marked.
SAM_2458_plus_logo_TLdressformstitchbliss
SAM_2452_plus_logo_TLdressformstitchbliss
Before the removal of the form, he used a laser level to mark the bottom of the form parallel from the floor.
SAM_2447_plus_logo_TLdressformstitchbliss
After the form was removed, the form was pierced with wire at the measurement points. Originally this was quite difficult, but we found that heating the wire first allowed the wire to be pushed through the tape and underlying t shirt without distorting the form.

SAM_2465_plus_logo_TLdressformstitchbliss

SAM_2460_plus_logo_TLdressformstitchbliss

Each wire was hooked at one end, and clamped at the other to the original measurement at that point.
SAM_2469_plus_logo_TLdressformstitchbliss

SAM_2472_plus_logo_TLdressformstitchbliss
We made a mistake here, sitting the form on a table - this made the backside too flat, and it was difficult to reshape at this point.
I then made a seal for the armholes and neck hole, using cardboard and tape, and applied these from the inside of the form.
SAM_2471_plus_logo_TLdressformstitchbliss
The pre-form was hung by a central wire, upside down, on the washing line. We used one 750ml can of filler foam, but found after an hour, that the form was only about 1/3 full, so I bought 2 more cans.
SAM_2474_plus_logo_TLdressformstitchbliss
SAM_2473_plus_logo_TLdressformstitchbliss
Unfortunately, 3 cans was a bit too much. This is what the form looked like 4 hours later.

SAM_2478_plus_logo_TLdressformstitchbliss

I was rather disappointed. However, after trimming off the excess foam, we found that the dressform was not too much bigger than me to prove partially useful. Using the wires and clamps had worked quite well, and the dressform has distinct similarities to my shape.
Next post I will describe the construction of the cover and stand.