Several of these lovely fabrics have been hanging in
However, I was a complete dunce at rolling the scarf hems on my overlocker. The edges wobbled in an abandoned manner and the corners were terribly dodgy. The Badger is extremely clever, that's all I can say. Back to the drawing board.
Fortunately, I am very good at reading blogs and looking things up on the computer instead of actually getting any sewing done. I vaguely remembered that Janine had something very interesting to say about silk chiffon a little while ago and followed the gelatine soaking recipe she found for my chiffon scarf attempt mark 2.
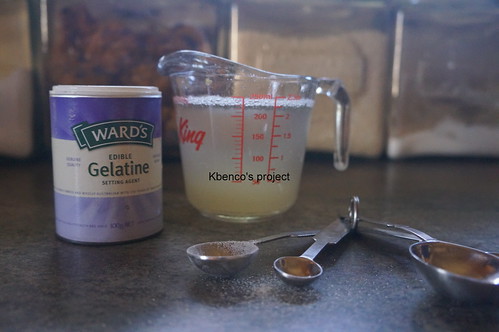
1.3tsp powdered gelatine stirred into approximately 250ml of cold water, leave for 30 minutes
2. Heat this mixture until just simmering at the edges
3. Add 3 litres of cool water
4. Soak fabric in the mixture for 1 hour (I did two pieces, one after the other. The red lost quite a bit of colour in the mixture, so one fabric at a time was a good call)
5. Line dry
6. Iron
This treatment was very effective in reducing slipperiness of the chiffon, and revealed that the two subject pieces of chiffon were both provided to me cut in interesting wedge shapes. Even my left handed rotary cutting improved this situation - the fabric was much easier to handle with a little extra stiffness, and I could use weights to keep it under control whilst cutting out straight lines with a ruler.
Once I had straight edges, I made another hemming attempt. This time I tried using the rolled hem foot on my conventional machine. The gelatine soaked chiffon was not quite as helpful as shirting cotton or cotton batiste, but had definitely improved in attitude from the earlier attempt on the overlocker without gelatine assistance. The silk now had more body and more tendency to stay where I put it. I used a size 60 sharps needle.
I started the stitching about 3 cm in from each edge, and by sewing slowly and managed a fairly respectable hem on each of edge.
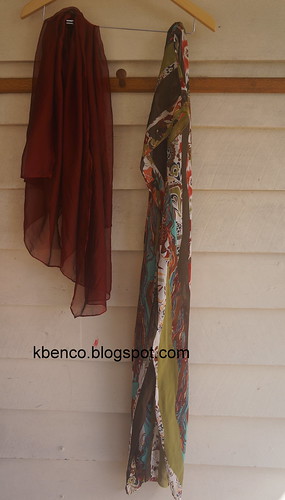
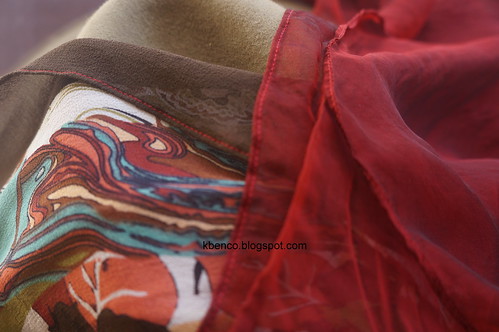
The patterned scarf is a 60cm width, chopped in half lengthways and joined by a french seam at one set of short ends, other short ends left as selvage, making a very long skinny scarf approximately 30cm x 220cm. The red scarf is an allegedly 80cm piece, trimmed to on grain, so now about 70cm wide, with the frizzy selvages trimmed off and hemmed so it is a rectangle of about 70x110cm.I finished the ends of the seams, and the corners of the red scarf, by hand, which was an interesting and clumsy experience, but I don't suppose too many people will be inspecting my scarf corners. After hand washing the scarves, they returned to their original floaty texture, just as Janine described. What a useful technique, thank you!
I am quite happy with my new scarves, and feel instantly better dressed when I add them to a plain t shirt and denim skirt or jeans.

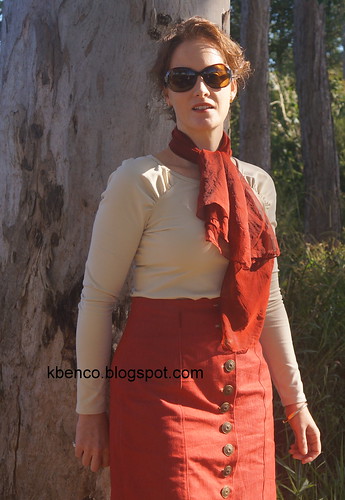
I made the t shirts just recently too - a short and long sleeved version of Burda Style 01-2013-127 and 128 both in the same sand coloured cotton-lycra knit. These were rather dull to sew, so don't deserve a whole post, but they go with nearly everything. Just as well, there are another half a dozen pieces of silk chiffon floating around somewhere!
Stashbusting statistics 2m of cotton lycra 2012 and 1.4m of silk chiffon, 2010 and 2011
8 comments:
Yay, success! I love both scarves and your Burda tee is nice too.
what a fantastic idea!
Actually, I don't think the tee dull at all. I like the decorative stitching at the neck and am keen to try this pattern myself.
The scarves are a lovely addition. They can be soo expensive. I would like to try some as well at some point.
Lovely scarves and have only heard good reports of the Gelatin mix. The gathered shoulders take the plain t-shirt up a notch and with your decorative stitching they look great.
Apart from making yourself a couple of gorgeous scarves (great fabric!) - you've really helped me out here. I've got a project in the to-sew-queue that involves chiffon, and had been thinking of trying a mix of baking soda and water to stiffen it? I'd heard that somewhere along the way... but maybe it was gelatine instead!! Thanks for the tips - I'll definitely be trying this :)
Great Scarves. Great to hear that gelatine soaking does work, too!
-Sewingelle
Beautiful. Love the mix of colours on the one with green. Also: narrow hem presser foot. Best investment ever. I do all all my inner seams with one. XD Wait no second best-new seam ripper is still in the lead...
Beautiful. Love the mix of colours on the one with green. Also: narrow hem presser foot. Best investment ever. I do all all my inner seams with one. XD Wait no second best-new seam ripper is still in the lead...
Post a Comment