Showing posts with label accessories. Show all posts

Tuesday, 2 December 2014

Vogue 9207 Patricia Underwood Hat. Desert Island Sewing

Do you remember Desert Island Sewing?

 No, neither did I, until I was doing a little, much needed, tidying in my sewing room and unearthed a few patterns.

 I have been meaning to make this for a very long time. It is a terrific hat. Version B. The first one I made from an old denim skirt and an ex-shirt of my husband.


The crown was too tall, which was easily fixed by a tuck, but I didn't get to wear the hat, as some other people kept stealing it.


 It is always flattering to have one's clothing approved by the teenage fashion panel to this extent, but to actually add to my own wardrobe, I had to make myself another one, from purple denim (Gorgeous Fabrics).

These hats are lined, with grosgrain ribbon covering the somewhat unsightly seam joining the crown and brim (Next time I may join the lining and outer crown separately to the brim)


There are two layers of heavy interfacing in the brim, which was still a little floppy until the many rows of topstitching were completed, and then it behaved beautifully. 

 I objected strongly to losing the first hat, and guess what, someone listened to me! 


Here is her version, even better than mine, possibly because she used cashmere/cotton twill from Michaels Fabrics for the outside, how luxurious. I love the contrast lining and how she has turned it over to form an edge on the outer brim.
I am pretty sure there will be many more of these hats in our future - or maybe I can find the more recent Patricia Underwood hat pattern, I'm sure its somewhere in my pattern collection.

Monday, 8 September 2014

Hobo Bag in leather

Back in April, 
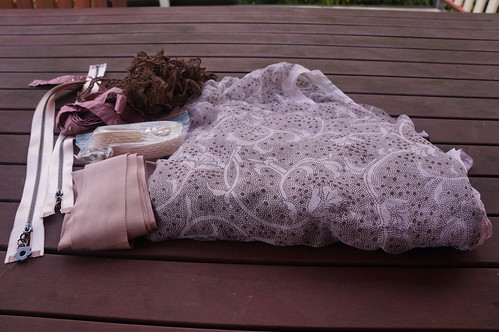
I bought myself leather to make the Hot Patterns Hobo Bag. I nearly made it straight away, in fact it got to 3/4 completion in a week, then I wrecked it, so it had to sit in the sewing room in disgrace for some time before undergoing rehabilitation of sorts.

DSC03699
First the good parts.
I thought I'd made the bag before, but actually, I had previously made the 
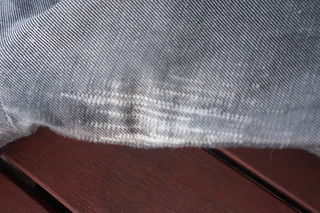
Soho Slouch Tote, for a reversible linen/hemp bag that was definitely on its last legs by April, as the denim hemp was disintegrating -just like the jeans I made from the same fabric. I found the Soho Slouch very useful, but seriously lacking in pockets, and I much prefer leather bags to those made of cloth.

It could have been a very bad decision to make my first version of the Hobo Bag pattern in leather, as having very large pieces, is probably less suited to a leather bag than the Soho Slouch- it took 4 kangaroo skins, and the scraps were legion. Had it not been a shape I like, this might have been rather an expensive experiment. I must have been feeling very confident when I cut this out (I used a rotary cutter). As lining, I used a thick shirting cotton from Michael's fabrics
I enlarged the internal zipped pocket of the pattern, in cotton, then continued with the following additions

DSC03701

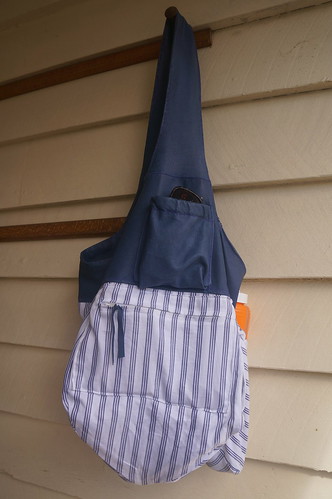
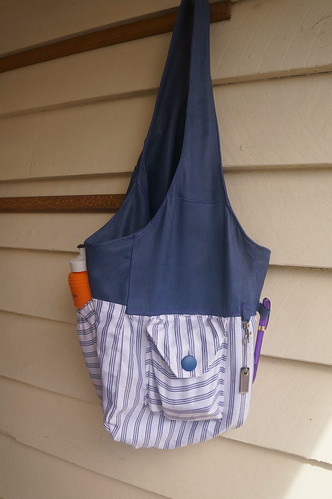
1. Leather sunglasses pouch in the strap - the top is gathered with elastic in a casing.This was a little difficult to construct with the edges turned in with the leather, and I decided to have all the other pockets inside the bag on the lining - however, it is in a particularly useful position for quick access to my sunglasses and I would repeat this pocket in leather for a second version.
2. Leather loops, one for a pen, one with a small clasp for my keys and an USB. I would add another loop in a second version and possibly also a loop strap with buckle - It is amazing how many things I carry about that need to stay upright!
DSC03700
3. Cotton pocket with a buttoning flap made to the dimensions of my phone in its wallet case.
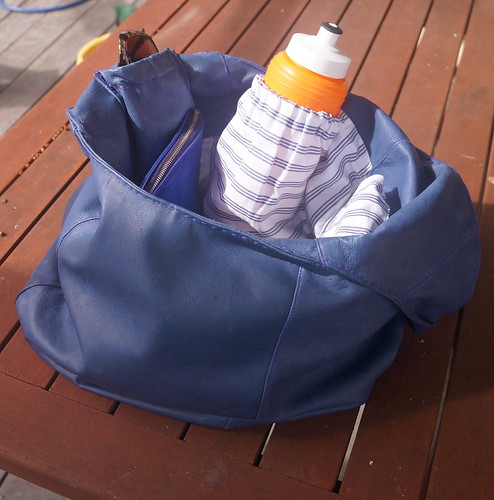
4. My best addition, never found in a normal handbag - a waterbottle pouch made like a poacher's pocket with folded expanding corners and elastic at the top in a casing. I have found with recent use that this pocket is also remarkably useful for a folding umbrella on days so wet that no waterbottle is necessary ;)

Construction:
Having previously sewn kangaroo leather, I was all prepared to glue and stitch with my handcranked Singer as previously, but a bit of trail and error allowed me to construct this primarily using a size 100 needle and jeans topstitching thread at 3.5mm stitch length on my Janome after my 1933 Singer had an episode of o ring disintegration that required ordering a new part from the U.S.A.
I didn't bother gluing, and used a teflon foot, but made no other concessions to sewing with leather. Things went swimmingly, even when sewing and turning seams in the leather through 4 thicknesses, until I came to the topstitching of the incorporated handles. At this point, the extra thickness over joining seams led to horrible stitches and stretching of the top layer of the leather. I was not happy.
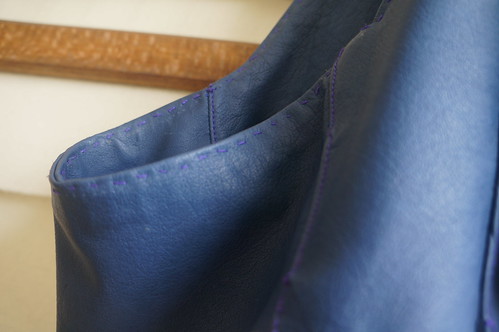
Now most sources about sewing with leather say you cannot unpick. This is completely true, unpicking does leave holes and marks, however, I unpicked, and I have decided that these damaged areas are mostly apparent to myself, rather than the casual observer.

DSC03702
Here is the unpicked, then hand sewn stitching around the edges of my bag. Yes, a little bit unsightly, but not too bad for for use in my opinion. The hand stitching took ages, and was very hard on my hands - I used some of the original needle holes, but for most stitches had to force the needle through at least one layer of the leather, and as there were several already sewn layers to get through, it was not possible to use an awl. I rested the needle on a nice thick Ikea catalogue and pulled the leather down over the needle for each stitch. Its not a technique I recommend! and was the main reason this bag took a long time to complete.

IMG_20140727_133306[1]

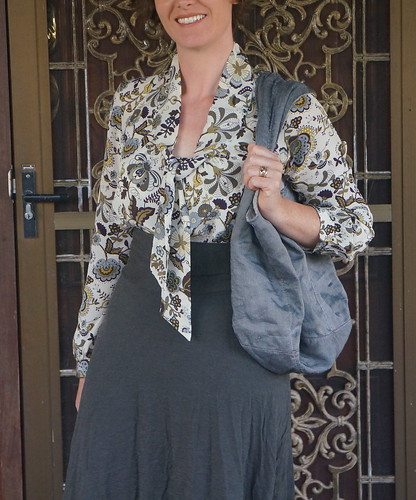
Overall, I am very pleased with this bag. It has room for all my bits and pieces, even a nice large knitting project, some groceries of the bread+milk- has- run- out variety, or a parcel-to-post, yet my phone and keys never fall to the bottom. I love the colour  and softness of the leather, and it is comfortable over my shoulder.
I will use this bag until it wears out - then I might make an even better version with beautiful topstitching the first time around.

Friday, 13 December 2013

Desert Island Sewing trousers Burda 04-2009-118 + bag

Once upon a time a few months ago I announced a self inflicted plan of sewing up all my Scruffy Badger inspired desert island patterns in the next 12 months.

 You might think I have actually been transported to a desert island, given my recent lack of internet presence, but this is not the case. I have in fact, been torn away from my sewing machine on multiple occasions in the last few months, and have somehow not managed to blog about what I have sewn, but am still thinking of this plan at odd moments.

Naturally, there has been some construction going on- after all, I still consider myself sane and reasonably even-tempered, things that might not be the case if I had nothing to make.

Here are my desert island jean-trousers, Burda World of Fashion Magazine 04-2009-118

DSC02393

The fabric is extremely cool. It is denim, and linen-hemp, and both soft to touch yet crisp looking. I had been stashing in a "what fabulous garment can I make from this amazing fabric" fashion for about 3 years after a fortuitous appearance on Michael's Fabrics website. A trip to chilly variably temperate Melbourne in October was the occasion for its use. (I am just a tad behind on my blogging)
As this is my TNT trouser pattern, I have little to report on the construction, other than the very sad loss of my adjusted calico pattern pieces. I had to readjust from the original tracing!!! This was not such a major project as the first time I did it, but still caused some muttering.
I loved these trousers for Melbourne. They were not-too-cool, not-too-hot and were  surprisingly free from any nasty crushing with wear. The grey tones of the fabric went with lots of tops, and my deep purple rain jacket (vital for Melbourne), and looked a bit more smart than regular jeans IMO.  I had added nice deep front pockets, so useful when out all day, and used these as a front stay, which keeps them looking shapely after sitting for too long.
However, the denim was surprisingly lacking in robustness.
This is what the inner leg of the jeans looked like after a mere week of second daily wash and wear.

DSC02436

It might have been due to my choice of transport during the week of my conference.

IMG_20131019_081125

Fortunately this bike hire scheme was great fun - almost worth sewing another pair of trouser jeans.....maybe for next time I visit Melbourne.

I had already used up the very last of the hemp denim - this is from the free pattern soho slouch tote I made a week too early for the virtual bag making event at Stitcher's Guild , .

DSC02381

 It seems to be lasting quite nicely - maybe being reversible and lined with thick embroidered linen helps - but I plan to write about this bag later if I ever get around to my leather version, and can report back on the denim properties then.

Stashbusting statistics about 2.3 metres of linen-hemp denim, 2010 and 1 recycled dress.
Melbourne souvenir fabric purchased
Alannah Hill outlet shop, Brunswick
3 metres of frivolous silk chiffon and assorted trimmings

DSC02700

hmmm - fortunately the liberty blouse (2m stashbuting) went to Melbourne too, so I am still ahead in my personal fabric accounting system ;).

Sunday, 21 July 2013

Ruffled merino gauze knit scarf. The Burda coat addition.

One of the best things about the internet sewing community is the excellent constructive criticism you can sometimes squeeze out of the very kind people who comment on your projects.
Several people commented on the lack of fluffy collar on my daughter's pink coat, suggesting a removable collar, and Gail commented that the coat did not really look like a garment for a first year Uni student.
I agree, it needed a bit more fun, for when she wears it to Uni, rather than on her way to work or the hospital, so I did something about it.

DSC01963

It might not have shown in the photos, but the original collar, made from the Shetland Wool of the coat, was heavy, stiff, and messy looking, rather than delightfully  deconstructed and shabby-chic in a Burdaesque manner, so I did not fuss with it again.

I perused my fabric collection for alternative ideas.

Nothing, because, I clearly do not have enough fabric ;)

I looked at my hideously large mending and refashioning pile, and stuck gold.

Do you remember this cardigan?

SAM_1044

 It did a marvellous job during an Easter in-law-visiting-trip in the Hunter Valley and Sydney, being tossed on over any old outfit from a fancy silk dress to jeans and t shirt, then scrunched up in a handbag when it got too hot.
Unfortunately, in my dedication to documenting my sewing, it was attacked by cobbler's pegs, and as I was away at the time, I did not mend the holes immediately.


Embroidering over the (cough) now quite large holes some weeks later with bullion roses somehow did not work, and I did not wear the cardigan again, finding it unappealing.

Cutting it up into strips was quite satisfying, and I managed to avoid the holes and embroidery. I pieced these strips together, abandoning my original idea of flat felled seams after the first piecing, and just overlapping the pieces, to make one 3m length and one 2m length.

DSC01977

These two strips were then gathered down the centre, and stabilized with a straight stitch over a strip of clear elastic, encased in the merino gauze knit (original front opening edges and neckline of the cardigan).

DSC01964


Don't you think it makes an excellent adornment to the coat?

DSC01969

I insisted on borrowing rights before I handed it over.

Saturday, 11 May 2013

Scarves

I have a very bad habit of buying a small piece of beautiful silk chiffon and pretending I will make myself a scarf from it. Once upon a time I only did this (buy the fabric, not actually make the scarf) if I lucked out in the remnant bin, but in the last little while I have actually done this deliberately from a whole roll of fabric at full price. I must be getting worse ;) I think I can date this worsening from Sherry's detailed and de-mystifying post about hand rolled hems. I was sure I could do this on my silk and make myself a lovely accessory.

Several of these lovely fabrics have been hanging in a nagging manner decoratively on the wall of my sewing room for a couple of years now, with absolutely no urges to hand roll the hems occurring to me for all that time. So, having an excuse not to hand sew them ,due to the bad behaviour of my right thumb in getting in the way whilst I was falling off my bike, I naturally was struck with the brilliance of Scruffy Badger's post about her gorgeous overlocked rolled hemmed scarf and awesome corner technique and had to try this myself.

However, I was a complete dunce at rolling the scarf hems on my overlocker. The edges wobbled in an abandoned manner and the corners were terribly dodgy. The Badger is extremely clever, that's all I can say. Back to the drawing board.

Fortunately, I am very good at reading blogs and looking things up on the computer instead of actually getting any sewing done. I vaguely remembered that Janine had something very interesting to say about silk chiffon a little while ago and followed the gelatine soaking recipe she found for my chiffon scarf attempt mark 2.

DSC01447

1.3tsp powdered gelatine stirred into approximately 250ml of cold water, leave for 30 minutes
2. Heat this mixture until just simmering at the edges
3. Add 3 litres of cool water
4. Soak fabric in the mixture for 1 hour (I did two pieces, one after the other. The red lost quite a bit of colour in the mixture, so one fabric at a time was a good call)
5. Line dry
6. Iron

 This treatment was very effective in reducing slipperiness of the chiffon, and revealed that the two subject pieces of chiffon were both provided to me cut in interesting wedge shapes. Even my left handed rotary cutting improved this situation - the fabric was much easier to handle with a little extra stiffness, and I could use weights to keep it under control whilst cutting out straight lines with a ruler.

Once I had straight edges, I made another hemming attempt. This time I tried using the rolled hem foot on my conventional machine. The gelatine soaked chiffon was not quite as helpful as shirting cotton or cotton batiste, but had definitely improved in attitude from the earlier attempt on the overlocker without gelatine assistance. The silk now had more body and more tendency to stay where I put it. I used a size 60 sharps needle.

DSC01580

 I started the stitching about 3 cm in from each edge, and by sewing slowly and managed a fairly respectable hem on each of edge.
DSC01579
The patterned scarf is a 60cm width, chopped in half lengthways and joined by a french seam at one set of short ends, other short ends left as selvage, making a very long skinny scarf approximately 30cm x 220cm. The red scarf is an allegedly 80cm piece, trimmed to on grain, so now about 70cm wide, with the frizzy selvages trimmed off and hemmed so it is a rectangle of about 70x110cm.I finished the ends of the seams, and the corners of the red scarf, by hand, which was an interesting and clumsy experience, but I don't suppose too many people will be inspecting my scarf corners. After hand washing the scarves, they returned to their original floaty texture, just as Janine described. What a useful technique, thank you!

I am quite happy with my new scarves, and feel instantly better dressed when I add them to a plain t shirt and denim skirt or jeans.

DSC01454

DSC01466

I made the t shirts just recently too - a short and long sleeved version of Burda Style 01-2013-127 and 128 both in the same sand coloured cotton-lycra knit. These were rather dull to sew, so don't deserve a whole post, but they go with nearly everything. Just as well, there are another half a dozen pieces of silk chiffon floating around somewhere!

Stashbusting statistics 2m of cotton lycra 2012 and 1.4m of silk chiffon, 2010 and 2011