Showing posts with label Pants alteration/construction. Show all posts

Monday, 8 March 2010

Alterations vs Sewing the lot

I don't like alterations. Alterations rank very highly on my boredometer. Despite this, I spend quite a bit of time doing alterations as I am even more bored by spending money on something I can do myself. However, I rarely carry out alterations on my own clothing any more, as I prefer to sew new things.
Yesterday, I had planned to start a pair of Burda 12-2009-115 trousers for myself, curved seams and all, but realized that these trousers would require 1. Tracing 2. Pattern fitting 3. a toile 4. several hours of actual construction, and 5. I wanted trousers to wear to work on Monday. #5 was not compatible with the previous numbers.
I thought that instead, I would make trousers 4-2009-115, which I had already made as jeans, so were already up to step 4 and also were very simple to construct.
Whilst searching for the altered back pattern piece I came across a shameful object - purchased trousers.
These were purchased in January 2008. After 3 days of shopping with my sister in Melbourne, all I managed to buy for my then desperate need of work clothes was one shirt (5 hours of alteration required) and this pair of trousers. I have not been able to wear RTW trousers since I was 13 years old. It is not simply that they are ill fitting, as if the hips fit, the waist is so ridiculously large, that it then falls down to the hips, giving a rap boy crotch line, which I consider unwearable.
I girded my loins, and altered them. 2.5 hours of precious sewing time. I am documenting this to discourage myself from even trying to buy trousers again.
First I removed the back waistband. This reminded me how badly sewn RTW can be.
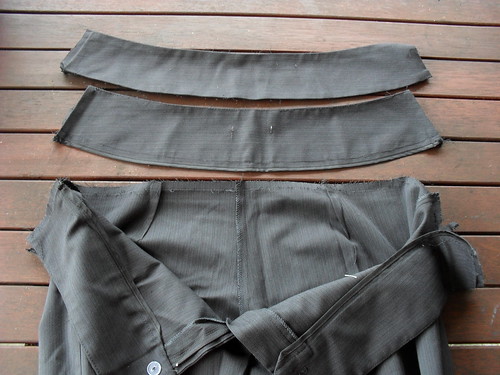
SAM_0121
Next I took in the sideseams of the entire outer leg.
I lowered the crotch seam.
I took in the back darts and the centre back seam at very top.
I added a centre back seam to the waistband, and sewed this at an angle, tapering to the waist.
I quartered the back waistband, and added a similar seam at each side of the waistband.
I reconstructed the back waistband, matching seams and darts.
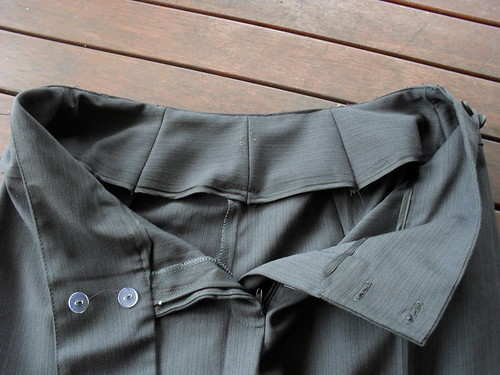
SAM_0122
I took up the hems.
I now have wearable trousers. The only problem is that they are made of not-very-nice poly blend fabric, the colour is not great on me, and they still don't fit very well. They are also pocketless trousers, as I always pick trousers with few details, such as pockets, as these make alterations more difficult.
Materials cost $89.95 trousers, $1 or so thread.
Time cost 3x4 hours shopping, 2.5 hours sewing, 14.5 hours.
I could not abuse my mojo this much on a Sunday, so started the Burda trousers. I was able to spend about 2 hours more sewing.
So far, I have cut out, sewn darts, tried a new welt pocket technique with exposed zipper for a pocket, sewn the legs and crotch, and am up to the zipper insertion. It will take me more than half an hour to finish them, but I am ahead already. Note to self. Do not buy trousers again.

Sunday, 14 September 2008

Marlene pants #3

I was quite pleased with the toile for the BWOF August 2008 pants #105. The photographs are of the toile after I added a dart to the central back waistband, both sides of the front waistband, and took in the side seams around 1cm all the way down. There is pulling at the front pleats, but I plan to deal with this by not stitching them down quite as far in the fashion fabric. There is a lot of fabric at the back thigh, but I think I need this for crouching down, and sitting on my heels. My work does not really allow for sartorial elegance or tight trousers. I am also inclined to think that I did not need both the sewing diva front thigh adjustment and the increased crotch depth at the front, as there seems to be excess fabric at the inner front thigh. I think I can live with this, especially as removing the front thigh sewing diva adjustment will require sewing another toile, and I just cannot be bothered at this stage. My next pants can be a wearable muslin. The fabric seems to be quite good quality, but is navy blue cotton twill from a Michael's Fabric bundle, and I do not really fancy navy blue. Fortunately I have several work blouses that will co-ordinate, but I am happy for the next attempt to be functional rather than gorgeous.


Here is a photograph comparing the size 40 original waistband pattern pieces (no seam allowances) to my new improved version (includes 1.5cm seam allowances). Tape measures do not tell the whole story!
 

I had hoped to sew up the pants today, but due to visitors, was only able to cut out the main fabric. (Fortunately, they were welcome visitors, or I would be feeling a bit cross about this :). My new goal is to have this pair made tomorrow, provided that I do not need to go to work.
Posted by Picasa

Saturday, 13 September 2008

Marlene pants continued

I worked more on the Marlene pants from the August BWOF today. My mission today was to look at the crotch curve, as this seemed to be a problem with the Jalie jeans.
First I measured the front and back curves on me with a flexible ruler - my new toy from Spotlight.
Unfortunately, I found the measuring rather tricky, particularly the back curve, so took the average of 3 attempts.
I also measured the curves in sitting and standing, but as the sitting measurement was overall less than the standing, decided to stick with the standing measurement for the moment. I was unable to find out how much ease I should allow, despite having a lovely hour or two looking through my Stitches and Threads magazines (I kept being distracted, so I have just guessed.
Here is my front curve, compared to the pattern. I am decidedly odd in shape, and when I straightened out the ruler to approximate the pattern, it was exactly the same length as the standing (greater) measurement.
 
I added 2.5 cm to the pattern for ease. I chose to add this to the inner leg seam in order to give myself extra insurance for the front thighs.
 

The back curve was different to my measured shape also.
 

However, this time, the measurement was already 3.75 cm greater than the sitting (larger) back curve measurement, so I left the pattern as is.
 
Posted by Picasa

Wednesday, 10 September 2008

BWOF 8-2008 Pants 105


A few weeks ago,Elizabeth at Stitchers' Guild started a sew along for these "Marlene" trousers from the August BWOF
Naturally, I did not have my August BWOF when the discussion started, but as I really need more trousers, and can use all the help I can get in making them, I thought I would join in late, once I received my magazine. These trousers have been a slow process so far. I have traced out the pattern, and tried tissue fitting per "Pants for real People". Unfortunately, not only do I always manage to tear the paper, but I really have no idea whether paper pinned together actually fits or not, other than the obvious - does it go around me? I decided that yes, the paper goes around me, but that the pattern is a bit tight across the backside and in the front thighs (no suprises here), and that following all the excellent advice from my Jalie jeans attempt, it would be worth trying out the new adjustment methods on these hopefully more forgiving pants.

First I reversed Ann Rowley's flat seat adjustment for my opposite problem.

Once I had done this, I thought the single dart was too big, so changed it to 2 darts. I hope this does not mess up the welt pocket marking, as I have not attempted a welt pocket before and would hate to make it crooked.

Next I added width to the front thigh. I did consider just making the pleat deeper and the whole leg wider all the way down, but decided that this was cheating and that I should try the sewing diva method.
I found the tissue changes rather difficult to manage in my follow up fitting, as the tape is not very effective (Note to self, buy a new glue stick). Next I will make up a pair in calico and see if these changes give me a wearable pair of pants.
Posted by Picasa

Friday, 22 August 2008

Threads"Elastic as a contour waist finish"

As I described in my previous post, this is my trial of the 'No-Nonsense Flexible Waist Finishes" from Connie Long's article in the September 2008 issue of threads magazine.
I continued with method 2, after applying the lining in my prefered method, described in my previous post, as I did not understand step 1 in Ms Long's article. Step 2, which is basting, then overlocking the waist of the lining and the garment together to leave a 3/8 seam allowance was not a problem. Step 3 and 4, where the elastic is pinned then sewn to the seam allowance using zig zag was only tricky in that the amount of elastic stretch to allow is trial and error. Ms Long suggests obtaining the correct amount of ease by practicing on fabric scraps, but this seems a little impractical to me, ease over a full waistband will be different to ease in short scraps, so I chose to guess, and then to wear the garment for a day at work to see if the ease was suitable. I did find that this application required great precision of stitching. The zig zag needed to just catch the outer edge of the elastic, or the turn over became very messy.(This means that I ripped out my first attempt and did it again more carefully)
Below is the inner view of the Vogue 2925 pants showing the differing waist finishes. The view on the top is of my worn out pair, finished with a strip of woven selvage as an alternative to the petersham ribbon called for in the pattern instructions. I have not experienced any waist expansion difficulties with this pair, but as I do not tend to wear my tops tucked in for work, I probably would not notice minor expansion. The lower pair has 1 inch non roll braided elastic applied according to the method 2 instructions in the article. I have trimmed this elastic down from 1 and 1/2 inches to meet the instructions.
 
I wore the pants to work, where I bent, crouched, stretched, knelt, twisted and climbed in my normal activities (work is hard on clothes). The waistband was fairly comfortable, but not noticeably more so than the previous pair.I did not like the uncovered elastic against my skin. This method of waist finishing requires a tucked in camisole in my opinion, and it is too hot where I live to wear several layers of clothing.
I do not think this waistband finish could be worn as I have made it with a tucked in blouse. I may have too much stretch in the elastic, but to me these pants look gathered at the waist, even though there are no obvious gathers in the elastic application. To me they appear more bulky at the waist than my previous pair. My daughters told me they look like clown pants. Fortunately this is not apparent with a blouse over the top. They allowed me to leave the house wearing the pants.


The other thing I dislike about this waist finish is shown in the photo below.
 
This is not immediately apparent in the previous photographs, but the elastic does not lie flat against the body, it is turned out by the pants fabric, and I can see it when I look down. Yuck! I will be removing this elastic, and applying a woven selvage waistband finish. Next I will make another pair of these pants using method 1 "elastic as a stabilizer".
Posted by Picasa

Monday, 18 August 2008

Lining pants with an invisible zip

I am still keeping away from fitting, so have temporarily abandoned my plans to make a pair of work pants from the July BWOF, and returned to my only TNT pants pattern, Vogue 2925, from which I made 3 pairs of pants for the Timmel SWAP. I have destroyed one pair of these, and the remaining 2 are looking rather worn after 4-6 months of hard wear and wash, so I will not be looking too repetitive, despite using the same fabric!
To give myself some interest in making these, I decided to use the elastic waistband application described in the September 2008 Threads magazine. For the first pair, I thought I would try method 2, where the elastic acts as a contour waistband. Unfortunately I did not understand step 1, which first instructs you to attach the lining to the invisible zipper by placing right sides together.
I could not figure out how this would work, and the photograph did not make it any more clear, so I have already diverted from the instructions. My method for applying lining to pants which fasten with an invisible zipper has been worked out by trial and error, undoubtedly re-inventing the wheel, but for what it is worth, here it is.
First I construct the pants with the zipper, then construct the lining up to making the legs, without joining at the crotch seam. Then I put the right side of the lining against the inside of the zipper tape. To me, this is the wrong side of the pants. I then sew down the zipper tape, and turn the lining so that the wrong side of the lining is next to the wrong side of the pants. I do the same thing to the other lining leg and zipper tape.
 

Next I join the crotch seam of the lining. I sew this as close as possible to where the lining joins the zipper tape, and finish the stitching with a bar tack.
 

When the lining is turned in, this gives a neat finish to the inside of the zip, or it would do if I had pressed it before taking a photo - sorry, but I was running out of light.
 

I will post about the success or otherwise of the contour elastic waist after I wear it.
Posted by Picasa

Saturday, 19 January 2008

Pants, Vogue 2925


Here are my alterations to the pants from V2925.

I have just managed to post my first attempt at a storyboard, which has been cancelled by the failure of the stretch woven pants from V8305 to remain even semi fitted after 3 hours wear. Today I did not work on rescuing the V8035 pants with refitting and stay tape, because they were in the wash. This was just as well, because I was not at all inspired to attempt this sure- to- be- difficult project. Instead, I revisited the woven pants from V2925. That's right, a different sure- to-be - difficult project, these being the pants I sewed the wrong way multiple times last night, thus eventually ensuring that they would not fit by sewing drastically inside the seam allowance in several places. Everything looks better in the morning. This morning I could not believe I'd experienced any difficulty in sewing these pants. There could not be an easier pair of trousers to construct (elastic waistbands are not found on trousers, just pants). It did take me until 10am to work up the fortitude to unpick the sewn and overlocked seams. The fabric is a very loose weave linen/viscose/silk that looks a bit like soft, finer hessian bag and frays incredibly, so the unpicking was not entirely stress free, and I ended up losing some precious seam allowance. However, the pants fit. In fact the pants fit pretty well, even though they are more snug than originally planned. I have started a review of the pants on patternreview.com, but have not pressed the pants or taken any pictures, so it is still in draft mode.I worked very hard on the fit of these pants. I made 2 toiles. My final alterations were :
1. Redraw side seam for size 12 waist, size 16 hip
2. Add another dart at the back and widen dart at the front to fit from hip to waist.
3. Lower waistline by 2.5cm, front and back.
4. Slash at back centre seam to add about 5 cm to this seam without altering side seam.
5. Redraw crotch curve at back to deepen, as shown in Morzel's review of this pattern.
6. Add 1.5cm to inner front leg seam at crotch.
7. Add 2 cm to inner back leg seam at crotch.
8. Taper outside leg seam ( The straight leg would have been fine for wearing fitted or tucked in tops, but I want to wear these pants with a semi fitted blouse outside the waistband, and the quite wide leg made me look big(ger) all over)
9. Shorten legs a little. (I have short legs, and these pants are to wear to work with flats.
10. I also used an invisible zip at the back, rather than a regular zip.
I have taken some pictures to show these changes, but they are still on the camera.
After this hard work on the pants, I had great fun making knit shirts. I had a few metres of chocolate cotton lycra knit that I bought on ebay from Fabric Warehouse Sydney. I played with this with great success. I made the camisole/almost t shirt from V2925. It went together in about 30 minutes including cutting out and drawing the pattern on to interfacing. It looks great and took hardly any fabric, definitely not the 80cm it calls for on the back of the pattern. I made the size 12, which should have been a good fit from the high bust measurement and ease, but was actually a bit big. I have redrawn it to size 10 to try tomorrow. I will use this t for my SWAP, even though I am unlikely to wear it by itself for work. It will look good under the jacket if I can achieve one. I bought small amounts of gorgeous camel brown and a deep red knit from Kerryn's fabric World last week for this item. They were very pricey, but have washed really well and are lovely colours.
After this I escaped from the SWAP for a while. Yesterday I went to my local fabric shop to buy an invisible zip, and check out woven fabric for pants now that I have scrapped the camel and the chocolate stretch woven pants. There was nothing unless I want Navy Blue drill (school uniform fabric). There were a few possibilities for shirts, but shirt fabric is a fruitful area of my stash and does not need attention. To cut a long story short there is a 50% off sale on Simplicity. I could not resist and bought Simplicity 3800 in order to try a twist top. This was fun and easy. Again, the 12 was too big, but I can wear it with a camisole underneath if it ever cools down enough. I will make this again tomorrow in a 10 if there is sufficient chocolate knit left. This is my only knit fabric other than some terrible, cheap looking white and blue interlock that my mother gave me because her quilt group couldn't use it. I must learn to throw out these fabrics as soon as she finishes her visit. Once it is in my cupboard I seem to be incapable putting fabric in the bin. At least I am using lots of rubbish fabric for all these toiles.