Showing posts with label Travel Wardrobe. Show all posts

Thursday, 14 June 2018

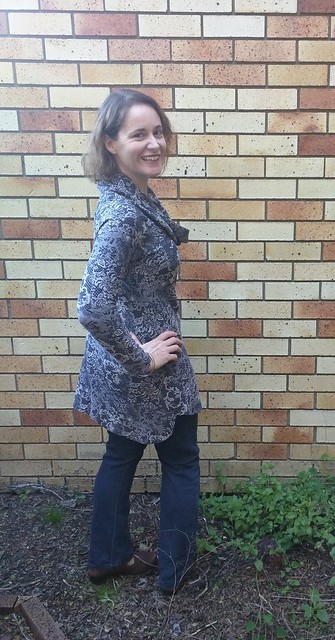
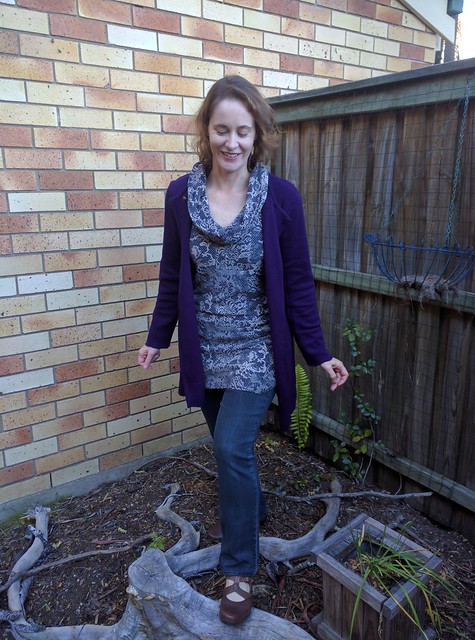
Long cardigan Ottobre and Vogue knit tunic top

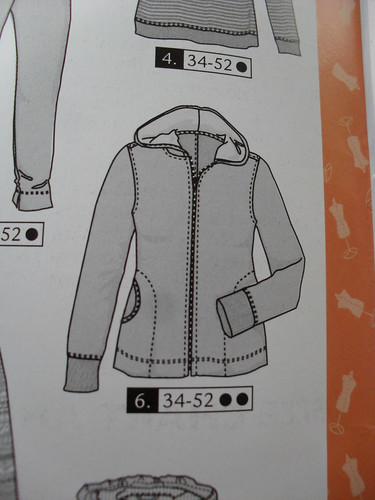
I have a long nylon/merino hoodie that I wear frequently around the house,during cooler weather, so when I was working on the winter travel wardrobe, I thought a smarter version of this would be a good idea for layering.

2017-07-29 07.46.44


SAM_1713


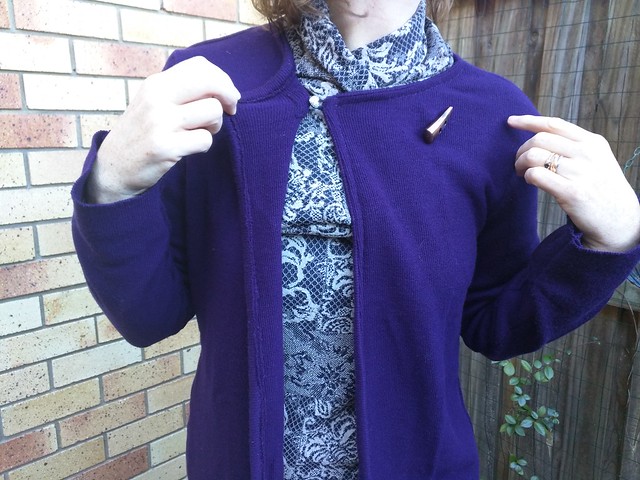
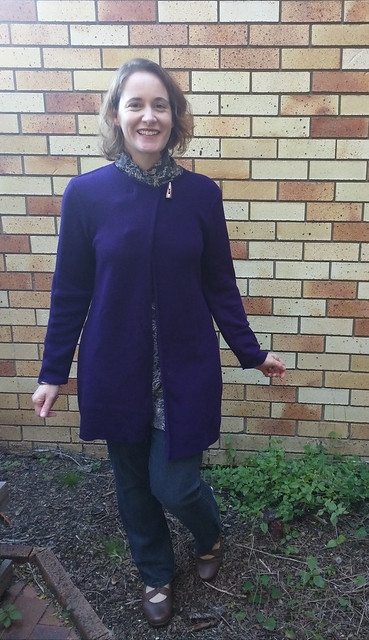
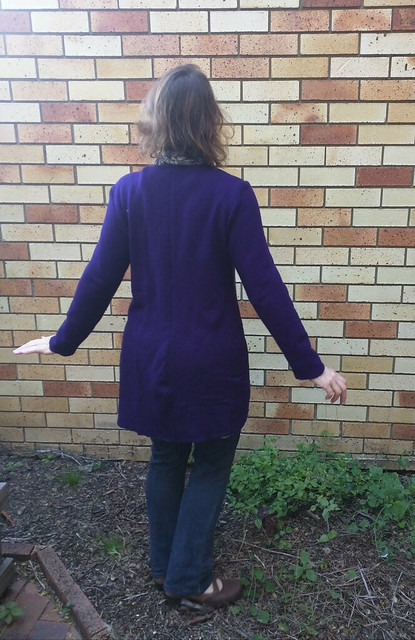
The pattern is Ottobre 05-2011-06, previously made here, but as you can see, this time I made it without a hood, for fabric saving and luggage saving reasons, and self bound and overlapped the neckline, wth an attempt to make the cardigan a little less sporty. The fabric is a wool ribbing, from Fabric.com, purchased quite some time ago, and is quite stretchy. I added about 5cm to each centre front with the idea of an overlap fastening, and due to the stretch this overlap is considerable. 
 2017-07-29 07.46.28
I prefered to fasten it only at the top (inside and out), and am pleased with the brooch effect of the inner button when the cardigan is worn open (silver button) or closed (bronze fastening)

2017-07-29 07.45.49

I particularly like the opportunites for fitting given by using a centre back seam in this type of pattern.

2017-07-29 07.45.43
Although I was reasonably pleased with the effect of turning in the centre front edges to finish them, this finish is quite bulky. Much against my sewing instincts, I chose to leave the hem and sleeve hem edges raw. They have held up surprisingly well and do not appear to ravel at all.

2017-07-29 07.59.54

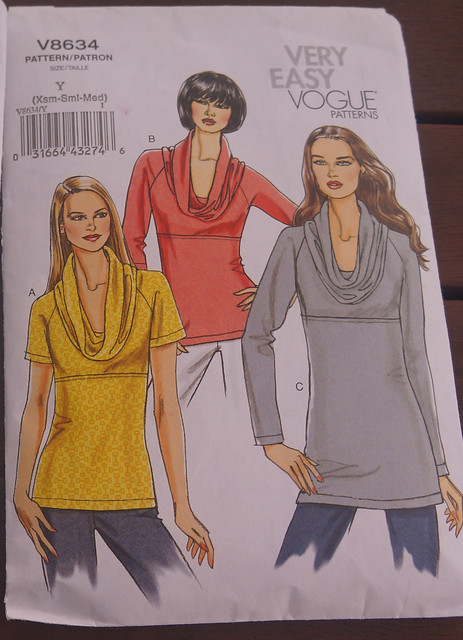
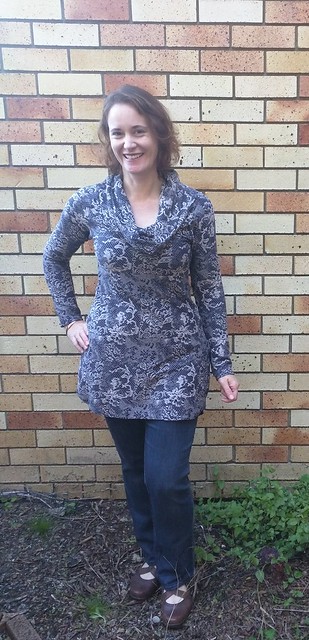
Underneath is a lengthened version of one of my favourite cowl neck t shirts, Vogue 8634. 
DSC01834
The fabric is a truly gorgeous heavy weight rayon knit from Knitwit, and I was extremely happy with this tunic - until a very kind person did some washing for me and managed to shrink it considerably. My older daughter was a grateful recipient of this worn-once tunic , and fortunately I was able to purchase more of the fabric, but alas, it is still in the flat fold stage. As you might have noticed, I used remanants from the original piece of this fabric for the insert in the Wren dress I posted about yesterday, and I am being very careful not to leave the dress anwhere where someone else is likely to put it in the washing machine for me!

2017-07-29 08.00.25

Sunday, 29 November 2015

Minimalist cycle touring travel wardrobe

The main problem with having a very interesting life with multiple hobbies is that they often compete. In my blogging absence, I have been trying to learn some French, and doing a lot of cycling, and have recently returned from cycling right across France with my husband and son, carrying all our camping gear etc. We cycled about 2000km, which I am still having trouble believing, then spent 4 days in Paris being proper tourists.
DSC05758

This was an amazing adventure, and has unsurprisingly cut into my sewing for the past 6 months or so, even though we were only away for 6 weeks. The preparation was a tad intense, and the recovery phase equally busy !Work will not just go away whilst I am on holidays, darn it.

So, you will want to see sewing. There was sewing, I promise, it just didn't make it to the blog. In fact I was almost about to leap into writing about my current project (a fancy dress, because you know I love to sew a fancy dress), when I was struck by a sense of blogger duty.

Its been such a long time since I wrote anything about sewing.This is a just-dipping-the-toe-in post about the minimalist, suitable- for- cycling- all- day- and- drying- overnight- whilst- hung- up- in- the- tent, yet co-ordinated wardrobe that I partly sewed myself for the cycling holiday, but as I forgot  was a little too preoccupied to take photographs before I left, you will have to make do with  mostly vacation/expedition shots. The clothes are pretty much worn out now. They were washed an awful lot, being worn in constant rotation.

You will see from the photos that I really didn't want to ride around France in lycra, but it is there underneath!.
To keep the sewing simple, I mostly used patterns with which I was already familiar

2015-09-27 18.08.00
1. Shirt dress, heavily adapted from Burda Style 02-2009-120  (pattern first made up here)
mid/base layer
Liberty Tana Lawn, with contrast linen collar stand, plackets etc. 2015-09-21 12.07.28

 I used french seams or felled seams for robustness, and also used Claudine's button instructions with Gutterman polyester thread. This method of attaching buttons I found to be less robust in 6 weeks of wear and wash second-daily, than a nice strong but admittedly sticking out knot, undoubtedly due to my poor stitching technique, but I had to reattch buttons on this garment whilst travelling, which I did not need to do with my other garments (alternative button attachment technique with Gutterman), or my son's shirt (hand made), which I had attached using Claudine's instructions with stranded cotton embroidery thread.. I also had to reattach buttons to my husband's purchased clothing.

Additions - internal passport pocket
Waist elastic gathering on either side at the front, and in the centre back because its not really comfortable to wear a belt on the bike.

2015-09-20 20.41.24
 2. mid/top layer Merino cardigan, Burda Style 03-2012-122 previously made,  described here. I don't have a great photo of this whilst on the trip, but I wore it nearly every day, in the evenings. I made this last  year.


2015-09-01 10.38.30
3. Long sleeved tunic blouse, Burda Style 2-2009-120 again. I told you I was making my life easy with familiar patterns!  The fabric was a slightly translucent silk/cotton batiste, white on blue print ,I wore any of my 3 base layer tanks under this shirt. The coolest was a rayon knit tank (base layer 1) originally sewn several years ago to wear under a long sleeved lace t shirt.

DSC05714
4. base layer 2 Merino princess t with cut on cap sleeve McCalls 5890 (fabric blotched dyed itself in the washing maching, but the overall effect was pleasing to me). I hand stitched the princess seams and hand stitched the neckline and armscyes with a nod to Alabama Chanin techniques, in a toning embroidery thread, because I was hating the bare bones nature of this wardrobe. The embroidery helped a lot. Feeble, really, being so attached to embellishment and prettiness in clothing....
I wore this as both a stand alone top, and as an underlayer garment. I made this garment longer at the back for additional coverage whilst cycling.

5. base layer 3 Merino vogue sleeveless t, pink, Vogue 2925 made about 10 times so far. Review here
Hemmed with embroidery floss, toning colour
(Embellished with running stitch seam emphasis, DMC cotton
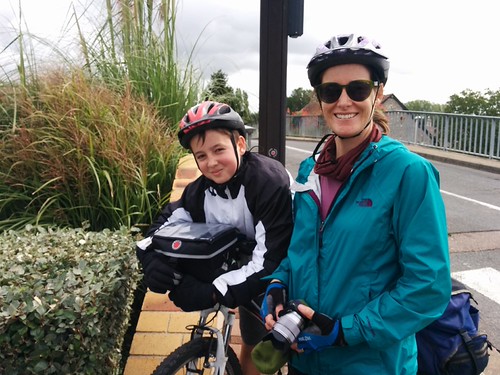
You can see this in the neckline of the cardigan photo and also in the one below, under my rainjacket. I wore this mainly as an undergarment, but this was also cut longer at the back to allow for the cycling position.
2015-09-17 12.11.01
6. Merino buff, copied from RTW. This was an incredibly useful item, and took up hardly any room. I found it added considerably to my warmth, and from about the second week of the holiday was cursing myself for not making 2 or 3 (it was very cold at night whilst camping!)
Edited to add: I've been asked to identify a "buff". I  did not use a pattern, but here is a very nice tutorial and some photographs by Melissa at Fehr trade, where she also describes the many uses of a buff.

7. Long sleeved merino t - made a few years ago. I used an older Burda pattern, and this was worn mainly as a pyjama top

Accessories:. Silk scarf A , blue, cream, pink, (not really sewing, but once upon a time it was raw edged fabric lurking in my collection.....Silk scarf B blue, dark brown, cream and an old, squashable sunhat which I intended to replace in France, but did not see a suitable subject. This was possibly because clothes shopping was extremely low on my husband's agenda- unless the clothing could be bought in a cycling shop.....
Not pictured:
Rayon knit "denim" leggings - I sewed these a few years ago, they're very useful for camping, both as pyjamas and as an underlayer for warmth.
Skirt/petticoat - silk cotton, purple, 2 layers, originally the skirt of this dress here. I loved this dress so much that I have to get every possible skerrick of wear from it. It makes a terrific petticoat skirt.
underthings
Not sewn :
-1 pair short cycling knicks,which I wore under the dress and skirts. Later on, as the weather cooled down, I looked for a long pair, but was not able to find these, so bought running tights instead, which I wore over the top of the knicks to keep my legs warm whilst cycling.
- 1 pair stretch woven cycling capris with under-knicks
-cycling gloves,
DSC05854
-1 metallicus A line grey knit skirt - merino/rayon blend
-1 rainjacket, blue/green
-socks
DSC05969
Purchased on route (planned purchases, as we started in warm weather and cycled through to cool weather).
 -1 thin, warm pullover, coral (very hard to find, and rather $$$, I should have taken one and carried it for 3 weeks without wearing it)
-1 new scarf to blend the coral jumper with my black capris and grey skirt and blue cardigan (yes, I needed the jumper and the cardigan at the same time)
-1 hideously ugly polar fleece beanie for 2 euros from the supermarket. - this was very painful as another buff would have prevented the purchase and been much more flattering.

 I sewed a very luxurious sand washed silk charmeuse double sleeping bag liner too :)

I also sewed a shirt, a buff, a merino long sleeved t shirt and some cycling knicks for my son.He took a previously made polar fleece jacket, now four and 1/2 years old, which I threw out at the end of the trip despite his vehemenent protests that it still fit (a lie!). I tried to steal his buff after a week or so as I hadn't seen him wearing it but he said it was extremely warm at night, so no chance Mum!

DSC05932
I had an exciting adventure holiday, but currently, I am greatly appreciating my extensive wardrobe, fabric collection and comfortable bed.
So in summary, I started with these clothes, which looked much  more respectable before the trip.

DSC06030
 3 base layer tops - tanks
2 base layer bottoms, 1 batiste skirt/petticoat, 1 leggings
3 light mid layer tops - 1 blouse batiste, 1 long sleeved merino t-shirt, 1 shirt dress lawn
1 medium layer top - merino long cardigan (missing in action)
3 bottoms - 1 pr capris, one wool skirt, one batiste skirt
1 outerlayer rainjacket
2 scarves, 1 buff , 1 sunhat
(cycling gloves and helmet)

When the weather cooled further
DSC06032
 I added a mid layer top (coral  pullover)
another pair of leggings
another scarf, and a warm hat. These new items did not co-ordinate with everything, but with enough of the travel wardrobe to make them useful purchases.
DSC06033
My entire wardrobe fit in this bag (up to the "stop" section), a bag only slightly larger in height and width to an A4 sheet of paper, and weighed less than 3kg, provided I was clad at the time. I admit that although this is a compressable bag, closing it was not terribly easy on a hot day, when I just wore a tank top and capris, but for most of the trip, I wore 2 to 4 layers, especially when we were not actually cycling.


So now that I am almost caught up, perhaps I will do some sewing.

P.S. I am such a rebel, in Paris, I forsook husband and son whom were visiting the Eiffel tower and went to the fabric district in Montmarte. I have never seen so many people in a fabric shop at once before.Surely that is a more culturally valuable experience than a second visit to a tourist icon?
Friday, 27 January 2012

Travel clothes 3. South Island New Zealand

SAM_0687
Hooker Lake Walk, Mt Cook National Park
The rest of the family needed some additions to their travel wardrobes too.
SDC10058
Leggings BurdaStyle 01-2011-130, made from a rayon/lycra knit from Gorgeous Fabrics. This was sold as suitable for jeggings (which I think are psuedo super stretchy leggings with jeans type embroidery, being an interesting denim look fabric, but unfortunately was far too thin for this use. It worked nicely as leggings for travel, drying quickly, but the fabric was a bit too fragile for New Zealand scrub, and became rather full of snags and pulls after a week of hiking. I squeezed 3 pairs from 3 yards, so was rather pleased with the economy of the cutting out.
SDC10057
2 poly wicking t shirts adapted from BWOF 09-2008-143( I have to use up that polywicking stuff in the stash somehow) and polar fleece trousers adapted from BWOF1-2009-143 pyjama trousers. I used wicking poly knit for the trouser waistband and cuffs, which dried very quickly, particularly important for the cuffs which were subject to puddle abuse and creek crossings.
I did not think my son would really need polar fleece trousers, but my husband convinced me, and he was right. It snowed, quite unseasonably, in Milford Sound whilst we were there,which was very exciting, as my son had never seen snow before.
DSCF3790(yes, I know, hardly any snow at all, but we live in the subtropics)

I also made a poly wicking turtlenecks from BurdaStyle 09-2010-121 for my daughter.

This pattern had looked so hideous on me that I threw out the tracings, but my older daughter traced it out again for herself, and it suited her very nicely, and was very quick to sew. My younger daughter, who has a more similar figure to mine, found the turtleneck equally unflattering, and wore a previously made one from a Kwik Sew pattern. I have no photographs of the turtlenecks as they were worn under coats and jackets.
Lucky last, in fact, so last that I sewed the button on in the car on the way to the airport were a pair of seersucker cotton shorts for my older daughter.

BWOF 07-2009-113
SAM_0699
I suspect that these are more suitable to the subtropics than New Zealand, but again they dried quickly, and were worn with the leggings for the warmer days.

Thursday, 26 January 2012

Travel Wardrobe. South Island New Zealand. Trousers BWOF 04-2009-118, t shirts

A particularly annoying thing about outdoorsy techical clothes is their incredible ugliness and unflattering nature for non-20-year-old-ectomorph figures.
I find this particularly notable in the trouser selection, my figure being trouser resistant. Shorts are worse.
Despite these feelings, I made a pair of trousers that convert to shorts for my travel wardrobe. The fabric is not-quite-thick-enough wicking woven nylon from The Rainshed. Sometimes practicality trumps feeling nicely dressed, and although we did no overnight hiking on this trip, there will be future trips where convertible clothing will save me pack room.
Fortunately I do have a TNT trouser pattern.This fits sufficiently for my trouser tolerance.
I converted my adjusted BWOF 04-209-118 trouser pattern to a convertible shorts/trousers pattern in the following way.
1. Lengthened the legs by 10 cm in the general region of the knee.
2. Constructed the trousers to hemming stage, then stood in front of the mirror with a roll of masking tape applying horizontal lines at possible shorts cut off lengths until I had a only slightly disgruntled happy compromise between no-zips-at-knee-creases and covering-sufficient-leg.
3. Added hem/cuff allowance to thigh end of this line (7cm-which was not quite enough as it turned out), and cut off the lower leg, marking the front of each lower leg with a pin
4. Discovered that the leg circumference was longer than any light coloured pairs of separating zips in my stash other than chunky zips.
5. Applied chunky zips to one leg, then folded down a cuff to cover the zip. (This is why the 7cm cuff allowance(+3 cm for the zip seams) was insufficient), as my cuff needed to be deeper than the 6cm I had erroneously allowed to cover the zip sufficiently, next time I would increase by 15cm rather than 10.
6.Discovered that chunky zips are too bulky and stiff for such an application and are also rather uncomfortable under the back of the thigh when sitting.
7.Removed chunky zip.
8. With reluctance, bought 2 overpriced Sullivan junky, thin separating zips from Lincraft,due to time constraints, still at less than the circumference of the leg due to the limited usefulness of Lincraft.
9. Reapplied zips, thigh end with wrong side of zip to right side of fabric, lower leg side with right side of zip to wrong side of fabric, gap at outer side seam.
10. Added button tab to cover gap.
SAM_0707
11.Hemmed ankle end of trousers.
This covers the shorts conversion.
SAM_0706
My other additions were to fold gussets into the back pocket vertically and horizontally, to give more storage room. I had to tack down the gussets where they crossed to avoid a very unflattering protusion when the pocket was empty.
SAM_0708
I added an internal waistline pocket.
I wore these as trousers several times in New Zealand, with leggings and stockings underneath.(The weather was not entirely wonderful at all points of our trip).
DSCF4064
Very windy walk to Rob Roy Glacier, near Wanaka
SDC10211
Gerturde Saddle walk, Fjordland National Park
I wore them as shorts only when staying at a backpackers' lodge at Milford Sound for trips to the showers - it is unpleasant to have trouser legs contact a wet floor whilst dressing.
The t-shirts I made for the trip co-ordinate with both the bone trousers and the burgandy skirt.
SDC10060
The pattern is an adaptation of the two layer t shirt in Burda Style 08-2010.
The dark purple/brown t shirt is a rayon knit, with a dark brown voile bias strip gathered and stitched with zig-zag to the neckline.
The print is from scraps of silk jersey left over from a wrap dress I used for my 2010 trip, with the neckline bound with fold over lingerie elastic.
I used these knit fabrics after my good experience with them as quick dry fabrics for a previous travel wardrobe. I find the wicking knit quick dry polyesters no faster to dry, less pleasant to wear, and prone to nasty smells if they are even slightly damp when packed, whereas the silk and rayon (and merino) do not seem to become musty in the same way.

Wednesday, 25 January 2012

Travel Wardrobe Part 1. South Island, New Zealand. Burda Style 10-2011-129 skirt

The other task that interrupted the blogging was a review of my travel clothes for a family holiday. For this type of holiday, the clothing needs to be quick drying, hardy, provide for outdoor activity in all weathers, and take up very little space. I find packing requires considerable thought. Unfortunately, the skirt and 2 pairs of trousers I made for a 3 week trip in 2010 have mysteriously shrunk in certain regions since I stopped the unsustainable 10 hours per week cycling I was doing at the time ( this unusual activity was in preparation for a cycling trip), so I had a very good excuse for some new travel clothes.
Here is the result of hours of vacillating considered selection for a 10 day trip to the South Island of New Zealand, where we spent most of our time walking in National Parks.
SDC10059
Two t-shirts, one pair of shorts/trousers,one skirt and the leggings are new additions. The shirt dress, lace two layer t shirt and raincoat have been displayed previously on the blog. The polar fleece jacket and the sun hat are old purchases (hmm, I think the polar fleece jacket is older than DD the second), and the wardrobe also inluded purchased tights, 3 pairs socks and smalls, and a hand knitted woollen hat. It fit in my day pack carry-on if I wore the jacket and raincoat, which is not really possible when leaving from 38 degrees C and 90% humidity, but is a nice idea in theory.
I forgot my woollen gloves, but fortunately it is very easy to buy warm gloves in New Zealand.
Skirt Burda Style 10-2011-129
Skirts being more forgiving than trousers, I was just considering the wearability of my slightly too snug dark brown A-line woven quick dry nylon skirt when Mary Nanna posted a fabulous A-line skirt in corduroy, saving me from searching through my Burdas for a suitable skirt pattern (procrastination blog reading is an important part of any sewing rush job). Aside from the other charms of this skirt, the pockets struck me as particularly useful for a travel/walking garment. I used woven nylon wicking fabric from the Rainshed, purchased 2010,which is a fabric used by outdoorsy shops for their travel clothes, found after much real life and on-line hunting, and not in the colours I particularly wanted. After seeing Mary Nanna's silk duponi version I am thinking a silk version would possibly have been more glamorous and equally practical, as the fabric cannot be tumble dried, although it hardly needs it, as the skirt washed by hand, wrung in a towel, dries fully between 10pm and 6am when hung up over the sink.
SDC10045
Unfortunately for me, the particularly charming buttons I placed on the pockets, per Burda, provided unecessary visual width at the hips. Having unfilled scraggy buttonholes looks better, I assure you.
SDC10043
Instead of lining the skirt, I made a voile petticoat, with elastic waist and button loop waist closure, using the skirt pattern pieces. It is easy to dry two layers if you can separate them. I used a blind stitch to make a scallop hem on the petticoat.

My concession to the walking aspect of this skirt was to add an invisible zip to the bottom of the sideseam.
SDC10044 I took this idea from a RTW outdoorsy skirt, and it worked very nicely, allowing me to leave the skirt as a fully covering garment when worn in tourist places,
SDC10080
Garden, Otago Peninsula
and to scramble up rocks (worn with leggings underneath) in less groomed locations.
DSCF3819
Greenstone track, Fjordland National Park, and there is a skirt under the several outer layers.
My other concessions to the drying requirements for travel were to use hemp for the waistband lining (resists mould and bacteria) and to finish the hems with the overlocker and a single rather than double turn.
SAM_0695
Elephant rocks near Duntroon