Thursday, 31 July 2008

Quick and easy projects

  I have been really busy at work this week, and more inclined to go to bed with a good book than to stay up in my drafty Queenslander house (designed for hot weather) to sew during a winter evening. It is funny that this did not stop me from sittin up to watch the Tour de France! It was a really exciting Tour to watch. I have made myself a long, warm polar fleece robe from my trusty New Look pattern, so maybe this will help with future evenings.
Whilst I was watching tele, I also finished my son's socks and started a new pair, with cables. The new pair will be for one of my daughters, although I am thinking they should start knitting their own socks.
 
Posted by Picasa

Saturday, 26 July 2008

Green Pepper F762 Men's Bicycle Racing Jersey


It has been unusually cold in Queensland this winter, and my husband asked me to make him a polar fleece cycling jersey. I was somewhat taken aback by this request, as the last time he wore polar fleece whilst cycling was when we rode mountain bikes on the snowmobile trails in Michigan, and well, there was snow, not mere 0 degrees C mornings, but I suppose he has acclimatised!
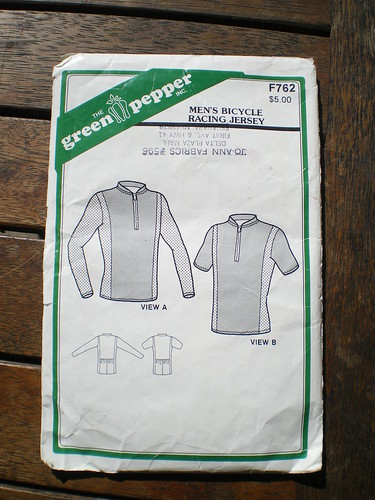
I used the Green Pepper pattern F762 "Men's bicycle racing jersey". This pattern has some history to it. I bought this pattern around 13 years ago to make a standard cycling jersey, at my husband's request, as cycling jerseys were, at the time, exhorbitantly priced, costing several hundred dollars in Australia during the mid 90's. Cycling was a much less popular sport here a decade ago. The cycling tops available in the USA were mostly much too loose, as my DH is a thin person for his height.

The pattern states " This pattern is suitable for use with nylon/spandex fabrics only". In obedience to this decree, I purchased black and lurid green nylon lycra, and made a jersey for DH. He was very pleased with it, especially as it was mostly black (with lurid green at the back for visibility to motor vehicles), as at the time, he felt the commercially available fleuro cycling jerseys available were not only expensive, but unmanly and unAustralian colours, as they were mostly imported from Europe, where manly colours do not seem to be restricted to black, brown and navy blue. He wore the jersey several times during Autumn in Michigan, then for the first time in Australia during the cycling leg of the Noosa triathalon whilst we were on a visit back to my parents. As he was cycling on a 37 degrees C day, wearing black, non- wicking fabric, he overheated and became very dehydrated despite drinking huge volumes, and achieved his worst time over this distance ever. I was demoted from cycling jersey manufacturing, and he bought a lurid fleuro jersey made from technical wicking fabric. I kept very quiet about this.

I have used the pattern since, for my husband, to make sun protective tops for fishing and kayaking. I make 2 sizes larger for these sports, as cycling jerseys are worn skin - tight, which is not my husband's normal style.
I have also used this pattern as a reference to modify a Burda turtleneck pattern to make sun protective tops for myself and my children, so it has been very useful. However, due to my demotion over a decade ago, it has not been used for its original purpose until now, which is a bit silly really, as I now have access to technical wicking fabric.

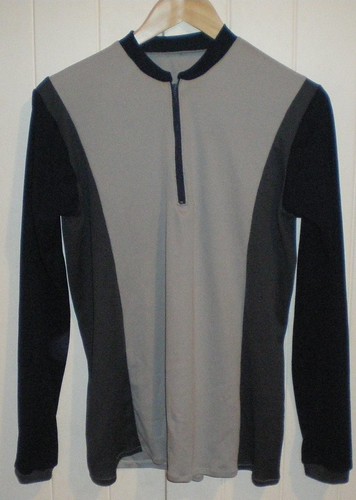
On revisiting this pattern, and comparing it to current ready to wear jerseys, I made a few changes to the pattern. The pattern has a straight hem, and is the same length back and front. As cyclists are leaning forward, the back needs to be longer than the front, so I have added length to the back, and to the back of the side piece as shown.


The idea of wearing a polar fleece jersey is to stay warm, particularly on cold, windy mornings. I have added a polar fleece placket underneath the zipper so that the wind does not hit the chest through the zipper teeth. This is attached with a snap at the neck. I have left it loose at the bottom, as I thought it might be restrictive when bent over the bike. I can add another one here if my husband finds it could do with one.
 

The back pockets on the pattern extend down to the back hem. They are much deeper than RTW pockets, and items are difficult to extract from the base of the pocket, not ideal whilst you are cycling along. I made the pockets more shallow, and they no longer reach to the hem, requiring slightly different application.
 

The pattern has a zig zag hem. The ready to wear jerseys usually have elastic in the hem. I have bound the hem, sleeve hems and placket with brown nlyon lycra, stretching as I applied it. This gives a little elasticity to the hem, but if it is not enough to prevent the jersey riding up during wear, I will add elastic to the hem.
As you have probably gathered, this is a trial version of the garment. If it works, I will make another one in good quality polartech 100, or the weather may warm up, and I will be off the hook!
Posted by Picasa

Sunday, 20 July 2008

Jeans, to make or not

Had you asked me a few years ago, I would have told you that making kids' jeans was not a good use of my sewing time. After all, children's jeans are relatively inexpensive,readily available, and sewing time is precious. However, my son has changed my mind. Below are his RTW jeans. I bought these on sale at the end of last winter, probably at BigW, but possibly at Target. They did not cost much, but the only jeans available, were "distressed". This may be highly fashionable, but it does not make for long lasting jeans. My son has been wearing these with increasing frequency since the weather cooled in early May, just over 2 months ago. He had not worn them previously. You can see that 2 of these pre distressed jeans have rapidly disintegrated due to the normal wearing activity of a 5 year old. Why do manufacturers think that small boys need assistance in wearing out their jeans? I thought that my somewhat stingy habit of buying left over clothes at the end of winter might be the reason for the lack of "new" jeans. I looked here, I looked there, even if I pay $38.95 for size 4 Pumpkin Patch denim jeans, they are "distressed", frayed seams, faded patches, the lot! I do not understand fashion.
 

I do not have a boys jeans pattern. I thought I would try Jalie 968, which starts at a size 2, given that small girls and small boys are much the same shape, and that despite the pattern description,these are a standard, straight leg jean. My son measures size G (3) in circumference and size H (4) in leg length. I made him a size H (4) as there is not a lot of ease in the pattern. I was very interested to see how these jeans work at the extreme of the size range. It impresses me that Jalie can include so many sizes in one pattern.
 
I am pretty pleased with the fit. These jeans do not have an elastic back waist, like most of the small person RTW jeans, and are a more narrow style, but I think they look quite good. If I make another pair, I will give him wider legs, but this is a style preference, not a problem with the pattern. I used velcro instead of a button, as the denim is very heavy, and velcro is easier for a small person to manage.
 
I used the left over belt loop as a carpenter loop over the outside leg seam. I want these to look like boy jeans.
 
The lizard appliques were a special request from my son. It was his idea to have them peeping out of the pocket. The fabric is a remnant from his favourite shirt of last year.
Posted by Picasa

Saturday, 19 July 2008

Works in Progress or the impact of the Tour de France on my sewing

 
I was hoping to have some sewing finished by today to post about, but the only thing I have finished this week is this pair of socks.
 
I have been sitting in front of the television, watching the Tour de France, as my husband is very keen on cycling. I started another pair of socks, for my son.
 
I was intruiged by the latest Smocking and Embroidery magazine, which includes smocking on velour, which I had not yet attempted, so I did a bit of this. You can see that I am not sticking to anything this week.
 
It is possible that the Tour de France is not entirely to blame for my lack of sewing. The pile of denim does not look much like 2 pairs of jeans. It is a rather discouraging pile. I have been whinging at Stitcher's Guild about my fruitless search for a size 90 or 100 twin topstitching needle as I have been fighting with a useless size 80, and the thread breaks every few cm despite strict attention to tension and stitch length. The lovely and generous Robin of a little sewing on the side tells me that a real jeans twin needle is winging its way towards me. After 3 or so hours of driving on Wednesday, with thoughts of finding this needle (actually there was an orthodontist appointment in the local metropolis, but that spoils the story), foiled by Spotlight,who claim such a needle does not exist, I am even more fond of Stitcher's Guild! Thanks Robin.
Posted by Picasa

Saturday, 12 July 2008

Tail and Mane Construction

Tails and manes are easy to make for costumes and dress ups, and can be quite effective.
I have added this tail type to the back centre seam of trousers, to velcro closing belts, but most frequently to all in one toddler pyjamas, Kwik Sew 1823. This particular type of tail is good for cows, leopards, lions and other cats, giraffes and donkeys.I usually use polar fleece remnants, but have also used cotton fleece, cotton lycra and other knit fabrics on occasion.
For the tail, cut a wedge shaped strip to the desired length. The narrow part should be at least 7.5cm (3 inches) wide, and the wide part around 12 cm wide (5 inches). I like the tail to the lower thigh for very small people who still crawl on occasion, but to mid calf or the ankles for older children so that they can see the tail if they whirl around.
Cut 3 to 5 strips of knit fabric, around 10cm long (4 inches)and 5 to 7 cm wide (2-3 inches. I find the tails most appealing if several colours of fabric are used. Slash each strip lengthwise to within a few cm (around 1 inch) of the top. Lay these pieces on the wrong side of the tail wedge piece, at the fat end of the wedge, and stitch across, using a zig zag stitch, and a heavy stretch needle. I find that the tails are frequently pulled during wear, so stitch 4 or 5 times for reinforcement.

Fold the wedge over, right sides together, and stitch down the long side to 2.5 cm (1 inch) past the stitching line holding the slashed fabric strips. I use a wide seam allowance of at least 2 cm, so that the body of the tail has a little bulk without needing to be stuffed with additional material.


Pull the strips of fabric through the tube made by the upper part of the tail, attach upper end of tail to a belt, pants, or a slit cut in the centre back of the pyjamas at a tail appropriate level.


I have made several manes for various pyjama costumes. My favourite is the lion mane.

This is made by attaching slashed strips of polar fleece to a hood with ears. The first strip is 25cm wide , and slashed from both long edges to within 5 cm of the center. This strip was stitched down the center, right side to hood, then the strip close to the face opening was turned back over the seam.
Subsequent layers were single. Each remnant was trimmed into a rectangle, and slashed from one end. The opposite end was sewn,to the hood, right side down, so that when turned right side out, the slashed strips were lifted up slightly over the seam, giving the mane body.

Other manes include the giraffe mane, which was a long strip slashed from each side towards the center. These slashes were short and further apart. The strip was placed right side down on the hood and stitched down the centre. The mane was then folded wrong sides together, and stitched together 1cm away from the seam so that the mane would stick up a little in a giraffe like manner.

The horse mane was the first one I developed. This one is made from a strip about 50cm wide, slashed from each side to within 2 cm of the center, then simply stitched right side down to the hood. The mane is then swept to one side to give the effect of hair.
Here is my son's costume hood collection.

Friday, 11 July 2008

Giraffe Pyjamas

 
This suit was commissioned by my son. I have no idea where he got the idea for a giraffe suit, but it has been a bit of a technical challenge, in fact I made the pyjamas last year, but gave up on the hood after making giraffe horns as I had not much idea of how to proceed. This year I had more fortitude, after my husband bought some light fittings that just happened to come packaged with a bowl like styrofoam shape, and a 10 or so cm long styrofoam cylinder. The giraffe neck is built around the bowl sitting on top of the child's head, and the cylinder sitting on top of that. The remaining head and neck are firmly stuffed with polar fleece scraps.
 
The giraffe has a short mane down the neck. To make this stand up a little, I have stitched the two rows of mane together around 1cm from where it joins the head and neck on the outside.

I think this is my last hurrah with this pattern. I am planning to post construction details for the tail and for my neck changes, so I will be able to remember how to do it in a few years.
Posted by Picasa

Wednesday, 9 July 2008

More pyjamas with tails

 
I have been using Kwik Sew 1283 again to make fun pyjamas for my son, my nephew, my son's best friend and for 2 of my nieces. Everyone has a new leopard suit, and my son also has a lion suit with matching mane hood. The lion suit is my favourite at the moment. I am really pleased with how the hood turned out. I used Green Pepper Oregon jacket 150 hood as the starting point, then added ears. I sewed long strips of polar fleece across the hood, right side to hood, so that the cut strips were towards the face. When the strips are turned back on themselves so that the right side is to the outside, the mane has some body and stands up a bit. I used lots of skerrick remnants, and think the mix of fabrics looks very effective. I have also sewn a mane trim to the neck of the pyjamas, so that when worn to bed, there is still a lion effect. The suit also has a tail and claws for added fearsomeness.
 
The leopard suits are not quite so interesting. I have simply added a tail to each suit. My youngest niece has a pink version, just for a change.
 
Posted by Picasa

Monday, 7 July 2008

June Capsule, Vogue 8305 top and scarf

Elizabeth (ejvc) of Stitcher's Guild fame has put up the website for the June Capsule contest , and I am so slow, that I have not yet posted about the other 2 items in my entry. I promise this is the last gasp about my June Capsule. This top is Vogue 8305, made with a fabulously cosy wool jersey knit from Gorgeous Fabrics. It is slubby on the outside, and has a very soft hand. For the top, I have lowered the neck slightly, and made some fitting changes, including eliminating the back zip. I have reviewed this top at patternreview, when I made a rayon jersey version.
I am really pleased with my accessory, I originally made this wrap/scarf to wear with a silk jersey dress that I made in May, and was very pleased to find that it co-ordinated with my capsule fabrics. I had 3 balls of "velvet ribbon" yarn that I bought because I loved the texture and colour. I have lightened the colour of this photograph in the hope that you can see the texture, the real shade is a deep purplish burgundy that I think looks good with the more red tones of the knit tops, and perfectly matches one of the colours in the wrap top. I used 12mm needles and cast on around 40 stitches, and knit in garter stitch until I ran out of yarn. This scarf is light and warm to wear and very soft. My daughters keep stealing it.
My photographer was also acting as my stylist. She really likes this shot, and kindly lent me her glasses! Apologies to 60's style icons.

Sunday, 6 July 2008

June Capsule, Vogue 8379 wrap top

 
the wrap top I made for the June Capsule is morphed from the popular very easy vogue wrap dress pattern 8379. I have previously made 2 versions of the dress, and find them comfortable and flattering to wear. I love the bargello print from Fashionista Fabrics, and had considered making a dress from this fabric, but felt that horizontal stripes should be restricted to my upper half. (also I had used some of the fabric for a jalie sweetheart top). I did not work very hard on the dress pattern to turn it into this top. I had already fitted the bodice with a FBA and widening the sleeve, and have posted about this earlier. This time, I again used view B, without the collar, and lengthening the arms, this time to the wrist, and eliminated the cuff. I lengthened and widened the ties. For the lower part of the bodice, I initially cut out the skirt to the lengthen lines, with a stripe placed at the hem, but this was not successful, being too long and sticking out at the sides. I shortened the "skirt", straightened the side seams, and fiddled about until I had a length I liked. This was much shorter than I initially expected.
In the upper bodice, I did not cut out the fronts on the bias, because I wanted the stripes to remain horizontal. I was a bit worried that this would affect the fit or drape, but it seems to me to have made no difference. I finished the neckline and fronts by turning the fabric once over 3mm swimwear elastic, which I stretched slightly, as this bargello lace type knit has less stretch than the fabrics I have used previously to make this pattern.
Posted by Picasa

Thursday, 3 July 2008

Vogue 8426 skirt, June Capsule

 
The denim skirt from Vogue 8426 has been on my to do list since I made a brown wool flannel version for my SWAP. I made view c for the SWAP, which has 5 back pleats, and finishes at the upper calf - usually a terrible length for me, but it seems to work in this shape skirt, it is a bit of trumpet shape. I have worn this wool skirt frequently, and always feel good in it. I want the denim version to do the same thing, but for my more casual wardrobe needs. This time I have made view A, which is knee length, and has one back pleat. The fabric I have used is a very heavy cotton denim with no stretch. It is made in Australia (amazing!)and I purchased it at Bundaberg Spotlight, where the staff are extremely helpful and pleasant.

 
Last time I made this skirt I did a lot of fiddling with the fitting after I had constructed the garment. This time I was more sensible, and made some adjustments before cutting out. First I started with a size 12 waist and 14 hip. I modified the back yoke by folding the pattern piece into a dart as shown. I then trimmed a little from the upper center back of this piece to horizontally straighten the centre back. I did not alter the hip curve at the sides during cutting out, but as I do not stick out at the sides as much as the pattern, I used a wider seam allowance - around 2.5cm for the first 7cm of the front hip curve seam, and 5cm for the back hip curve seam. This made the skirt flatter at the sides, but still curve out at the backside, where I need it! I also changed the construction order, sewing all the front, including the yoke, and each side of the back, excluding the pleat, then basting the side seams. I took in the side seams to fit at the waist and below the hips. Although it is not apparent in the envelope drawing, and hard to see on the line drawing, even this short version of the skirt has a slight trumpet shape. This did not work in the denim, and the stiff sticking out hem was unflattering. I took around 7cm from the lower side seams, to make the hem peg slightly, and am inclined to think I could have taken a little more off. I also could have taken a bit more off the waist, but am hoping that the fabric will soften a little with repeated wear and washing.
 
I greatly admired the topstitching on Miriam (HawkeMorningStar's version of the skirt. (see her review on pattern review). I felt that this emphasised the multiple curves of the pattern. The denim has a tan weave through it, rather than classic white, and I have used tan upholstery thread for topstitching to both match the warm colours in the rest of my capsule, and to bring out the tan background of the denim. I topstitched mainly vertical seams, as I did not wish to emphasise horizontal dimensions! The topstitching was very difficult because of the fabric and my needle. For construction, I used a size 90 "jeans" needle, and a 3mm stitch length. This was no problem. Unfortunately, the biggest twin needle I could find was a size 80, 4mm width universal.I used a 4.5mm stitch length. The needle had trouble getting through the seams, and also made the thread fray and snap, so I kept having to cut and rethread, then join the rows of topstitching by hand. However this gave me some good ideas. First, I unpicked the topstitching on the hip curves for a few cm before sewing the side seams, then hand stitched so that the topstitching matched perfectly across the seams. I also used this idea to manage the pleat. I topstitched down each side of the invisible zip and the back seam to just above the pleat, and topstitched along the pleat edge on each side until I could not avoid the under lay, then I handstitched the join, and I am very happy with the final look of the topstiching here.
 
I like this skirt, and think I will like it even more when the denim softens a little. I think it gives a lot of "smart" to my casual wardrobe.
Posted by Picasa

Wednesday, 2 July 2008

Warm Winter Red, June Capsule


composite
Originally uploaded by kbenco
I was planning to enter this composite photograph to the June Capsule, but I have just re-read the rules, and the photograph of all 5 items is to be (paraphrase) hanging or composite or whatever, and no one else seems to be wearing their garments in the composite, so I have just hung the garments up on the lattice in my usual manner! I did not want to waste this picture, "writing" with the airbrush is hard work! I must find out how to use Adobe photoshop.
I plan to post more about each individual item later. At the moment I feel as if the photographs take longer than the sewing, but I am trying not to be whingy about this, I am learning, always a good thing.