Sunday, 24 August 2008

Jalie 968 jeans for me revisited.

First I would like to thank Liana for leaving me a link in the comments to a much better sounding elastic waistband method than the Threads version I tried earlier this week. I almost made a pair of these this afternoon, I was so tempted by this link, but somehow developed some fortitude and went back to my disastrous Jalie 968 jeans.
Jeans do not suit me, and I do not like wearing them, but later this week, I am working at a charity event for 4 days, where the dress code for "officials" is a red boxy polo shirt given ordered for the event(I plan to adjust these later) and denim jeans, so I have to wear them. In previous years I have bought cheap nasty jeans from Big W, that do not fit,then thrown them away after the event, as despite Vicki and Brmm leaving me some possible sources for good jeans in Australia, my pants resistant figure remains highly difficult to put into this type of garment.

I have lightened these photographs a lot to show the wrinkles, as, although these are as well fitting as I can get them, and remarkably comfortable, there are still lots of problems. (All the nice topstitching was done with Robin's terrific jeans twinstitching needle, all the other topstitching is all my own fault)
I expect the jeans to be a bit wrinkly at the crotch, but am not at all happy with the inner leg seam. It twists to the front all along the leg, and the inner side seam ends up almost in the front of the foot.


I am not sure why this happens. I know there is plenty of room at the back of the thigh and in the calf. If I pull the back thigh fabric in, the twist improves, but then I cannot sit down in the jeans.
I have taken these jeans in a lot at the side seams. You can see that I can no longer use the front pockets as the opening is so small.
I am wondering if pants fitting is a bit like top fitting. In tops, I use a small size to fit my shoulders, then increase for my bust. I am wondering if the hip measurement I frequently read about - measure the widest part of your hips even if it is actually below your hips (eg booty or thighs) and use this to pick the pattern, is right for me. I think with my next attempt, I will use my actual hip measurement, across the bony pelvis, then enlarge for the necessary areas. Unfortunately I do need another pair of jeans by Thursday. Wish me luck!
Posted by Picasa

Friday, 22 August 2008

Jumper from Handmade magazine

At the beginning of winter, I showed my son some jumper patterns from Handmade magazine. There were articles over several years in the early 90's featuring 2 classic jumper patterns in sizes 2-5, with variations including fair isle, and intarsia picture designs. I have a " Best of Handmade" book published in 1994 which includes the "top twenty" of these designs, and there is different "Best of Handmade" book in my local library with another "top twenty" but the ones he really liked were from a series featuring characters from popular children's books. These particular patterns are from a folder full of torn out magazine pages of knitting and crocheting designs that I bought at a second hand book sale. The magazine issue is not printed on the pages I have, but I guess it is from the same era. The characters included Barbar, Spot, Misty and other Dick Braun characters, and also a Mr. Men jumper. My son fancied the Mr. Men jumper.
I finally finished the jumper this week, and gave it to him today with his other birthday presents.
 

He was quite pleased with it and put it on straight away after school.
 

Unfortunately, he felt that one photograph was sufficient.
 

He agreed to just one more, but does not really appear to be co-operating - What is it with photographs and the males in my family?
 
Posted by Picasa

Threads"Elastic as a contour waist finish"

As I described in my previous post, this is my trial of the 'No-Nonsense Flexible Waist Finishes" from Connie Long's article in the September 2008 issue of threads magazine.
I continued with method 2, after applying the lining in my prefered method, described in my previous post, as I did not understand step 1 in Ms Long's article. Step 2, which is basting, then overlocking the waist of the lining and the garment together to leave a 3/8 seam allowance was not a problem. Step 3 and 4, where the elastic is pinned then sewn to the seam allowance using zig zag was only tricky in that the amount of elastic stretch to allow is trial and error. Ms Long suggests obtaining the correct amount of ease by practicing on fabric scraps, but this seems a little impractical to me, ease over a full waistband will be different to ease in short scraps, so I chose to guess, and then to wear the garment for a day at work to see if the ease was suitable. I did find that this application required great precision of stitching. The zig zag needed to just catch the outer edge of the elastic, or the turn over became very messy.(This means that I ripped out my first attempt and did it again more carefully)
Below is the inner view of the Vogue 2925 pants showing the differing waist finishes. The view on the top is of my worn out pair, finished with a strip of woven selvage as an alternative to the petersham ribbon called for in the pattern instructions. I have not experienced any waist expansion difficulties with this pair, but as I do not tend to wear my tops tucked in for work, I probably would not notice minor expansion. The lower pair has 1 inch non roll braided elastic applied according to the method 2 instructions in the article. I have trimmed this elastic down from 1 and 1/2 inches to meet the instructions.
 
I wore the pants to work, where I bent, crouched, stretched, knelt, twisted and climbed in my normal activities (work is hard on clothes). The waistband was fairly comfortable, but not noticeably more so than the previous pair.I did not like the uncovered elastic against my skin. This method of waist finishing requires a tucked in camisole in my opinion, and it is too hot where I live to wear several layers of clothing.
I do not think this waistband finish could be worn as I have made it with a tucked in blouse. I may have too much stretch in the elastic, but to me these pants look gathered at the waist, even though there are no obvious gathers in the elastic application. To me they appear more bulky at the waist than my previous pair. My daughters told me they look like clown pants. Fortunately this is not apparent with a blouse over the top. They allowed me to leave the house wearing the pants.


The other thing I dislike about this waist finish is shown in the photo below.
 
This is not immediately apparent in the previous photographs, but the elastic does not lie flat against the body, it is turned out by the pants fabric, and I can see it when I look down. Yuck! I will be removing this elastic, and applying a woven selvage waistband finish. Next I will make another pair of these pants using method 1 "elastic as a stabilizer".
Posted by Picasa

Monday, 18 August 2008

Lining pants with an invisible zip

I am still keeping away from fitting, so have temporarily abandoned my plans to make a pair of work pants from the July BWOF, and returned to my only TNT pants pattern, Vogue 2925, from which I made 3 pairs of pants for the Timmel SWAP. I have destroyed one pair of these, and the remaining 2 are looking rather worn after 4-6 months of hard wear and wash, so I will not be looking too repetitive, despite using the same fabric!
To give myself some interest in making these, I decided to use the elastic waistband application described in the September 2008 Threads magazine. For the first pair, I thought I would try method 2, where the elastic acts as a contour waistband. Unfortunately I did not understand step 1, which first instructs you to attach the lining to the invisible zipper by placing right sides together.
I could not figure out how this would work, and the photograph did not make it any more clear, so I have already diverted from the instructions. My method for applying lining to pants which fasten with an invisible zipper has been worked out by trial and error, undoubtedly re-inventing the wheel, but for what it is worth, here it is.
First I construct the pants with the zipper, then construct the lining up to making the legs, without joining at the crotch seam. Then I put the right side of the lining against the inside of the zipper tape. To me, this is the wrong side of the pants. I then sew down the zipper tape, and turn the lining so that the wrong side of the lining is next to the wrong side of the pants. I do the same thing to the other lining leg and zipper tape.
 

Next I join the crotch seam of the lining. I sew this as close as possible to where the lining joins the zipper tape, and finish the stitching with a bar tack.
 

When the lining is turned in, this gives a neat finish to the inside of the zip, or it would do if I had pressed it before taking a photo - sorry, but I was running out of light.
 

I will post about the success or otherwise of the contour elastic waist after I wear it.
Posted by Picasa

Sunday, 17 August 2008

Jalie 2215 activewear pants

In the spirit of Barbara Eumondi of Australian Stitches fame re restoring one's mojo, this weekend, I started by giving myself only easy projects, involving no fitting. First I made some cushion covers, although I usually dislike and avoid home dec sewing, as I was pretty sure these would turn out.
Having some success here was good for my sewing motivation, so next I made 2 pairs of new dance pants for my daughters, who have grown considerably since I bought them new pants around 4 months ago. As both daughters are young adolescents blessed with slim figures inherited from their father and improved by 4-5 hours of dance classes per week, they are really easy to fit. I used the trousers from Jalie 2215. On the left is size 0, on the right size Q. I did not even need to alter the length. The fabric used is a cotton lycra knit from Fashionista Fabrics. It is described as a bottom weight knit, but is not particularly heavy. It has a 50% width way stretch, rather than the 70% called for in the pattern, but close fitting pants are a requirement for class, so this was not a problem. I did make the size Q first, thinking that if this turned out too tight for my older daughter, they could be worn by the younger, and I could make a larger pair for the next girl up, but the fit for both was very good.


This was enought success to encourage some more sewing for me - but nothing too hard. Now I do not tend to wear tight pants, or tracky daks, but although I do not look like a runner, I do run for fitness. I also do some yoga and a weights class. I decided to try these Jalie pants for these activities, as knowing full well that they look pretty bad does not remove the need for me to have something to cover myself for activewear!
 
I made several alterations. My first change was to use 2 layers of the same fabric for the pants. This makes them less revealing and more supportive, although they may be a bit too warm for running - I will have to try them to make sure. I cut a size S at the waist, U at the hips, as the pants have negative ease and the fabric is a little understretchy for the pattern, but also added 2 cm to the back center crotch seam length, and 1 cm to both the inner leg seams. I am pretty happy with the fit, but probably added too much to the leg seams. If the pants prove to shift and chafe during use, I will take them in a bit.
 
Next I can see that I need something to replace my daggy running event t shirts, or maybe I should look at the work pants and some jeans again.
Posted by Picasa

Thursday, 14 August 2008

Cable socks


The Olympics are good for knitting progress. These are socks for my daughter, but they fit me pretty well, I may make another pair. I made my sirdar sock pattern skinnier by 4 stitches, and added a simple horseshoe cable from a stitch dictionary that is now back at the library, so I can't tell you the name of it. I have used patonyle 4 ply again, this time in a more subtle self striping wool, to show off the cables. I have also increased the area of the "reinforcing" stitch over the heel turn and in the toe, and made more of the foot in rib, so I almost have this pattern where I want it.
Last night I started on my last knitting UFO, and have nearly finished the neck of my son's Mr Men jumper. I ran out of grey, although I was sure I had half a ball somewhere, so the neck is now orange, like Mr Tickle. I hope to sew up this jumper tonight. I am guessing that we have about 1 month left of cold weather, as my garden is showing signs of spring.

I am quite taken with the 2 layer knitted beanie that Marji has just posted about, and was considering attempting this, but the pattern looks like double dutch to me at the moment. I may make a cable beanie instead so that I can watch TV at the same time. Go Aussie!

All this knitting is going on because sewing is in a very bad state. My Jalie 968 jeans are a fitting disaster, despite my muslin looking OK to me. The front is really badly oversized, and I cannot change it any further because of the pockets and the zip. I am really discouraged, as this fitting disaster comes almost straight after my Betzina blouse fitting slump. I am thinking hard about making children's clothes, but I really need new pants for my paid work in addition to jeans for my charity work, so it is back to the fitting struggle if I can find some Mojo.
Posted by Picasa

Tuesday, 5 August 2008

Polar fleece mitten pattern Green Pepper F790

 
Recently I took part in patternreview's stash "contest" which I viewed as more of a sewing challenge. I have many fabric remnants, which I find very difficult to discard, in case I might find a use for them one day! Unfortunately, these are taking up valuable room in my stash, and I gave myself the personal stash busting challenge to use as many of these smaller pieces as possible. I did not get around to entering this pattern in the stash contest, but I did use it to make several sets of mittens as part of my personal challenge. I have found it an extremely useful pattern for around 10 years now. The only thing I find a bit fiddly is the teensy weensy 2.5mm seam allowance included in the pattern. I increase this to 5mm as I am not that good at cutting out stretchy fabrics with pile and fluff to that degree of accuracy.
 
The pink leopard fabric mittens are adult size large (for my 13 year old, do you think she will be tall?) and the blue are a slighty cut down child's size small. These are to fit my 3 year old nephew. These mittens take me around 20 minutes per pair to cut out and sew, so everyone at my house has lots of pairs for cold morning walks and camping.
 
I did make my son some new mittens, but he continues to prefers last years. He is a bit of a conservative. I took his modelling offer whilst it still held!
Posted by Picasa

Monday, 4 August 2008

BWOF 7-2008 #135 Burda version vs my version

 
I have finished my version of the #135 dress. At first glance it appears very similar to Burda's dress, but that was the idea.
 
I know this sounds arrogant, but the main improvement in my version of the dress is the ease of the pleating, smocking and construction, and I cannot really show you this. With the Burda version, I had to wrestle with many aspects, one of the worst was applying the bias binding to the neckline. You can see that in my version, the on grain neck, and the line of cable within the seam allowance make the application very straight forward. I lined up the edge of the bias strip with the line of cable smocking, stitched around 3mm away, and not only did my wave stitches stay an equal distance away from the neck, but all my pleats remain straight, and evenly spaced. This was not what happened in the Burda dress, despite serious sewing wrestling.
 
You can see the difference that this makes to the finished dress in this close up. Part of the better appearance of the strawberry print is the additional width of fabric in the bodice.
 
The other aspect of my version that I like is the less voluminous skirt. The Burda skirt is as wide as the baby is long. The Burda sleeves are also more voluminous.
I do think that you can make a pretty smocked dress as a smocking newbie, just using written instructions. I am pleased that Burda put one in their magazine to entice new smockers, I just wish they had made the pattern more user friendly.
Posted by Picasa

Sunday, 3 August 2008

Pleating, Blocking, Smocking altered version of BWOF 7-2008 #135

After altering the a line dress to a bishop dress as described in my post yesterday, I am now reaping the rewards of this change. First, this new version is much easier to pleat, as the neckline is on the cross grain. Instead of using the curved template that Burda instructs you to transfer to the neckline, which I can assure you is time consuming,tedious,and difficult to keep accurate, the new version can be pleated by much quicker methods. I used a pleater.
 

An alternative is to use a smocking dot transfer
 
However, if you are new to smocking, and using this as a first attempt, you do not need any fancy equipment. You can rule 6 lines horizontally, 1cm apart (note I suggest 6 lines, not 4 as Burda instructs) with the first line just above the stitching line of the neck, around 3mm. Mark each of these lines at 1cm intervals. These marks are where you stitch to gather the fabric - Burda's instructions are correct in this section.
Once you have pulled up the threads to gather your fabric, you need to block the neckline to the shape of Burda's pattern piece. Burda's instructions give a rough idea of how this is done. The template should have the top edge on the second row of gathering (this would be the first row if you use only 4 rows as per Burda) and the bottom edge on the 5th row of gathering (4th per Burda). If you lightly spray the fabric with starch, evenly spread the pleats in a fan shape. In the new version, the fan spreads out more gradually, as there is a lot more fabric. Pin the neckline to a flat surface, I use my ironing board. You can then either lightly steam the pleats, holding the iron above the fabric, or allow the starch to air dry. When the fabric is dry, you are ready to smock. However, although Burda tells you to mark the centre front of the dress, it does not tell you that your smocking design should be centred here too. After you have pleated the garment, your centre front is the valley between the 2 centre pleats. You do need to count your pleats to find out where this valley is located. If it is more than a few mm off the marked centre front of the fabric, you will need to unpick some pleats from the more numerous side in order to have the centre of your smocking design at the centre of your fabric. Start your smocking with an over cable at the 2nd line of gathering thread, work to one end, then turn and start from the middle again. This will make your design finish at the same part of the pattern at the back. I have chosen to finish at a cable, as I find this neat and visually satisfying.
 

I have used the same smocking design - the 4 step wave, as my take on the Burda intent and used in the previous version of this dress. The dress size is the same, and I have again used 3 strands of DMC thread. As there are more pleats, and the pleats are now close to each other, the effect of the same stitches is much more rich and textural. It was also far easier to stitch, and I had no difficulties in keeping the pleats in the blocked shape.
You can see that the first row of gathering has a cable stitch along the gathering thread. This is a holding row, to keep the pleats even during smocking, and in garment construction. You will not see this line in the finished garment. The gathering thread below the smocking is used to help keep the lower edge of the pleats evenly fanned out during the smocking.
I hope to construct the new version of the dress tomorrow. I have made one change to my pattern already - I think the sleeves are too long and too curved, and have trimmed them down around an inch at the deepest part of the curve, tapering to nothing at the side seam.
 
Posted by Picasa

Saturday, 2 August 2008

Reinventing the wheel - turning Burda A line dress into a bishop

I have worked out that I have a lot to say about this new smocking plan, so have decided to write about it in several stages. This is how I am redrawing the Burda WOF July 08 #135 dress into a pattern that is easy to smock. My plan is to have a dress that looks like the one I have already made, from the magazine pattern, but is easy to mark, pleat, smock and construct, and does not have the nasty neckline I showed in my previous post. It would be much easier for a novice smocker to go straight to a good pattern, such as one from Australian Smocking and Embroidery magazine, Children's Corner, Cherry Williams or even an old Vogue or Simplicity pattern, but I would like someone who just has this Burda magazine to be able to fix the problems I see with the pattern. (If you are interested in a different bishop pattern, look at pattern review, the Australian Smocking and Embroidery Magazine patterns are in the "other" pattern company, usually under "baby clothes", and the other patterns are reviewed under the pattern company names, again usually under "baby clothes" or "toddler clothes")
 
First I used the front dress piece, which is cut on the fold. I marked the widest part of the hem, the lowest part of the hem, and both the lowest and highest point of the neck. I then ruled straight lines from each of these points to make a rectangle. I used both the high and low points of the neck, as I will later ensure that the smocking includes both of these points.
 

Next I pivoted the Burda front piece so that their side seam was on my new side seam (actually on the seam allowance, but this will not make a difference, as the seam allowance is the same on both pieces). I used the height of the raglan seam and the lower curve of this seam to draw a new armhole curve. The part of the curve that will be smocked is now on the straight of grain. The depth of this armhole looks much smaller than the Burda pattern. This is O.K., the manipulation of the fabric will give plenty of room for the arm.
 

Here you can see the difference between the 2 pieces. The shaded area will be cut out. You can see that there is a lot more fabric in the bodice region.
 
I have done the same thing to the sleeve piece. The armhole curve used is the same as that I used at the front.

Because the sleeve is an angel wing shape, I have kept a curved hem here. I drew a new curve after straightening the neckline grain as shown in the first sleeve photograph. In a batiste, the sleeve would still form a wing with a straight hem, as the fabric is light, and the pleats can hold it out, but I think the quilting cotton may need a bit of extra insurance to avoid drooping. After I have constructed my version of the dress, I will consider whether the dress hem needs a curve or not. At this point, I tend to think not.

I actually took these photographs of the size 1 Burda dress, thinking I could spread these dresses amongst my nieces, but then realized that I should make another size 3 months dress to provide a more clear comparison. I repeated these steps for the size 3 month pattern. These pieces are smaller. However, after making the new pattern (The back of the new pattern is the same as the front, except for adding an extra inch for the button placket). I measured the neckline template and compared it to the new width of the pattern. It was now over 3x the width, which is more than I need for the smocking. I removed 3 inches from the width of the front and the back pattern pieces, and 1 inch from the sleeve pattern pieces. Fortuitously, this means that I now only need the length of the dress + the length of the sleeve for the size 3 month dress, as I can now fit both front and back pattern pieces on a 114cm standard width of quilting cotton.
Posted by Picasa

As I have now added this post to the tutorial link on my side bar, you may be interested to see both the dress I made using the Burda pattern and the version made using the alterations I have outlined in the tutorials

Friday, 1 August 2008

A smocking disaster waiting to happen

I love smocking, have, over the last 12 years or so smocked at least a hundred garments, but I have never had an in-person lesson. I learnt from magazines and books. I have read a lot about smocking and embroidery, have received favourable critiques of my work from Show judges, and the Smocking arts guild of America, but I make no claims to formal training. I am saying this because I am about to get on my soap box!
 
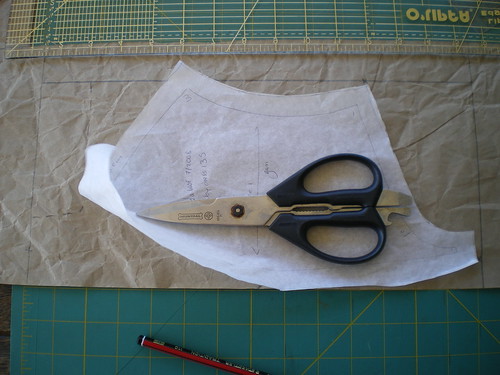
This baby dress is from Burda World of Fashion, July 2008, number 135. It is a special designer feature of the childrenswear shop Jacardi. The pattern uses English style smocking, where the fabric is gathered into regular pleats, then geometric stitches are applied to manipulate these pre formed pleats.
When I first saw this, aside from being pleased for some beginner, I had little interest in this pattern, I thought, a nice easy baby bishop for someone who wants to try smocking, lovely. I have many beautiful and complex smocking projects on my list, this is not the sort of thing I am smocking at this point. However, out of interest in my smocking hobby, and in case this dress used something new to me, I looked at the instructions and the line drawing. I was horrified.
 
In these two photographs, even I will admit that this dress looks OK. In fact, I will probably give it to my niece, but I believe that if a beginner had attempted this pattern, with the Burda instructions, they would be put off smocking for life. I have made this dress solely so that I can write a scathing review of it, and hopefully save an almost smocker from a project designed to fail.
The first thing I want to point out, is that the instructions for the smocking stitches themselves are not just scanty, but incorrect. There may be a translation issue, but a backstitch is not the same as the cable stitch used at the top and bottom of each wave. A backstitch will give you a completely unstretchable stitch, and prevent you from shaping the neck. If you use a backstitch, as Burda advises, your dress will be toast.
The instructions for what appears to be a 5 step wave pattern are the worst smocking instructions I have ever seen. I know I am spoilt with Australian Smocking and Embroidery and Sew Beautiful magazines, so I also looked at the instructions for smocking in an Australian Stitches article, a Handmade magazine project (in less space than used by Burda), a McCalls sewing book, a Vogue and a Simplicity printed pattern and a 1930's pamphlet with no diagram. These Burda instructions were still the worst by far. However, you may be able to follow most of the steps and end up with something approximating a trellis section, but Burda has completely missed the cable at the bottom of the wave before changing direction. If you get this far and follow Burda's instructions, your dress will be toast.
What I have used, is what I think Burda meant, a wave pattern, with a second wave pattern .25 cm above, along each gathering line. Looking with my magnifying glass, the dress in the magazine seems to use a 5 step wave. This was far too stretched out on the size 3 month version I have used, so I substituted a 4 step wave for a similar appearance.
This is a really simple stitch pattern, called wave, trellis, travelling zig-zag and various other names as it is so commonly used. There are good instructions for this pattern all over the internet. index to smocking stitches,4 step wave pattern are just two I found with a google search.
Unfortunately, the awful smocking stitch instructions are not the worst issue with this dress. Basically the smocking has been used solely as adornment. The gathering and elastic properties of the smocking have not been used in the design of the pattern, and in fact work against the dress design, making both the smocking and the garment construction uneccesarily difficult.
 
Here you can see some of the problems. The pleats at the sleeve seams are shapeless and bubbling. This is not the fault of the smocker, but of the pattern. The pleats in this region cannot be on grain, as the cut of the dress prevents this. You can also see the messiness of the pleats in the neckline seam. Despite careful stitching, using the pattern and construction instructions given in the magazine, this was an inevitable result. You may also be able to see that the pleats are very widely spaced at the lower line of smocking stitches. I have given the pleats plenty of slack, but this dress will tend to have a "turtle neck" and be poorly shaped on the baby unless the neck is stretched out after each wash. This is not the sort of thing for which you want to make a new mother responsible!
 
Here you can see how wide this dress is at the hem. I think this may be overpowering on a 3 month old baby. The thing that really annoys me about the width of the hem, is that although there is not enough fabric width at the neck and sleeves to give nice close pleats, the dress is an a-line, with much more fabric width at the hem than at the bodice. It looks as if the designer added the skimpiest amount of fabric to the bodice, to almost allow for the pleats, but didn't realize that this would also make the hem wider, and that the further hem width added by the a line cut could have been transferred to the bodice without making the dress this oversized.
I have several other issues with #135, for instance, the instructions for the sleeve seams confuse "neck" with "side seam", the under arm finish is messy, but these are not project destroying issues.
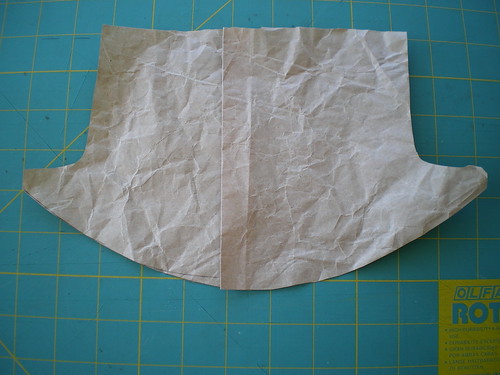
Today, I redrew this pattern to the way I think it should be. I have a lot of bishop patterns, so I really don't need to do this,as I am sure any of the patterns I own will be better than Burda's, but I will make up a dress from this redraw, and see if I know what I am talking about!
Posted by Picasa