Monday, 30 March 2009

Vogue 7903 with ruffles

I did manage a little sewing for myself over the weekend, but the photographs were a problem. Not only was my photographer busy entertaining, but the weather was most unco-operative. The weather today was terrific, except for the half hour window in which I was not at work, and could have worn the blouse outside in daylight.
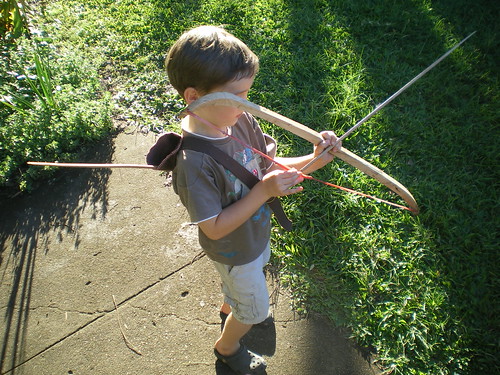
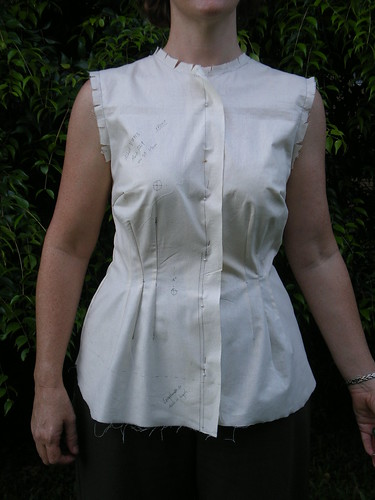
So here is yet another shot of my verandah wall, decorated with the lastest version of V7903.
 

The fabric is a shirting from Gorgeous Fabrics. Unfortunately I did not read the fabric description properly, and somehow ended up with a stretch cotton woven, something I am trying to purge from my fabric collection, due to past failures. This fabric did not convince me to restore cotton woven with lycra to my favourite list. It was hard to press, and wrinkles as soon as I look at it. It also wanted to stretch under the needle whenever I was aiming for precision, but maybe I should blame this on operator error! Despite this fabric wrestling (self inflicted), I am happy with the blouse.

Front modifications
1. I added a seperate button band, as per the instructions in David Page Coffin's Shirtmaking book.
2. I needed the button band to divide my ruffle additions. The ruffles are 3cm wide, cut on the bias, and finished with a rolled hem on the overlocker. The central ruffles are over nearly the full length of the front band, but I did not like the effect of the full length ruffle on the more lateral set. The original version of the outside ruffles gave a pouter pigeon effect, and were much improved when I shortened them to finish well above the bust line.
3. I again used a version of the action back pleat. For this blouse I added an embroidery stitch from my machine, instead of a reinforcing satin stitch, to the top of the pleat.


4. This time I made a full length sleeve, which I simply lengthened from the short sleeve, tapering slightly then pleating into a barrel cuff. I used a cuff from a RTW men's shirt as a pattern, shortened slightly, and the placket is from David Page Coffin's book. The monogram is a built in stitch on my Janome.
I did try out the long sleeve from the V7903 pattern, with some mid biceps level widening, but found it a very uncomforable shape on me in my toile.
 

5.I cut the inner collar stand, the inner button band and the inner cuffs on the bias, as I like the change of direction in the stripes. I was very tempted to use another print for these pieces, but thought the design was already a bit busy with the ruffles and my very last addition - double spaced buttons. I was inspired to use this button placement by this shirt by Karen (obviously Karen is a great name for those who sew, as when I went looking for Karen- who- made the- fabulous-stripey- Valentine- shirt on pattern review so that I could link to the picture, the member search "Karen" runs to 23 pages! I gave up and looked at my bloglines list instead)
 
Posted by Picasa

Sunday, 29 March 2009

Birthday pyjamas

My older daughter is having a sleepover 14th birthday party this weekend, so you would not think I would get any sewing done, but somehow I have done more sewing in the last 24 hours than I have for weeks.
My daughter instigated the plan. She wanted to do some fabric painting as an activity at her party. She originally thought of t shirt painting, but when we found exceptionally cheap XL men's t shirts at a discount shop, the plan changed to sleep shirt/nighties, which she thought they could all wear at the party as soon as they had finished. However, some of her friends are tall, and she thought we should make pyjama shorts to wear with the sleep shirts. Not a problem.
However, when I brought out a selection of fabrics so that the girls could choose, I struck a problem. As I should have predicted, they all wanted the same fabric, so they could match. Unfortunately, there just was not enough of the fabric they had selected - a frog print that has been in stash since DD was 4. I think she selected it!
I used the french knicker pattern 129 from BWOF 12-2008, which is really short in the legs. By laying out the pattern pieces on a single layer of fabric and using both straight and cross grain, and tiny seam allowances. I managed to squeeze in enough pairs for everyone, but thought I had better not send home extra short pants with these teenagers and risk offending their mothers.I added a bias cut pleated ruffle to the pyjama legs, with rolled hem finishes top and bottom. The ruffle fabric is a quilting cotton with a lilypad print. I think they are really cute pyjama shorts, and the girls were thrilled. It did take quite a bit longer than the quick boxers I had originally planned, but I think it was worth it.
Here they are on my daughter this morning.


All the girls are still here, but they are such great kids (and self entertaining)that I think I can spend the rest of the day sewing for myself - after I make a birthday cake. They have just eaten 5 pancakes each, so I think I am safe from food requests for a while.

Mary Pat asked about the inner closure on the baby cardigan. It is a true wrap top, and the ribbon tie on the left passes through the right side and around the back. So if I was to make a seamless body, I would need to include an eyelet for the ribbon to pass through under the right arm. I'm glad you asked or I would have forgotten this step. I will write it on my pattern.
Posted by Picasa

Saturday, 28 March 2009

Sirdar Baby Cardigan

I just made this cardigan, Design F from Sirdar's "Baby Bamboo Too", which has some really gorgeous looking designs for babies and children up to size 7.
The yarn was fabulous to knit. It is smooth, soft and perfect for a baby IMO (washable in machine, Yay!). I want to make something for myself using this delicious yarn. I used Sirdar Snuggly Baby bamboo, shade 137 lilac. It is 80% bamboo, 20% wool, 8ply (DK/light worsted, 3 Light), so made a very quick knit for this newborn size wrap top.
 

I love the idea of the design, as it will grow a little with the baby, and think this is a very sweet little cardigan, but the pattern was cumbersome IMO. The pattern has you knit each piece seperately, including a front band trim, then sew everything together. I quite like hand sewing, but not on knitting for some reason, and although the knitting was super fast, this languished in my knitting bag for 6 whole weeks before I could force myself to stitch it all together. Only the actual arrival of the baby for whom it is intended spurred me on!
If I make it again I will knit the back and fronts in one piece, and crochet on a neck trim.
Posted by Picasa

Thursday, 26 March 2009

Making, limes and a sewing report

I know that sewing a quiver is not a terribly tricky or enthralling project, but I really appreciate the kind comments on my last post, and would like to answer some questions.
My son did make the bow himself, mostly. We all like making things at our house, and the children have a workbench in my husband's shed, for their own woodworking projects. My son drew the shape of the bow, using a ruler for the straight bit and a tin can for the top and bottom curve. My husband cut it out for him, then my son sanded the bow, drilled the holes with a hand drill, and threaded through the elastic. He also sawed the notches in each "arrow" (under supervision) after clamping suitably shaped off cuts in a vise. I think this is pretty clever for a 6 year old, and am pleased to boast about it. Unfortunately, he was not at all interested in cutting out the fabric for his quiver, although he did cut his belt into pieces for me.
A few people were worried about the fate of the limes. My son is developing considerable accuracy with the bow, and there is a reasonable lime attruition rate. This is not a problem for me. We have 3 lime trees, all 10 years old, and I cannot use or give away the fruit quickly enough. (Although we are rather fond of poppy seed lime cake and lime marmalade). Fruit that we cannot use goes to the compost.
The reason for suggesting he aim exclusively at limes was to protect 1. His sisters 2. The chooks 3. Visiting wildlife and 4. Cars and backyard structures that we would prefer to remain relatively undamaged.
The original suggestion was to aim for the fruit on our Kaffir lime tree. The tree is grown mostly for its leaves, which are great in South East Asian recipes. You can also use the rind of the lime, but the fruit itself is inedible. My son felt that the rough appearance of the fruit was rather like dragon skin, hence his dragon hunting reference.
 

This became rather tame after a while, so he moved his attentions to our 2 Tahitian lime trees, for variety.
 

To get back to sewing, I have been sewing a little bit here and there. I am making my 3rd post- second- round- of- fitting vogue 7903 blouse. For this one I have used a lot of techniques from David Page Coffin's shirtmaking book, so it is taking quite a while.
 

I hope to post some finished objects later in the week.
Posted by Picasa

Saturday, 21 March 2009

The Archer - Making a quiver for a costume

I have finally made my son a quiver for his new favourite activity - shooting limes from the tree with his self constructed bow and arrows (AKA dragon hunting). He was quite specific in his request - the quiver needed to belt across the chest diagonally, and he did not want a lid or flap to cover the "arrows" despite our discussion about the need to keep the bow string dry inside the quiver in a nod to historical veracity. This is a cartoon quiver!

I took photos of the construction. The quiver was very simple to make. I used a canning jar lid as the pattern for the base, measured the seam line, and drew a rectangle with the same width as this measurement plus seam allowances for the body of the quiver.

I used a webbing belt with D ring fastener that came with a pair of shorts as the strap. I sewed the bottom part of the belt (ring free end) to the base of the rectangle before sewing up the back seam.

The fabric for the outside is left over faux suede from upholstering dining chair seats. It does not ease at all well, but surprizingly sewed very easily into the cylinder I had made from the rectangle piece described earlier. I clipped the body of the quiver very slightly each 2cm around before stitching.

I lined the quiver with a woven plaid cotton. I left the lining open in the middle of the back body seam before stitching the lining and outside together at the top opening. This is where the bottom strap came in handy, it was very easy to pull the cylinders out to the right side by tugging on the strap.

Finally I stitched in the ditch at the top of the quiver, then sewed on the other half of the belt. The top section of the belt is offset from the bottom to encourage the quiver to stay put in a diagonal direction when worn across the back.


I tried to get a good shot of the quiver, but it was too busy working to stay in one spot for long.

Tuesday, 17 March 2009

V7903 olive stripe version

Olive stripe is how Michael's Fabrics described this fabulous shirting cotton, but it looks much more pale than olive to me - white and beige with a tiny deep burgundy stripe. I loved sewing this fabric. I made V7903 again, but decided to try a 7/8 to 3/4 very simple sleeve rather than a proper sleeve with a buttoning cuff.This particular sleeve design was due to my inherent laziness. I did not want to fit the long sleeve from the Sandra Betzina pattern at the particular moment I happened to be cutting out, so I winged it by eyeballing the short sleeve I had already adjusted. It seems to work.
I am particularly happy with the collar. The contrast inner collar stand is a quilting fabric scrap left over from a shirt I made for my son. He thinks this is rather cool on my shirt, as he selected the fabric, both for the original purpose, and to put on my shirt whilst I was pouring over the scrap bag for a suitable print. It is lovely to have a 6 year old who is excited about making things. The only problem is, he was visiting me at the sewing machine in order to request a quiver for his arrows, and a scabbard for his sword. This has something to do with Robin Hood, or possibly dragon hunting, and may be leading to a new cloak request. My SWAP is retreating into the distance.


For this shirt, I added a yoke to the back, and an inverted pleat to the centre back. I lay the two piece back pattern on the fold of fabric, with the very large adjustment for "sway back" giving a generous amount of pleat at the yoke level. I closed the pleat again for a short distance at waist level, making an "action back", as described with lovely internal construction photographs in a nursing corporate clothing catalogue I saw up at the hospital last week. I had not considered looking at corporate clothing catalogues for sewing tips before, but there is useful information in all sorts of peculiar places! I left in the two back darts, as I do not want a ballooning shirt back whilst wearing this with my wide legged Marlene pants.


Although I was feeling lazy about the sleeves, I did use the cross grain for the under cuff. I interfaced with silk organza, which felt rather luxurious. I hand sewed the inner cuff to the sleeve using running stitch in the pale beige (3 strands of DMC stranded cotton) then alternated stitches with the burgundy. I quite like this effect when I wear the sleeve rolled down, and have the horizontal stripe on view with the sleeve rolled up to 3/4 length.
 

This is possibly top number 3 in my SWAP. I am not sure if this will look good with my possible jacket options - I will worry about this if I get up to the jacket.
Posted by Picasa

V7903 cream cotton eyelet

I have really run out of time for my SWAP challenge at Stitchers Guild but am continuing anyway. Here is completed top #2, V7903, which is actually on my storyboard (I amaze myself - that makes 3 things from my storyboard). I have been working on the fitting for a little while but cannot show you how well it fits as my oportunity for photography whilst clean and wearing makeup has been rather limited lately. There has been a lot of painting and gardening going on.
 

My design changes to the pattern were fairly minor. I made a shorter sleeve with a curved hem.
 

I rounded the collar, and used a lot more buttons than called for in the pattern. The blouse fits closely, and I do not want any gaps.
 

Next up is the same pattern, with more modifications. After all the fitting mess about I want to really use this pattern.
Posted by Picasa

Sunday, 8 March 2009

More Vogue 7903

Anne of Le Manine de'oro was kind enough to comment on my blog that I must like this blouse to work so hard at it. I am not sure that I do like this blouse at all this evening! It is rather frustrating. I worked on it for about a month back in June last year,and it has taken me a long time to get back to it, but I want some reward for all my fitting work. It has just got my goat. I think the Kwik Sew pattern I have used for the past 6years or so is finally too old fashioned for my conservative work wardrobe, but this reminds me why I have been using it for so long :). I am also reminded of why I sew for myself every time I try to buy a plain blouse for work. They do not exist in my shape.
I took Belinda's advice (thanks Belinda, and let the waist out a little, by sewing just inside all the dart lines at the waist front. I had overfitted a bit.

My next issue with the blouse was the sleeve. In the earlier two versions with sleeves, I had plenty of room to move. However, the more fitted bodice showed up a major sleeve problem. I could not move my arm very well.
 

Kathryn (fxdoc at stitchers guild) pointed out that the armscye seemed a bit low. I raised the armscye to one inch below my arm, which my McCall's dress making book states is the correct depth, and things did improve consierably.
 

However, my job requires a lot of vigorous and free arm movement, so I had to keep working at the sleeve. I went back to my McCall's book, and thought I would try this adjustment for binding sleeves at the upper seam, having already added rather a lot to the original sleeve for "large upper arms". The dress making book does not give any suggested measurements, just a sketch, so I guessed. There was no ease at all in the sleeve last time I put it in, so I did not alter the armscye at all, just the sleeve. It worked quite well, but there are no photos yet, as my photographer has gone to bed.
 

I did not sew all day, so my progress with the blouse was a bit limited. I spent a considerable portion of the day being a good wife. I went to the tip and the Sunday markets at the instigation of my husband. I do not share his fascination with garage sales, op shops, junk shops and tip shops, but I can still take advantage of this hobby. He found a gas regulator which he wants to pull apart for some wonderful woodworking/metalworking project ($2) and I found these patterns (60c the 3), I am particularly thrilled with the baby pattern. It is in "factory folds" and I do not have one in this style, or anything similar. I don't have a 6 month old baby either, but that is beside the point. :). My youngest niece is nearly 6 months old, and I am sure she needs a present. The dress patterns are not my size, but I think they are interesting for the different dart treatments. I left them on the back verandah in the sun to air a bit. It was a very dirty tip shop. I have heard there are clean and interesting recycling centres at city tips, but out here we have the old style dusty sort. Maybe I should vaccuum them????
 
Posted by Picasa

Saturday, 7 March 2009

More V7903 fitting

Fitting is very dull, but I feel I am progressing. I have written out my next steps on the flat photograph. I will make up a blouse using this pattern shell, after I have lowered the side darts a tiny bit more. I have curved the side darts for a softer look, the side darts are pretty big!


Posted by Picasa

Friday, 6 March 2009

V7903 fitting

I had a series of attempts at the blouse Vogue 7903 back in about June 2008, and was rather exasperated at the fitting. I then made a sleeveless version in November 2008, and thought I had almost nailed the front and back pieces, other than needing a FBA.
I was wrong. I should have made a toile about 4 attempts ago. This is still horrible, and although there is now sufficient room in the front, I seem to have developed a below the bust growth.


My next step will be to take out a horizontal tuck at mid front. I know I will have to change the position of the side dart, but otherwise I think this fits better pinned out like this. What do you think?

Sunday, 1 March 2009

Marlene pants Mark #2

I finished the Marlene pants, BWOF 9-2008-105 today. These are my second attempt, this time in basketweave linen from Gorgeous Fabrics. I had much more trouble with this pair than my first pair. I had imagined that the successful toile, and previous pair in cotton twill (gabardine) would have eliminated fitting issues, but this was not the case. Althought the linen was a similar weight to the gabardine, it was much more drapey, and I found that the second pair needed a lot of tweaking. I took around 2cm from the centre back of the yoke, and also 1cm from both the front and back inner thigh, after taking out 2.5cm of front thigh addition. Theoretically , this should make the pants much more close fitting than the previous pair, but this does not seem to be the case.


The fun thing about these pants was the use of a fat quarter for the zip guard and binging the yoke facing. A non sewing friend bought me a bunch of fat quarters for my last birthday, and I have been looking for a use for them, as I am not a quilter.
 

I think these pants are not too bad with the cream silk blouse, my SWAP progresses!
Posted by Picasa