Thursday, 27 March 2008

Trial Blouse McCalls 8584


I made the trial blouse last night, and put on buttons this morning. I am wearing it to work today to see how it acts in real life. Looking at the photo, I think it is a bit short to wear with pants, and will be better with a skirt. The length is due to my fabric limitations. I have used pleats below the raised waist in the front and back, and I like this effect. I have not put a button at the top, as it looks better under the jacket without the interruption to the neckline. The twisted braid at the waist is to distract attention from my inexact stripe matching. This is partly due to fabric limitations, and partly to the darts and pleats interrupting the stripes. I bound the neck and hem with self bias binding, and have added an underplacket to the centre front. I think this is a good base for a work blouse.
 

I have added a centre back inverted pleat as an "action back" to allow free arm movement. I am pleased with how this looks.

I looked at Eva's blog this morning, and she has made a great blouse with a flat sitting collar, no stand, that looks terrific with the jacket. This tempts me to try a collar on this blouse. I cannot decide whether to work on this tonight, or start on my daughter's jeans.
Posted by Picasa

Wednesday, 26 March 2008

Quest for the collarless blouse

I am having trouble with the blouse requirement for the Timmel SWAP constest. Two of the 6 tops need to be more of a blouse than a t shirt, which I suppose means that all the knit tops I have made to replace my collared blouses that clash with my jacket are t shirts, not blouses.
This week I made a collarless bias cut linen top. I quite like it, but it looks like a t shirt,even though it is made from woven fabric so I don't feel that I have met the criteria. I have been looking for patterns, but am running out of time.
 

I have been thinking about this top. This is one of my favourite tops, that I wear for work and unlike most of my work clothes, also casually. I bought it from Colorado in Brisbane. It is about 5 years old, in common with most of my clothes before this sewing for myself phase, and became totally worn out a few weeks ago when my painty son gave me a hug, transferring irremovable red paint to the front. The v neck does not look good with the jacket, but I thought the other aspects of the blouse might work.
 

This is the pattern I found in my out of date ebay box. It has the raised waist and back darts of my blouse, so I thought I could morph it.
 

I have cut out the top bodice,and sleeves accoriding to the pattern. I will use 3 raised waist darts at the bust like my Colorado blouse instead of the gathers, and have clasps or buttons down the front. I have used the jumpsuit lower bodice with a straight centre as shown above. I will make the top without a collar, but with a jewel neck.
 

I am very short of suitable fabric. Here is a 5 year old pair of drawstring pants that I bought in a fit of postnatal madness and wore about 3 times. The fabric is a striped cotton linen blend, and if it works, the brown and cream stripes are exactly the colour of my jacket and one of the pairs of pants from the SWAP. How fortuitous! I leave this blog in order to unpick.
Posted by Picasa

Tuesday, 25 March 2008

McCall's 8745 Pattern Morphing


A little while ago I wrote about Johanna Lu's review of a bias cut, dartless shirt, that I greatly admired. Ideas inspired by this shirt have been perculating in my head, as I want to make more blouse type tops to wear to work, but they need to avoid collar clash with the V2925 jacket, yet allow sufficient movement for my active work.
Not too long ago, I bought a bulk lot of patterns on ebay. They were very inexpensive, which was just as well, as they are mostly about 10 years old, to old to be current, but too young to be vintage. One of the patterns was this dartless, but not too boxy looking McCalls 8745, copyright 1997. I thought this might work as a bias cut top. When I opened it, I was suprized to see that although the envelope says 8,10, there is only one size on the pattern tissue - I suppose this is why the envelope also says "Small". This concerned me slightly, as size 8 would usually be too small for me. The ease however, seemed to be considerable at 37 and 1/2 inches for a bust measurement of 32 and 1/2 inches for size "small' so I thought I might get away with it.
I usually trace my patterns, but this bulk lot has very little value to me, so I gaily chopped and changed the tissue, quite a liberating experience! I widened the shoulders and the neck by 1cm, and lowered the neck by 1/2cm front and back. I redrew the front facing to a modified T shape, and drew a back facing as the pattern does not include this. I then cut out the pattern pieces on the bias, in a quite nice mid weight linen that has been sitting in my stash for over 5 years, so I have forgotten the provenance. I am calling the colour "caramelized apricot" to fit my SWAP theme of Winter Indulgence. I cut out the facings on the straight grain, and applied pro weft textured fusible interfacing to the facing pieces.
When I machine basted the shoulder and side seams together, there were severe diagonal wrinkles at the front, so I took the side seams out and added side bust darts, I also shaped the waist a little. I then stabilized the shoulder seams with selvage. The pattern called for a roleau loop at the neck. I made a 3 loop piece, and basted it to the front opening, then sewed the neck facing seam in a tadpole shape, cutting down the tail of the tadpole after stitching. The sleeves were eased in, very simple when they are cut on the bias, and I left side openings at the base of the side seams.
I was quite happy with the shape and fit of the top at this point, but it looked very plain. I machine embroidered 3 rows of alternating fern - like leaves around the neck, starting at the base of the t each time, so that they all faced in the same vertical direction. I was pleased with this effect, and did not want to interrupt it with buttons, so have fastened the neck on the inside. I also embroidered 2 of the same motif above the side slits at the side seams.
I have not hemmed this top yet, I want it to hang for a few days as it is cut on the bias.

I am experimenting with places to display my SWAP as a whole, so have taken a photograph of the top pretending to be a hanging basket from my verandah. I don't think this will work for the wardrobe shot, the photo is blurry because the wind kept blowing the top about.
Posted by Picasa

Monday, 24 March 2008

ultra denim cardigan jacket

 
I finished this cardigan last week. It is a bulky cotton/wool yarn, sirdar ultra denim, and was very quick to knit. I plan to wash it and block it, but it is too wet today. I am wearing it over the v8305 ultra stretchy pants - this is the only way I will ever wear these pants - covered up. I am also wearing a singlet top made from the left over wool jersey. I used a burda pattern from 6/98. I bought this magazine yesterday from a second hand stall for 20cents - thinking I would like to try the fit of some burda before I receive my subscription, and envisioning the singlet as a winter underlayer. I got a real bargain. There are lots of basic patterns - t shirts, swimsuits, ling erie, skirts in the magazine. I can see myself using this a lot. The singlet fit well straight from the pattern, so I also made a t shirt.
Posted by Picasa

Saturday, 22 March 2008

v8305 dress

 The dress from V8305 is a longer version of the top. This time around, I used woven selvage in the neck and shoulder seams instead of interfacing, as this fabric is less drapey than the rayon jersey. I used a wool jersey that I bought on ebay from fashionwarehousesydney. It is a very different fabric from the wool jersey I used for the jalie top, being lightweight and a fine weave. I was very pleased with the dress. I did lower the neck by about 1.5m, and shortened the sleeves to bracelet length, and the skirt to just on the knee (5 inches off). I also used my blind hem foot with the knit stitch for the first time. It does a great job, and I am sorry that I did not use it for the other knit garments I made today. My next plan is to make either a full length or a half slip to wear under this dress. I have some china silk left, but not a huge amount, so it will depend on how much fabric I need. The knit is very comfortable, but it is a bit clingy.
Posted by Picasa

SWAP knit tops

I made two tops for the SWAP after finishing the jacket. It was a great relief to have 2 instant gratification projects to work on.
 
This top is from V8305. It is made from a thin drapey rayon knit from Gorgeous Fabrics. It is much more stretchy than the 25% called for in the pattern, so I used pro tricot fusible knit interfacing from Sew Exciting Sewing supplies for the neck facing and sleeve hems with good results. I also topstitched the neck, but found this required great care, due to the fabric pulling, so will probably not do this again. I did not use a zipper at the back, and it is a bit tricky to put on. I am planning to made a dress from this pattern next, and am in two minds about the zipper.
 
This is another Jalie sweetheart top. It is made from a wool jersey from Gorgeous Fabrics, this has a slubby side, almost like terry towelling, which I had not expected, despite the description (note to self, read fabric descriptions very carefully before internet shopping). It is a beautiful fabric I have renamed the colour "raspberries with brown sugar" as it is not at all orange like "paprika", and I love it, but I do not think it is suitable for the V8305 dress, which was my original intention for the fabric. I have used it for this top, and embroidered more squiggles on my skirt in DMC shade 221 so that the top now matches this skirt and I can use it in the SWAP. Both of these tops look great under the V2925 jacket, so I am pleased with how my new revised SWAP is progressing. I may make a cardigan jacket from this fabric as a SWAP extra.
Posted by Picasa

Wednesday, 19 March 2008

#2 v2925 jacket completed


I have just finished the wool flannel version of v2925 jacket. I have turned it inside out to show the facing seam piping, and you can see it hanging next to version 1. I like version 2 much better, and despite all the tailoring work I have put into it, it was much quicker to make than version 1, mainly because I was pleased with the results I was getting with version 2, so kept working at it, whilst with version 1, I kept feeling unhappy with it, and going away to read about jacket construction far too often. I am even more convinced that Vogue is mistaken about the easy rating on this jacket. I think the instruction sheet should refer to a good tailoring text rather than giving the novice jacket maker (me) a false impression that the jacket can be made by following the pattern sheet alone.
Unfortunately, I have lost one clasp piece. I plan to steal one from version 1, but it is still warm here, and although we will go to an early service, there is no way I could wear jacket 2 to church on Easter Sunday. I may be able to wear jacket 1, and I think I like it enough, so it can keep the clasp half until then!
Posted by Picasa

Monday, 17 March 2008

#2 v2925 jacket, sleeve header, shoulder pads


Today I attached wool wadding sleeve headers to the eased and attached sleeves, according to the instructions in the book "Sewing Jackets the easy way". Whilst taking a break from working on the jacket, I read a patten review by Annette1 on pattern review, where she describes a one step process for easing the sleeve and applying the sleeve header. I may try this next time, as it looks easier than the two step process I used. The sleeve does sit better with the header, but there was a definite ridge line at the edge of the header, so I pinked the wadding at this edge.

The next step was the shoulder pads. I did consider making a shoulder pad to cover the whole shoulder, and cut out some wadding for this as shown in the photograph, but I looked a bit like an 80's leftover when trying out this extra wadding, so reverted to my commercial 13mm shoulder pad. I did attach a layer of silk organza to the upper front bodice, between the garment and the shoulder pad, in the same placement as the hair canvas described in the Armani Threads article, as when I tried this, the front of the jacket sat better. All of this area was hand sewn, and a slow process.

I then sewed the outside seams of the jacket and lining per the pattern instructions. In the photograph, only this outer seam and the collar have been pressed. When I lightened the photograph, it looks puckered at the front sleeve, but this is not very noticable in real light, and I am not worried about it, as I have not yet steamed the shoulder seams. I will steam the collar over a rolled tea towel to improve the shape, and still need to hand sew the neck seams of the lining and garment together. I plan to also sew the waist seam in this manner, and need to hand sew the remaining hem. I hope to finish the jacket by tomorrow evening, as I am now behind schedule in both SWAPs.
Posted by Picasa

Sunday, 16 March 2008

smocked angel wing bishop


I did not sew today, as we attended our niece's christening. I was pleased and flattered that my sister in law had dressed her baby in one of the outfits I made as her Christmas present. My sister in law selected this style of dress from Australian Smocking and Embroidery, after I had told her of my plans for the present. She asked that I make her a short pink dress. I made the dress and bloomers from pale pink imperial batiste. The smocking is my own design, in DMC stranded cotton. I used 2 shades of green for the smocking, 2 threads, and 3 shades of pink for the bullion roses, 2 strands. I had not made an angel wing sleeve bishop previously, as this is not a style that particularly appeals to me, but despite this I was very pleased with the outfit, and it is very suitable for our hot weather. The photographs are taken after my niece has been wearing the outfit for half a day, so I think it holds up pretty well to the active life of a 6 month old baby.
Posted by Picasa

Saturday, 15 March 2008

#2 v2925 jacket, collar and sleeves


Today I worked on the construction of the jacket and lining body, peplum, sleeves and collar. I used several sources for my methods of construction. My reference for turn of cloth adjustments to the lining and collar was an article by Judy Barlup in Threads July 2007, number 131. I also used information from Martyn Smith's lining article in the current Stitches magazine.
I used a book I borrowed from my local library,Easy Guide to Sewing Jackets, by Cecelia Podolak as a reference for construction order, but particulary the method of easing the sleeves shown above. The method involves sewing a 1 and 1/2 bias strip to the sleeve cap, "from notch to notch", stretching the strip as you sew, except for a 2" section at the top, so that when you stop sewing, the bias strip relaxes, and the sleeve has been eased. I very much like this idea, but I was not sure if "notch to notch" meant the easing area marked on the pattern, or the pattern matching notches. The photographs in the book do not make this clear, but the bias strip appears to be applied over a large section of the sleeve. I have eased over the greater area, as when I previously made this jacket, there seemed to be a lot of fabric to ease into the armhole, and the ease provided by this method is very gentle. I steam pressed the seam allowance to flatten the fabric in the seam allowance area, but have not yet attempted to sew the sleeves in. I may not be so impressed with this technique tomorrow!
I used two references, again from my library, for work on the collar, as Cecelia Podolak's book only deals with collarless jackets. These books are "Fashion Making" by Gloria Mortimer-Dunn, and a 2006 Dorling Kindersely book "The Complete Book of Sewing" which has a skimpy tailoring section at the very back of the book. The instructions were better in "Fashion Making", but the photograhs in the DK book were much better than the drawings in "Fashion Making". My collar construction beyond the pattern instructions involved, first trimming the under collar and lapel, machine pad stitching the undercollar, then pinning it to the padded ironing board over a rolled towel and steaming into shape. After I had done this, the undercollar was amazingly easy to fit to the neckline, far easier than I remember from the previous jacket. Unfortunately I did a beautiful job of sewing it to the lining instead of the outside, and did not realize until I had trimmed the seam very close and clipped it! I have unpicked it and attached it to the outside jacket, but not quite as nicely.
Posted by Picasa

Friday, 14 March 2008

v2925#2 interfacing, underlining


I am a novice at jackets, and did not realize that I was venturing into tailoring by trying to improve my techniques and outcome at this item for my SWAP. It is a very steep learning curve, and I am definitely at the bottom of it. This post is very dull, as I am cataloguing my decisions and the reasons behind them for my own benefit.
I am working on the second version of the jacket from v2925. Yesterday I chose the interfacing after testing samples, and a lot of help from several people at Stitcher's Guild. Thank you Liana, who wrote about interfacing at her blog sewintriguing, after which I ordered interfacings from Sew Exciting Sewing Supplies, and to Kathryn (fxdoc), Terri, and Marji at fiberartsafloat,for all your assistance. I was relieved to learn that these choices are made on a case by case basis, as I was really confused about what to use. I am not completely confident, but as this jacket is another trial run, I am happy to experiment.
I think the fabric is a wool flannel after Kathryn explained how thick wool melton usually is. I have underlined the backs with silk organza. I pinned this closely before machine basting inside the seamlines, as I saw this method on Saashka's blog studio Alexandra(all erroneous variations on her successful technique are entirely my fault). I then basted in the dart areas, sewed the darts and went to press. One side looked fine, but the other was bubbly. I unpicked the basting seams, and tacked all of this side before sewing the back seam, it is a bit better, but not 100%.
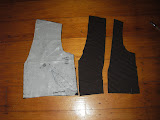
I decided not to fully line the fronts with self fabric after Kathryn's comments about bulk and my previous problems with the dart. Instead I cut a facing, then a front lining piece from the lovely silk I bought from Gorgeous Fabrics. I cut out the lining according to Martyn Smith's article in Australian Stitches vol 15 no 2 (current issue, which adds turn of cloth, rather than cutting out exactly to the pattern piece as instructed in the pattern. Vicki suggested in a stitcher's guild critique post that the collar might not have enough turn of cloth, so, thinking of this whilst cutting out lining, I measured the undercollar piece and was very surprised to see that there was NO turn of cloth allowed for at all on the pattern, so I trimmed the undercollar, and lapel facing. Thank you Vicki.
I have used pro - weft on the fronts, and pro - woven fusible on the facings. I have also used the pro-weft on the sleeve hem area, and the entire peplum facing, which I have cut out in self fabric per the pattern. After reading Marji's tweed jacket review, I sewed cotton selvage to the front neck and front seam, clipping at the curve. I think this is similar to the cotton tape used in the Armani Threads article she references. I also plan to make a shoulder pad after reading this article and Robin's blog about her jacket. Another plan is to make a front shield - the Armani article mentions flexible hair canvas, but the small piece of hair canvas I have purchased seems too stiff. I am considering a piece of organza for a minimal take on this idea.
Posted by Picasa

Wednesday, 12 March 2008

Free patterns

I was reading Johanna Lu's review at patternreview today, and she not only details the clever bias version of a blouse she has made for her SWAP, but describes the source of her pattern as a free download. I immediately went looking for the site "printsew.com" and found downloadable patterns, for $, and 3 free ones, unfortunately not Johanna's blouse source (still available for $)- but, a pattern I have been looking at in Stitches magazine was there for free! McCalls 5466


I was very pleased to find this, and tried downloading it, which involved switching to internet explorer. I thought I was pretty clever to work this out, but when the pattern printed (60 pages)it looked a bit funny.
I discussed this with my husband over lunch, and worked out the page size was incompatible with the printing. I went back to download it again, lo and behold when I logged in another pattern had appeared, Simplicity 4116. I thought this would look good on my daughters, so I switched the download to A4 and it looks as if it has worked.

Later, when I have finished the SWAPs I would like to make the McCall's for me as a winter dress, and I am thinking of a trans-seasonal version in some peach plaid linen. The simplicity pattern would look fresh as a little white dress for my almost teenager, and it comes in size 4 already.
SWAP wise I am working on a chocolate brown wool melton version of the V2925 jacket. Today I cut out fabric, underlining and lining, and will embark on interfacing tonight. I sewed a few seams to feel as if were getting somewhere - 2 part sleeve lining with french seams are now done.

Monday, 10 March 2008

v2925 skirt part 3

The wonderful skirt from V2925 uses a lot of fabric.There is very little instant gratification involved in my acquisition of fabric. I order most of my fabric on-line, and then I have to wait for it to arrive. Most purchases are posted very quickly, but we are relying on rural postage here. When I have an urge to make a skirt on a Saturday afternoon, I need to visit my stash. This piece, an Indonesian cotton batik from Ewan Gardam fabrics (a visit to Brisbane = fabric shopping ), is around 2.3 m long, and not quite 112cm wide, but I squeezed a long version of the V2925 skirt (my third)from it. First I trimmed the side seam flare as suggested by Morzel in her review of the V2925 skirt. I took this to extremes, and removed nearly the entire flare at both the side seam and the front and back side seam of the side piece in order to fit the skirt on to the fabric. Naturally, this removed a lot of the fullness, so I added a godet (see above) to the side seams to replace some fullness. I needed to use the cross grain for this, but the print is small, and quite busy, so I do not feel that this detracts from the skirt, or is noticeable to anyone except seamstresses.
I wore this skirt with a top from V2925 to the farmer's markets on Sunday morning and found it very comfortable and light to wear. It was rather windy, so I have shown a photograph of the skirt on the hanger as well so that the shape and fullness is easier to see.
Posted by Picasa

v2925 skirt part 2


After making a knee length version of the skirt, I was ready to try one in wool.
Where I live, the climate is subtropical, and hot for most of the year, but as we live inland, we do have winter. This lasts about 6 weeks, and involves chilly evenings, nights and mornings. At this time of year, my husband is heavily involved in putting on a music festival, and all the events associated with this seem to be held outdoors, many at night. This is my excuse for making a woollen skirt suit. I think I will wear it, and will definitely enjoy making it. I bought 8m of chocolate wool melton from fabricwarehousesydney.com. When I bought the fabric I read "thin woollen fabric suitable for suits, skirts pants, jackets" on the description. I was a bit worried when I borrowed Sandra Betzina's book "Fabric Frenzy" from the library and read that wool melton is very heavy stiff fabric and can only be used in simple jacket and coat styles, but this is not the case for this particular melton. The fabric is fine in texture, and quite thin. The surface appears a little felted, but it has a very soft drape. I hand washed the wool with pure soap and a drop or two of eucalptyus oil, and lay it out to dry on blankets in the back yard, much to the amusement of my neighbour, who wants to know if I am sewing a tent. I like the hand of the fabric, and found it lovely to sew.
I cut out the skirt with the full side flares, and longer than the pattern, as I have plenty of fabric. What I had forgotten about was lining fabric. I do have some on order from Gorgeous Fabrics, but could not wait to sew the skirt ( sewing urgency is a bit of a problem for me), so used a remnant of lavender satin backed crepe/crepe backed satin? that was bought to make mermaid costumes for my daughters. It is a heavy fabric with a lovely texture, but not nearly long enough! (see picture left). As I had already fitted the pattern with my trial version there was very little adjusting to do. The side seams were a little pouchy over the hips, so I took them in a bit (see above). The waist was a little loose. I did nothing about this, as it still sits well at the hips, and I will probably wear tops over the waist. (see below).
I am very pleased with this pattern. I feel tall and elegant (it is all relative) wearing this skirt, and want to wear it now! It is too hot to wear at the moment, so I am making another one.. watch this blog.
( I also need to buy some brown winter shoes, if only I hadn't spent all my (self imposed) allowance on fabric.......)

Posted by Picasa

V2925 skirt part one


When Evaposted about her V2925 skirt made in wool crepe at target="_blank">Stitcher's Guild, I instantly wanted to make one, as hers looks fabulous. I have learned my lesson, however, and knew that I should first fit, and second make a trial version before cutting into any fabric that I would be sad about if I ruined.
I decided to use my second piece of stretch woven cotton lycra for the trial version. This was not cheap fabric, but I had a dismal failure making V8305 pants from a caramel coloured piece of fabric that I bought at the same time, from the same shop, and had just over 2 m of chocolate brown looking at me every time I rifle through my stash, reminding me of my horrible sewing experience, not a feeling I like!
I bought this for pants, so there was not nearly enough fabric for this skirt. First I trimmed around 15cm from the side piece flare, as suggested by Eva in herreview of this pattern (it is very nice of Eva to think all this through and post about it so that I don't have to come up with ideas myself). There was still not nearly enough fabric, so I took yet another tip from Eva, and looking at the picture she put up of V8461, saw that this envelope shows a knee length version of a very similar skirt. I do not usually wear this length skirt, as I truly love long and disguising skirts, but decided that I had nothing to lose (well, maybe a few kilos), and went ahead with a shorter version.
I started by tracing out a pattern with size 12 waist and size 16 hips, which is where I started with the pants. I found when tissue fitting, that this was too big at the waist and the hips, and scaled down to 10 and 14. When I constructed the skirt, I found that it was pouchy at the hips, so I took in the side front seam, and trimmed the pattern for next time (see photo above). I put in a single dart at both centre back pieces, then trimmed the tissue at the back side seams to match this for next time. My other changes were very minor. I put the centre back seam just inside the selvage, which I did not trim, for added stability. I interfaced the zipper area, again for stability (all fabrics and interfacing are pre washed, so I do not expect shrinkage), and I used an invisible zip. I did not line this skirt, as I want to wear it soon, in warm weather, and the fabric is thick.
Below is a photo of the skirt worn with the V2925 jacket, that I am still hoping to replace, and one of the V2925 tops. I love the skirt pattern. I am making more versions - see the next post.

Posted by Picasa